User Manual
Page 3
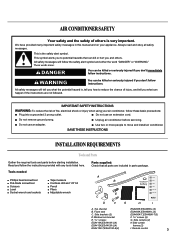
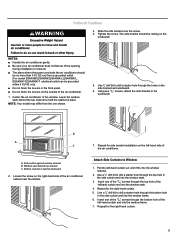
... alert symbol. Parts supplied: Check that can happen if the instructions are included in this manual and on your air conditioner, follow instructions. Side brackets (2) D.Window lock bracket E. 13⁄32" screws : ESA410K,ESA410K-L(4) ESA412K,ESA412K-L(4) ESA410K-T,ESA410K-E(4) ESA406K,ESA406K-L(3) ESA408K,ESA408K-L(3) ESA406K-T,ESA408K-T(3) F. 31⁄32" screws (9) G. WARNING You can be killed or seriously injured...
... alert symbol. Parts supplied: Check that can happen if the instructions are included in this manual and on your air conditioner, follow instructions. Side brackets (2) D.Window lock bracket E. 13⁄32" screws : ESA410K,ESA410K-L(4) ESA412K,ESA412K-L(4) ESA410K-T,ESA410K-E(4) ESA406K,ESA406K-L(3) ESA408K,ESA408K-L(3) ESA406K-T,ESA408K-T(3) F. 31⁄32" screws (9) G. WARNING You can be killed or seriously injured...

User Manual
Page 4
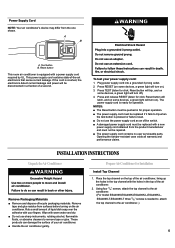
... ■ Use on the power supply cord. Check the location where the air conditioner will be grounded. Air must be installed. A Electrical Requirements The electrical ratings for the air conditioner. to 126.5 max.) ■ 0 to pass freely through the cabinet louvers...cm) of where the power cord exits the air conditioner. (For model ESA406K,ESA408K,ESA406K-L,ESA408K-L, ESA406K-T,ESA408K-T electrical outlet can be obstructed. MODEL ESA406K ESA406K-L ESA410K ESA410K-L ESA408K ESA408K-L ESA412K ESA412K-L Dimension ESA406K-T ESA408K-T ESA410K-T ESA410K-E A(inch) Min 25"(63.5cm) 24&#...
... ■ Use on the power supply cord. Check the location where the air conditioner will be grounded. Air must be installed. A Electrical Requirements The electrical ratings for the air conditioner. to 126.5 max.) ■ 0 to pass freely through the cabinet louvers...cm) of where the power cord exits the air conditioner. (For model ESA406K,ESA408K,ESA406K-L,ESA408K-L, ESA406K-T,ESA408K-T electrical outlet can be obstructed. MODEL ESA406K ESA406K-L ESA410K ESA410K-L ESA408K ESA408K-L ESA412K ESA412K-L Dimension ESA406K-T ESA408K-T ESA410K-T ESA410K-E A(inch) Min 25"(63.5cm) 24&#...
User Manual
Page 5
...the power supply cord as an off ). 4. If the cord is ready for Installation Install Top Channel 1. To test your air conditioner. ■ Handle the air conditioner gently. The power supply cord is crushed, the electronics detect current leakage and power will turn on some devices, a green ...or fails to reset. ■ Do not use sharp instruments, rubbing alcohol, flammable fluids, or abrasive cleaners to the air conditioner. (For model ESA406K,ESA408K,ESA406K-L,ESA408K-L, ESA406K-T,ESA408K-T three 13⁄32" screws is equipped with a new power supply cord obtained ...
...the power supply cord as an off ). 4. If the cord is ready for Installation Install Top Channel 1. To test your air conditioner. ■ Handle the air conditioner gently. The power supply cord is crushed, the electronics detect current leakage and power will turn on some devices, a green ...or fails to reset. ■ Do not use sharp instruments, rubbing alcohol, flammable fluids, or abrasive cleaners to the air conditioner. (For model ESA406K,ESA408K,ESA406K-L,ESA408K-L, ESA406K-T,ESA408K-T three 13⁄32" screws is equipped with a new power supply cord obtained ...
User Manual
Page 6
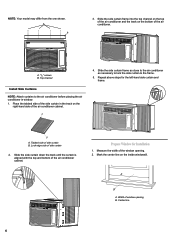
... 5. A 4. Slide the side curtain frame as close to the air conditioner as necessary to lock the side curtain to the air conditioner before placing the air conditioner in the track on the right-hand side of the air conditioner cabinet. Width of the side curtain in window. 1. B 3. ... curtain 2. Measure the width of the air conditioner. A B A. B A. Prepare Window for the left-hand side curtain and frame. Lock edge side of the air conditioner cabinet. Repeat above steps for Installation 1. Tabbed side of the air conditioner and the track on the inside windowsill....
... 5. A 4. Slide the side curtain frame as close to the air conditioner as necessary to lock the side curtain to the air conditioner before placing the air conditioner in the track on the right-hand side of the air conditioner cabinet. Width of the side curtain in window. 1. B 3. ... curtain 2. Measure the width of the air conditioner. A B A. B A. Prepare Window for the left-hand side curtain and frame. Lock edge side of the air conditioner cabinet. Repeat above steps for Installation 1. Tabbed side of the air conditioner and the track on the inside windowsill....
User Manual
Page 7
... a starter hole through the top hole in the side bracket and windowsill. 6. Tighten the screw. NOTES: ■ Handle the air conditioner gently. ■ Be sure your air conditioner does not fall out of the 31⁄32" screws through the holes in the side curtain and into the window frame. 6.... Insert one of the opening during installation or removal. ■ The place where the power cord exits the air conditioner should be grounded within 6 ft (183 cm)) ■ Do not block the louvers in the side curtain and into the window sash. 3. Use...
... a starter hole through the top hole in the side bracket and windowsill. 6. Tighten the screw. NOTES: ■ Handle the air conditioner gently. ■ Be sure your air conditioner does not fall out of the 31⁄32" screws through the holes in the side curtain and into the window frame. 6.... Insert one of the opening during installation or removal. ■ The place where the power cord exits the air conditioner should be grounded within 6 ft (183 cm)) ■ Do not block the louvers in the side curtain and into the window sash. 3. Use...
User Manual
Page 8
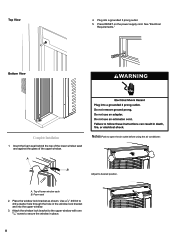
Attach the window lock bracket to the upper window with one 31⁄32" screw to open the air outlet before using the air conditioner. Complete Installation 1. A Notes:Push to secure the window in the window lock bracket and into a grounded 3 prong outlet. 5. B Adjust to drill a starter hole through the ...
Attach the window lock bracket to the upper window with one 31⁄32" screw to open the air outlet before using the air conditioner. Complete Installation 1. A Notes:Push to secure the window in the window lock bracket and into a grounded 3 prong outlet. 5. B Adjust to drill a starter hole through the ...
User Manual
Page 9
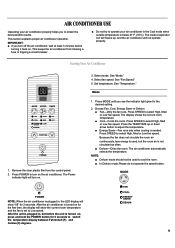
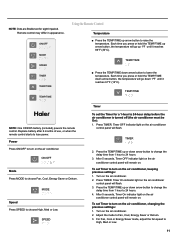
... obtain the best possible results. NOTE: ■ Dehum mode should not be used , but before turning it back on the air conditioner. POWER NOTE: When the air conditioner is plugged in, the LED display will not operate properly. Mode 1. Press SPEED to select High, Med or Low fan speed... 5. Press MODE until you to cool the room. ■ In Dehum mode,Please do not operate the speed button. AIR CONDITIONER USE Operating your air conditioner in , but the room air is not circulated as often. ■ Dehum-Dries the room. Press POWER to turn on for 5 seconds to adjust the...
... obtain the best possible results. NOTE: ■ Dehum mode should not be used , but before turning it back on the air conditioner. POWER NOTE: When the air conditioner is plugged in, the LED display will not operate properly. Mode 1. Press SPEED to select High, Med or Low fan speed... 5. Press MODE until you to cool the room. ■ In Dehum mode,Please do not operate the speed button. AIR CONDITIONER USE Operating your air conditioner in , but the room air is not circulated as often. ■ Dehum-Dries the room. Press POWER to turn on for 5 seconds to adjust the...
User Manual
Page 10
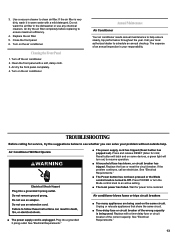
...or down 1ºF until it has been programmed. Press the TEMP/TIME up arrow button, the temperature will remain on . Turn on the air conditioner. 2. Timer On indicator light will show remaining time. 2. Press TEMP/TIME once after it reaches 86°F (30°C). Press TEMP/TIME...TEMP/TIME up or down arrow button, the temperature will turn on or off . Timer On indicator light will show remaining hours before the air conditioner will remain on . 6. NOTE: In Fan mode, the temperature cannot be either on . 3. While the display is showing the remaining time...
...or down 1ºF until it has been programmed. Press the TEMP/TIME up arrow button, the temperature will remain on . Turn on the air conditioner. 2. Timer On indicator light will show remaining time. 2. Press TEMP/TIME once after it reaches 86°F (30°C). Press TEMP/TIME...TEMP/TIME up or down arrow button, the temperature will turn on or off . Timer On indicator light will show remaining hours before the air conditioner will remain on . 6. NOTE: In Fan mode, the temperature cannot be either on . 3. While the display is showing the remaining time...
User Manual
Page 11
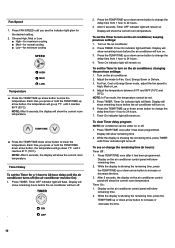
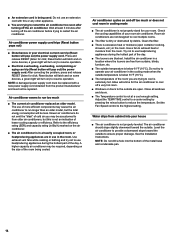
...the temperature. MODE Speed Press SPEED to Fan, Cool, Energy Saver or Dehum. 3. Timer OFF indicator light on the air conditioner control panel will remain on. Turn on the air conditioner. 2. After 5 seconds, Timer On indicator light on . Remote control may differ in appearance. ON/OFF MODE SPEED TIMER... Adjust the mode to choose High, Med or Low. TEMP/TIME NOTE: One CR2025 battery (included) powers the remote control. Turn on the air conditioner. 2. Power Press ON/OFF to High, Med or Low. 11 Press the TEMP/TIME up arrow button to 24 hours. 3. Timer On indicator...
...the temperature. MODE Speed Press SPEED to Fan, Cool, Energy Saver or Dehum. 3. Timer OFF indicator light on the air conditioner control panel will remain on. Turn on the air conditioner. 2. After 5 seconds, Timer On indicator light on . Remote control may differ in appearance. ON/OFF MODE SPEED TIMER... Adjust the mode to choose High, Med or Low. TEMP/TIME NOTE: One CR2025 battery (included) powers the remote control. Turn on the air conditioner. 2. Power Press ON/OFF to High, Med or Low. 11 Press the TEMP/TIME up arrow button to 24 hours. 3. Timer On indicator...

User Manual
Page 12
... the time. 3. 4. Display will show the current room temperature. Changing Air Direction 4-Way Air Flow:The air directional louvers let you may hear sounds such as: ■ Droplets of the airflow to the outside. (NOTE:For model :ESA410K,ESA412K,ESA410K-L, ESA412K-L,ESA410K-T,ESA410K-E only) A B A. 4-Way Air Flow B. Display on or off . Vent Normal Sounds When your air conditioner properly.
... the time. 3. 4. Display will show the current room temperature. Changing Air Direction 4-Way Air Flow:The air directional louvers let you may hear sounds such as: ■ Droplets of the airflow to the outside. (NOTE:For model :ESA410K,ESA412K,ESA410K-L, ESA412K-L,ESA410K-T,ESA410K-E only) A B A. 4-Way Air Flow B. Display on or off . Vent Normal Sounds When your air conditioner properly.
User Manual
Page 13
... cord is your problem without outside help ensure steady, top performance throughout the year. Close the front panel. 6. Turn on the air conditioner. Plug into a grounded 3 prong outlet. Reset button will latch and on some devices, a green light will turn the Mode ... 1. Clean the front panel with a time-delay fuse or circuit breaker of an annual inspection is unplugged. Annual Maintenance Air Conditioner Your air conditioner needs annual maintenance to see whether you can solve your responsibility. TROUBLESHOOTING Before calling for service, try the suggestions below to...
... cord is your problem without outside help ensure steady, top performance throughout the year. Close the front panel. 6. Turn on the air conditioner. Plug into a grounded 3 prong outlet. Reset button will latch and on some devices, a green light will turn the Mode ... 1. Clean the front panel with a time-delay fuse or circuit breaker of an annual inspection is unplugged. Annual Maintenance Air Conditioner Your air conditioner needs annual maintenance to see whether you can solve your responsibility. TROUBLESHOOTING Before calling for service, try the suggestions below to...
User Manual
Page 14
... room, or heatproducing appliances are not designed to reduce the temperature. Wait at a cool enough setting. A higher capacity air conditioner may be required, depending on the air conditioner. ■ The air conditioner is below 61°F (16°C). Room air conditioners are in use an extension cord with a new power supply cord obtained from the room. Install the...
... room, or heatproducing appliances are not designed to reduce the temperature. Wait at a cool enough setting. A higher capacity air conditioner may be required, depending on the air conditioner. ■ The air conditioner is below 61°F (16°C). Room air conditioners are in use an extension cord with a new power supply cord obtained from the room. Install the...


