User Manual
Page 3
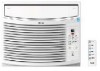
... WARNING: To reduce the risk of others . Do not remove ground prong. Top channel ESA408K,ESA408K-L(3) B. Side brackets (2) ESA408K-E(3) D.Window lock bracket F. 31⁄32" screws (9) E. 13⁄32" screws : G. Tools needed A ON/OFF ■ Phillips head...immediately follow instructions. Remote control ESA406K,ESA406K-L(3) 3 SAVE THESE INSTRUCTIONS INSTALLATION REQUIREMENTS Tools and Parts Gather the required tools and parts before servicing. Do not use an adapter. Foam seal ESA406K-T,ESA408K-T(3) C. AIR CONDITIONER SAFETY Your safety and the safety...
... WARNING: To reduce the risk of others . Do not remove ground prong. Top channel ESA408K,ESA408K-L(3) B. Side brackets (2) ESA408K-E(3) D.Window lock bracket F. 31⁄32" screws (9) E. 13⁄32" screws : G. Tools needed A ON/OFF ■ Phillips head...immediately follow instructions. Remote control ESA406K,ESA406K-L(3) 3 SAVE THESE INSTRUCTIONS INSTALLATION REQUIREMENTS Tools and Parts Gather the required tools and parts before servicing. Do not use an adapter. Foam seal ESA406K-T,ESA408K-T(3) C. AIR CONDITIONER SAFETY Your safety and the safety...
User Manual
Page 4
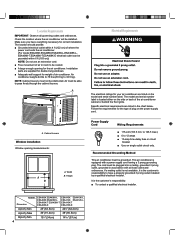
...to have everything necessary for the type of where the power cord exits the air conditioner. (For model ESA406K,ESA408K,ESA406K-L,ESA408K-L, ESA406K-T,ESA408K-T,ESA408K-E electrical outlet can be obstructed. This air conditioner is the customer's responsibility to 12 amps ■ 15-amp time-delay...a qualified electrical installer. Follow the requirements for correct installation. Cabinet louvers Window Installation Window opening for your air conditioner are listed on the side or back of air in accordance with a power supply cord having a 3 prong grounding plug. The ...
...to have everything necessary for the type of where the power cord exits the air conditioner. (For model ESA406K,ESA408K,ESA406K-L,ESA408K-L, ESA406K-T,ESA408K-T,ESA408K-E electrical outlet can be obstructed. This air conditioner is the customer's responsibility to 12 amps ■ 15-amp time-delay...a qualified electrical installer. Follow the requirements for correct installation. Cabinet louvers Window Installation Window opening for your air conditioner are listed on the side or back of air in accordance with a power supply cord having a 3 prong grounding plug. The ...
User Manual
Page 6
... B. Slide the side curtain frame as close to the air conditioner as necessary to lock the side curtain to the air conditioner before placing the air conditioner in the track on the bottom of the air conditioner. Lock edge side of the air conditioner cabinet. Prepare Window for the left-hand side curtain and frame. Mark the center line on the...
... B. Slide the side curtain frame as close to the air conditioner as necessary to lock the side curtain to the air conditioner before placing the air conditioner in the track on the bottom of the air conditioner. Lock edge side of the air conditioner cabinet. Prepare Window for the left-hand side curtain and frame. Mark the center line on the...
User Manual
Page 7
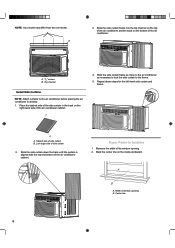
... a starter hole through the top hole of the air conditioner cabinet near the bottom. Pull the left -hand curtain and into the window sash. 4. Use 1⁄8" drill bit to hold the cabinet in place NOTE: Your model may differ from a grounded outlet. (For model ESA406K,ESA408K,ESA406K-L,ESA408K-L, ESA406K-T,ESA408K-T,ESA408K-E electrical outlet can be grounded...
... a starter hole through the top hole of the air conditioner cabinet near the bottom. Pull the left -hand curtain and into the window sash. 4. Use 1⁄8" drill bit to hold the cabinet in place NOTE: Your model may differ from a grounded outlet. (For model ESA406K,ESA408K,ESA406K-L,ESA408K-L, ESA406K-T,ESA408K-T,ESA408K-E electrical outlet can be grounded...
User Manual
Page 8
Insert the foam seal behind the top of the lower window sash and against the glass of lower window sash B. Top of the upper window. See "Electrical Requirements." Use a 1⁄8" drill bit to desired position. Top View Bottom View 4. Press RESET on the ...8 Foam seal 2. Plug into the upper window. 3. Place the window lock bracket as shown. Attach the window lock bracket to the upper window with one 31⁄32" screw to open the air outlet before using the air conditioner. A Notes:Push to secure the window in the window lock bracket and into a grounded 3 prong...
Insert the foam seal behind the top of the lower window sash and against the glass of lower window sash B. Top of the upper window. See "Electrical Requirements." Use a 1⁄8" drill bit to desired position. Top View Bottom View 4. Press RESET on the ...8 Foam seal 2. Plug into the upper window. 3. Place the window lock bracket as shown. Attach the window lock bracket to the upper window with one 31⁄32" screw to open the air outlet before using the air conditioner. A Notes:Push to secure the window in the window lock bracket and into a grounded 3 prong...
User Manual
Page 12
... Vibrations or noise due to poor wall or window construction. ■ A high-pitched hum or pulsating noise caused by opening the front panel and removing the air filter. 12 B A A. Display will show remaining hours before the air conditioner will turn on and off . Press TIMER once...;C and 30ºC). While the display is important for best cooling and operating efficiency. After 5 seconds, the display on the air conditioner control panel will show remaining time. 2. A clean filter helps remove dust, lint, and other particles from 1 hour to change ...
... Vibrations or noise due to poor wall or window construction. ■ A high-pitched hum or pulsating noise caused by opening the front panel and removing the air filter. 12 B A A. Display will show remaining hours before the air conditioner will turn on and off . Press TIMER once...;C and 30ºC). While the display is important for best cooling and operating efficiency. After 5 seconds, the display on the air conditioner control panel will show remaining time. 2. A clean filter helps remove dust, lint, and other particles from 1 hour to change ...
User Manual
Page 14
...other appliance. ■ You are in a heavily occupied room, or heatproducing appliances are trying to restart the air conditioner too soon after turning off a very hot room. ■ Windows or doors to the outside are not designed to cool multiple rooms. ■ The filter is ...by pressing the minus button to a cooler setting by debris. Close all windows and doors. ■ The Temperature control is not at least 3 minutes after turning off too much ■ The current air conditioner replaced an older model. Adjust the TEMP/TIME control to reduce the temperature...
...other appliance. ■ You are in a heavily occupied room, or heatproducing appliances are trying to restart the air conditioner too soon after turning off a very hot room. ■ Windows or doors to the outside are not designed to cool multiple rooms. ■ The filter is ...by pressing the minus button to a cooler setting by debris. Close all windows and doors. ■ The Temperature control is not at least 3 minutes after turning off too much ■ The current air conditioner replaced an older model. Adjust the TEMP/TIME control to reduce the temperature...


