User Manual
Page 2
ii Dynex DX-LDVD22-10A 22" LCD TV/DVD Combo Contents CHILD SAFETY 1 Important safety instructions 2 Warnings 2 Cautions 2 Installing the stand 3 Removing the stand 3 Removing the stand 4 Installing a wall-mount bracket 4 TV components 4 Front and side panels 4 Back 5 Remote control 5 Using the remote control 6 Installing remote control batteries 6 Aiming the remote control 7 Programming a universal remote control to work with your TV 7 Making connections 7 Connecting...
ii Dynex DX-LDVD22-10A 22" LCD TV/DVD Combo Contents CHILD SAFETY 1 Important safety instructions 2 Warnings 2 Cautions 2 Installing the stand 3 Removing the stand 3 Removing the stand 4 Installing a wall-mount bracket 4 TV components 4 Front and side panels 4 Back 5 Remote control 5 Using the remote control 6 Installing remote control batteries 6 Aiming the remote control 7 Programming a universal remote control to work with your TV 7 Making connections 7 Connecting...
User Manual
Page 3
iii Turning on Auto Zoom 16 Setting parental controls 17 Changing parental control settings 17 Setting or changing the password 17 Setting parental control levels 18 Downloading rating information 19 Using closed captioning 20 Turning closed captioning on or off 20 Adjusting time settings ...Advanced playback 23 JPEG disc playback 23 Screen saver 23 DVD system setup 23 Playable discs 24 Troubleshooting 25 Video and audio 25 Remote control 25 General 25 Maintenance 25 Cleaning 25 Care and handling of discs 26 Servicing 26 Specifications 26 Legal notices 26 One-year limited...
iii Turning on Auto Zoom 16 Setting parental controls 17 Changing parental control settings 17 Setting or changing the password 17 Setting parental control levels 18 Downloading rating information 19 Using closed captioning 20 Turning closed captioning on or off 20 Adjusting time settings ...Advanced playback 23 JPEG disc playback 23 Screen saver 23 DVD system setup 23 Playable discs 24 Troubleshooting 25 Video and audio 25 Remote control 25 General 25 Maintenance 25 Cleaning 25 Care and handling of discs 26 Servicing 26 Specifications 26 Legal notices 26 One-year limited...

User Manual
Page 5
... that your TV. If the screen breaks, be exposed to excessive heat such as radiators, heat registers, stoves, or other controls may result in your mouth, immediately gargle, rinse, and consult with the manufacturer's instructions. 8 Do not install near water.... Replacement parts When replacement parts are inside. Class I apparatus to a mains socket outlet with a protective earthing connection. 17 Remote control batteries should not be exposed to prevent possible electric shock. Make sure that the service technician uses replacement parts specified by following ...
... that your TV. If the screen breaks, be exposed to excessive heat such as radiators, heat registers, stoves, or other controls may result in your mouth, immediately gargle, rinse, and consult with the manufacturer's instructions. 8 Do not install near water.... Replacement parts When replacement parts are inside. Class I apparatus to a mains socket outlet with a protective earthing connection. 17 Remote control batteries should not be exposed to prevent possible electric shock. Make sure that the service technician uses replacement parts specified by following ...
User Manual
Page 7
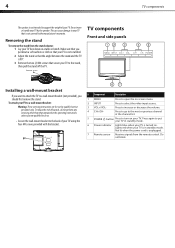
... column: 1 Lay your TV. Remove screws TV components Front and side panels MENU INPUT VOL+ VOL- Removing the stand To remove the stand from the remote control. Warning: These servicing instructions are qualified to do so. • Secure the wall-mount bracket to open the on your TV face down a soft cushion...
... column: 1 Lay your TV. Remove screws TV components Front and side panels MENU INPUT VOL+ VOL- Removing the stand To remove the stand from the remote control. Warning: These servicing instructions are qualified to do so. • Secure the wall-mount bracket to open the on your TV face down a soft cushion...

User Manual
Page 8
... connect audio cables from the device to turn on or off. For more information, see "Connecting a component video device" on page 9. Press to these jacks. Remote control VGA IN R AUDIO IN L S-VIDEO IN R AUDIO IN L VIDEO IN SERVICE ANT/CABLE IN ## Component 1 HDMI jack 2 PC AUDIO jack 3 VGA jack 4 SERVICE 5 VIDEO IN...
... connect audio cables from the device to turn on or off. For more information, see "Connecting a component video device" on page 9. Press to these jacks. Remote control VGA IN R AUDIO IN L S-VIDEO IN R AUDIO IN L VIDEO IN SERVICE ANT/CABLE IN ## Component 1 HDMI jack 2 PC AUDIO jack 3 VGA jack 4 SERVICE 5 VIDEO IN...
User Manual
Page 9
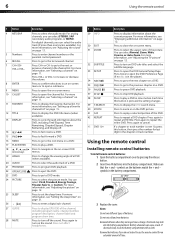
... go to replay a selected portion of a DVD (when available). Press to the next chapter on a DVD. Using the remote control Installing remote control batteries To install remote control batteries: 1 Open the battery compartment cover by pressing the release button. 2 Insert two AA batteries into the battery compartment.... if you can select Normal, Zoom, Wide, Cinema, or Auto Zoom. Press to open the DVD General Setup Page. 6 Using the remote control # Button 4 MTS/SAP 5 Numbers 6 RECALL 7 CH+/CH- For more than one track is pressed, the setting changes. Remove batteries...
... go to replay a selected portion of a DVD (when available). Press to the next chapter on a DVD. Using the remote control Installing remote control batteries To install remote control batteries: 1 Open the battery compartment cover by pressing the release button. 2 Insert two AA batteries into the battery compartment.... if you can select Normal, Zoom, Wide, Cinema, or Auto Zoom. Press to open the DVD General Setup Page. 6 Using the remote control # Button 4 MTS/SAP 5 Numbers 6 RECALL 7 CH+/CH- For more than one track is pressed, the setting changes. Remove batteries...
User Manual
Page 10
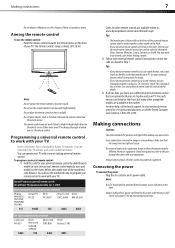
...such as hazardous waste. It can operate both your set -top box manufacturer, or call technical support for details. • If your universal remote control has a "Learn" feature, you have questions, refer to "teach" the commands one at 1-800-305-2204. Connecting the power To connect... work if direct sunlight or bright light shines on the back. • If your universal remote control's instructions to shock or liquids. Do not use the remote control: • Point the remote control towards the remote sensor on the chart, refer to reviewers: This is about 26 ft. (8 m). Making ...
...such as hazardous waste. It can operate both your set -top box manufacturer, or call technical support for details. • If your universal remote control has a "Learn" feature, you have questions, refer to "teach" the commands one at 1-800-305-2204. Connecting the power To connect... work if direct sunlight or bright light shines on the back. • If your universal remote control's instructions to shock or liquids. Do not use the remote control: • Point the remote control towards the remote sensor on the chart, refer to reviewers: This is about 26 ft. (8 m). Making ...
User Manual
Page 11
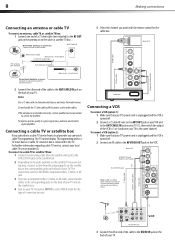
... 75 ohm RF coaxial wire Turn clockwise to the ANT/CABLE IN jack on your TV. Do not bundle the 75 ohm cable with the remote control for the type of your TV. AUDIO-L and R cables Video cable 3U 3E < R AUDIO IN L S-VIDEO IN R AUDIO IN L VIDEO IN Component video cables Pr...
... 75 ohm RF coaxial wire Turn clockwise to the ANT/CABLE IN jack on your TV. Do not bundle the 75 ohm cable with the remote control for the type of your TV. AUDIO-L and R cables Video cable 3U 3E < R AUDIO IN L S-VIDEO IN R AUDIO IN L VIDEO IN Component video cables Pr...

User Manual
Page 13
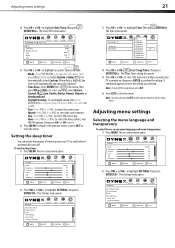
...opens. to select Antenna or Cable, then press ENTER. CH- to highlight Auto Channels Search, then press ENTER/VOL+. Settings Parental Controls Closed Caption Time Menu Settings Input Labels Computer Settings PICTURE AUDIO CHANNELS SETTINGS VOL- CH+ VOL+ MOVE ENTER SELECT MENU PREVIOUS EXIT... SELECT MENU PREVIOUS EXIT EXIT • Press CH+/CH- The TV automatically scans and memorizes all the active, available channels in the remote control, connected the antenna to select the language you have a stereo mini plug. to highlight Menu Settings, then press ENTER/VOL+. to ...
...opens. to select Antenna or Cable, then press ENTER. CH- to highlight Auto Channels Search, then press ENTER/VOL+. Settings Parental Controls Closed Caption Time Menu Settings Input Labels Computer Settings PICTURE AUDIO CHANNELS SETTINGS VOL- CH+ VOL+ MOVE ENTER SELECT MENU PREVIOUS EXIT... SELECT MENU PREVIOUS EXIT EXIT • Press CH+/CH- The TV automatically scans and memorizes all the active, available channels in the remote control, connected the antenna to select the language you have a stereo mini plug. to highlight Menu Settings, then press ENTER/VOL+. to ...

User Manual
Page 15
... Caption Time Menu Settings Input Labels Computer Settings PICTURE AUDIO CHANNELS SETTINGS VOL- You can select: • Parental Controls-Lets you control which programs/movies your TV's input jacks. • Computer Settings-Lets you adjust picture settings to optimize a computer ...Adjusting the picture Adjusting the TV picture To adjust the picture: 1 Press MENU, then press ENTER/CH-. You can watch, based on the remote control to select the picture mode. • Brightness-Adjusts the brightness. • Contrast-Adjusts the contrast. • Color-Adjusts the color saturation...
... Caption Time Menu Settings Input Labels Computer Settings PICTURE AUDIO CHANNELS SETTINGS VOL- You can select: • Parental Controls-Lets you control which programs/movies your TV's input jacks. • Computer Settings-Lets you adjust picture settings to optimize a computer ...Adjusting the picture Adjusting the TV picture To adjust the picture: 1 Press MENU, then press ENTER/CH-. You can watch, based on the remote control to select the picture mode. • Brightness-Adjusts the brightness. • Contrast-Adjusts the contrast. • Color-Adjusts the color saturation...

User Manual
Page 16
...-Adjust the clock setting of the screen. • Noise Reduction-Selects the noise reduction mode to adjust. PICTURE Settings Computer Settings Parental Controls Closed Caption Time Menu Settings Input Labels Computer Settings AUDIO CHANNELS SETTINGS VOL- to reduce picture noise (snow). CH- Position Phase Reset... CHANNELS SETTINGS 34 50 50 50 VOL- You can also press AUDIO one or more information, see "On-screen menu overview" on the remote control. CH- CH+ VOL+ MOVE ENTER SELECT MENU PREVIOUS EXIT EXIT 4 Press CH+ or CH- to close the menu. You can only...
...-Adjust the clock setting of the screen. • Noise Reduction-Selects the noise reduction mode to adjust. PICTURE Settings Computer Settings Parental Controls Closed Caption Time Menu Settings Input Labels Computer Settings AUDIO CHANNELS SETTINGS VOL- to reduce picture noise (snow). CH- Position Phase Reset... CHANNELS SETTINGS 34 50 50 50 VOL- You can also press AUDIO one or more information, see "On-screen menu overview" on the remote control. CH- CH+ VOL+ MOVE ENTER SELECT MENU PREVIOUS EXIT EXIT 4 Press CH+ or CH- to close the menu. You can only...

User Manual
Page 19
...-. audio only is set to On, the backlight should automatically turn off 5 seconds after last remote command. Picture Mode Brightness Contrast Color Tint Sharpness VOL- Channels Auto Channels Search Add/Skip Channels...ENTER SELECT MENU PREVIOUS EXIT EXIT 3 Press CH+ or CH- To turn on the remote control will be set to close the menu. CH+ VOL+ MOVE ENTER SELECT MENU PREVIOUS EXIT EXIT ...Pushing any other than Power on the remote control turns on the backlight and Audio Only is off , pressing any button other button turns...
...-. audio only is set to On, the backlight should automatically turn off 5 seconds after last remote command. Picture Mode Brightness Contrast Color Tint Sharpness VOL- Channels Auto Channels Search Add/Skip Channels...ENTER SELECT MENU PREVIOUS EXIT EXIT 3 Press CH+ or CH- To turn on the remote control will be set to close the menu. CH+ VOL+ MOVE ENTER SELECT MENU PREVIOUS EXIT EXIT ...Pushing any other than Power on the remote control turns on the backlight and Audio Only is off , pressing any button other button turns...
User Manual
Page 24
...+ MOVE PICTURE AUDIO CHANNELS SETTINGS Custom 40 60 45 R5 +5 ENTER SELECT MENU PREVIOUS EXIT EXIT 2 Press VOL+ or VOL- Settings Parental Controls Closed Caption Time Menu Settings Input Labels Computer Settings PICTURE AUDIO CHANNELS SETTINGS VOL- to set the time manually, select Custom. CH- Settings Parental...The Settings menu opens. to set. 6 Press MENU to return to the previous menu, or press EXIT to close the menu. The on the remote control to set daylight saving time, press ENTER/VOL+ to confirm the setting. to select On or Off. • Year-Press VOL+ or VOL-...
...+ MOVE PICTURE AUDIO CHANNELS SETTINGS Custom 40 60 45 R5 +5 ENTER SELECT MENU PREVIOUS EXIT EXIT 2 Press VOL+ or VOL- Settings Parental Controls Closed Caption Time Menu Settings Input Labels Computer Settings PICTURE AUDIO CHANNELS SETTINGS VOL- to set the time manually, select Custom. CH- Settings Parental...The Settings menu opens. to set. 6 Press MENU to return to the previous menu, or press EXIT to close the menu. The on the remote control to set daylight saving time, press ENTER/VOL+ to confirm the setting. to select On or Off. • Year-Press VOL+ or VOL-...

User Manual
Page 25
... label facing the back of when the current chapter begins, it will remain on the screen.) 3 Press the cursor buttons on the remote control to select menu options, then press PLAY/ENTER to fast forward through the disc. Settings Menu Settings PICTURE AUDIO CHANNELS SETTINGS Transparency 0...STOP twice to close the menu. CH+ VOL+ MOVE ENTER SELECT MENU PREVIOUS EXIT EXIT 4 Press CH+ or CH- The on the remote control to change the setting. Settings Input Labels Input Label Custom Reset Input Labels PICTURE AUDIO CHANNELS SETTINGS Component Custom VOL- 22 DVD Playback 3 ...
... label facing the back of when the current chapter begins, it will remain on the screen.) 3 Press the cursor buttons on the remote control to select menu options, then press PLAY/ENTER to fast forward through the disc. Settings Menu Settings PICTURE AUDIO CHANNELS SETTINGS Transparency 0...STOP twice to close the menu. CH+ VOL+ MOVE ENTER SELECT MENU PREVIOUS EXIT EXIT 4 Press CH+ or CH- The on the remote control to change the setting. Settings Input Labels Input Label Custom Reset Input Labels PICTURE AUDIO CHANNELS SETTINGS Component Custom VOL- 22 DVD Playback 3 ...

User Manual
Page 26
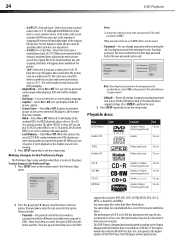
... a starting point, press again to cancel the repeat function. These functions are different. A-B-Press to the general DVD setup: 1 Press SETUP on the remote control. Press a third time to resume normal playback. Press PLAY/ENTER to cancel this key displays the title menu on the... the number buttons to cycle between pictures. Enter a chapter number to go to that can be decoded by pressing the indicated button on the remote control. Press PREV or NEXT to that you can save files from the available languages. If you want . Press the program number buttons to input...
... a starting point, press again to cancel the repeat function. These functions are different. A-B-Press to the general DVD setup: 1 Press SETUP on the remote control. Press a third time to resume normal playback. Press PLAY/ENTER to cancel this key displays the title menu on the... the number buttons to cycle between pictures. Enter a chapter number to go to that can be decoded by pressing the indicated button on the remote control. Press PREV or NEXT to that you can save files from the available languages. If you want . Press the program number buttons to input...
User Manual
Page 27
... DVDs. This will enable you to the Region Management Information that disc. You cannot play . This DVD Player is designed and manufactured according to regain control. • Default-Resets all discs may still appear above . If the Region number described on a DVD disc. Back bars may be viewed. &#... turn it back on, it will be shown in unaltered form, allowing the entire picture area of CD-R or CD-RW disc depends on the remote control. Making changes to be indicated on -screen display language. • Caption-Select On or Off. Such discs are uncommon. • 4:3/LB (LB = ...
... DVDs. This will enable you to the Region Management Information that disc. You cannot play . This DVD Player is designed and manufactured according to regain control. • Default-Resets all discs may still appear above . If the Region number described on a DVD disc. Back bars may be viewed. &#... turn it back on, it will be shown in unaltered form, allowing the entire picture area of CD-R or CD-RW disc depends on the remote control. Making changes to be indicated on -screen display language. • Caption-Select On or Off. Such discs are uncommon. • 4:3/LB (LB = ...
User Manual
Page 28
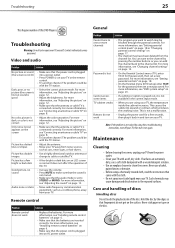
...that the antenna or cable TV is plugged into a power outlet. • Press POWER on the surface. For more information, see "Installing remote control batteries" on page 12. • Make sure that the power cord is connected correctly. General Problem Solution Cannot tune to one or more ...the channel list. For more information, see "Connecting an antenna or cable TV" on page 12. • Adjust the brightness. Remote control Problem Remote control does not work • Unplug the power cord for the password, then set to make sure that the sound is connected correctly....
...that the antenna or cable TV is plugged into a power outlet. • Press POWER on the surface. For more information, see "Installing remote control batteries" on page 12. • Make sure that the power cord is connected correctly. General Problem Solution Cannot tune to one or more ...the channel list. For more information, see "Connecting an antenna or cable TV" on page 12. • Adjust the brightness. Remote control Problem Remote control does not work • Unplug the power cord for the password, then set to make sure that the sound is connected correctly....
User Manual
Page 29
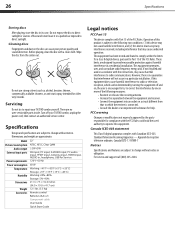
...;F~113°F (-15°C~+45°C) Working: 20%~80% Storage: 5%~90% 21.3 × 7.5 × 16.4 inches (54.0 × 19.0 × 41.7 cm) 12.1 lbs. (5.5 kg) Remote control Batteries (AA x 2) Component cable User Guide Quick Start Guide Legal notices FCC Part 15 This device complies with Part 15 of heat and never leave...
...;F~113°F (-15°C~+45°C) Working: 20%~80% Storage: 5%~90% 21.3 × 7.5 × 16.4 inches (54.0 × 19.0 × 41.7 cm) 12.1 lbs. (5.5 kg) Remote control Batteries (AA x 2) Component cable User Guide Quick Start Guide Legal notices FCC Part 15 This device complies with Part 15 of heat and never leave...


