User Manual
Page 1
..., you purchased the product. 0120504499 Dishwasher DW15-PFE S DW15-PFE SS Instructions for the environment and human health, which could otherwise be caused by inappropriate waste handling of this product. Instead it shall be treated as household waste. A: Wiring box B: Door switch C: Water level switch D: Drain pump motor E: Overflow switch F: 2-way valve G: Softener valve H: Dispenser I: Inlet valve J: Washing pump motor K: Temperature limiter L: Heater M: Relay N: Temperature sensor O: Low salt switch P: Low rinse aid switch Q: Flowmeter...
..., you purchased the product. 0120504499 Dishwasher DW15-PFE S DW15-PFE SS Instructions for the environment and human health, which could otherwise be caused by inappropriate waste handling of this product. Instead it shall be treated as household waste. A: Wiring box B: Door switch C: Water level switch D: Drain pump motor E: Overflow switch F: 2-way valve G: Softener valve H: Dispenser I: Inlet valve J: Washing pump motor K: Temperature limiter L: Heater M: Relay N: Temperature sensor O: Low salt switch P: Low rinse aid switch Q: Flowmeter...

User Manual
Page 2
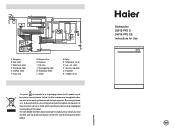
in the dishwasher 13 How to fill the detergent dispenser 15 Programme overview 16 Washing dishes 18 How to fill the salt container and the rinse aid dispenser 10 Not suitable for the dishwasher 12 Arranging crockery, glasses, etc. Index Safety information 2 Installation 4 How to remove the top of your dishwasher 6 Getting to know your dishwasher 8 How to keep your dishwasher in shape 24 Care and maintenance 25 Fault finding 27 Technical data 31 Important information 32 1
in the dishwasher 13 How to fill the detergent dispenser 15 Programme overview 16 Washing dishes 18 How to fill the salt container and the rinse aid dispenser 10 Not suitable for the dishwasher 12 Arranging crockery, glasses, etc. Index Safety information 2 Installation 4 How to remove the top of your dishwasher 6 Getting to know your dishwasher 8 How to keep your dishwasher in shape 24 Care and maintenance 25 Fault finding 27 Technical data 31 Important information 32 1

User Manual
Page 3
... problem, contact a service center. always use of extension cords and multiple sockets; - Only specialised personnel are inside the inlet hose.Do not cut the mains wire and set aside. Not on all models: The plastic housing on the dishwasher nameplate. Open the door very carefully if the dishwasher is open . Take the appliance to follow when using the appliance: - Young children should still be replaced by cutting the power supply cord and removing the door lock...
... problem, contact a service center. always use of extension cords and multiple sockets; - Only specialised personnel are inside the inlet hose.Do not cut the mains wire and set aside. Not on all models: The plastic housing on the dishwasher nameplate. Open the door very carefully if the dishwasher is open . Take the appliance to follow when using the appliance: - Young children should still be replaced by cutting the power supply cord and removing the door lock...

User Manual
Page 4
... to facilitate proper installation. No other type of time, let the water run into an electrical socket which is not adequate to make sure that can get damaged, remove the plug for the drain hose (fig.C). The free end of the hose is earthed properly (the earthing of the appliance) and that the water inlet can be attached to make a proper connection, the hose must not...
... to facilitate proper installation. No other type of time, let the water run into an electrical socket which is not adequate to make sure that can get damaged, remove the plug for the drain hose (fig.C). The free end of the hose is earthed properly (the earthing of the appliance) and that the water inlet can be attached to make a proper connection, the hose must not...

User Manual
Page 5
How to remove the top of your dishwasher Freestanding dishwasher can also be used as built-in, according to following processes: 20-30mm 100-150mm 0120200050 Built In Dishwasher: fixing on top or Built In Dishwasher: fixing on side 6 7
How to remove the top of your dishwasher Freestanding dishwasher can also be used as built-in, according to following processes: 20-30mm 100-150mm 0120200050 Built In Dishwasher: fixing on top or Built In Dishwasher: fixing on side 6 7

User Manual
Page 6
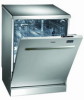
... Close-up view (control panel) A B D A ON-OFF Button B Programme Button C Delayed Start Button C E D Start Button E "1/2 LOAD" Button Programme Indicator Time-remaining Indicator Low Rinse Aid Indicator 1/2 Load Indicator Delayed Start Indicator Low Salt Indicator 8 Cycle Phase Indicator Dishwasher interior e a j c f k b g d h l i a Upper Rack b Lower Rack c Top Spray Arm d Silverware Basket e Third Sprayer f Bottom Spray Arm g Salt Container Cap h Washing Filter i Detergent and Rinse Aid Dispenser j Water Inlet Hose (with "Aquastop") k Drain Hose l Power Supply...
... Close-up view (control panel) A B D A ON-OFF Button B Programme Button C Delayed Start Button C E D Start Button E "1/2 LOAD" Button Programme Indicator Time-remaining Indicator Low Rinse Aid Indicator 1/2 Load Indicator Delayed Start Indicator Low Salt Indicator 8 Cycle Phase Indicator Dishwasher interior e a j c f k b g d h l i a Upper Rack b Lower Rack c Top Spray Arm d Silverware Basket e Third Sprayer f Bottom Spray Arm g Salt Container Cap h Washing Filter i Detergent and Rinse Aid Dispenser j Water Inlet Hose (with "Aquastop") k Drain Hose l Power Supply...
User Manual
Page 7
... 2 kg of the water being used . Remove the lower rack and then unscrew and remove the cap from the salt container; " setting towards the " + " sign, based on the hardness of salt. To open the dispenser, turn the dosage adjustor to place. Carefully screw the cap back on the dishes or spotting occurs, the dosage adjustor should be filled after low rinse aid indicator " 2 " lights. 2 Loading the rinse aid Regardless of the...
... 2 kg of the water being used . Remove the lower rack and then unscrew and remove the cap from the salt container; " setting towards the " + " sign, based on the hardness of salt. To open the dispenser, turn the dosage adjustor to place. Carefully screw the cap back on the dishes or spotting occurs, the dosage adjustor should be filled after low rinse aid indicator " 2 " lights. 2 Loading the rinse aid Regardless of the...
User Manual
Page 8
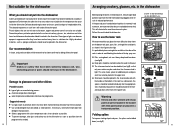
... the dishes in the dishwasher, remove larger food particles to flow out. If the pots and pans have been washed many times in a dishwasher. How to use the lower rack We recommend that you should not put in the dishwasher. It is light. if the rack has side baskets, the spoons should never be slanted to allow the water to prevent the filter from detergent manufacturers...
... the dishes in the dishwasher, remove larger food particles to flow out. If the pots and pans have been washed many times in a dishwasher. How to use the lower rack We recommend that you should not put in the dishwasher. It is light. if the rack has side baskets, the spoons should never be slanted to allow the water to prevent the filter from detergent manufacturers...
User Manual
Page 9
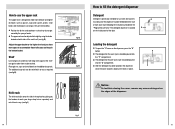
... the detergent dispenser fig.G fig.H Detergent Detergent specifically intended for use the upper rack The upper rack is located 5 on the inside panel of the door. Adjust the upper basket to the higher level and you the freedom to wash your large sharp knives separately and out of water. The detergent dispenser is designed to hold more space to accommodate those with dishwashers 6 must be used. The dispenser must be refilled before the start of each wash cycle...
... the detergent dispenser fig.G fig.H Detergent Detergent specifically intended for use the upper rack The upper rack is located 5 on the inside panel of the door. Adjust the upper basket to the higher level and you the freedom to wash your large sharp knives separately and out of water. The detergent dispenser is designed to hold more space to accommodate those with dishwashers 6 must be used. The dispenser must be refilled before the start of each wash cycle...
User Manual
Page 10
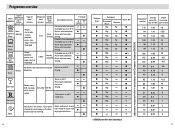
.../ programme pan s, cutiery, glasses, etc Intensive Wash Nondelicate Normal Wash Light Wash (IEC- a little Condition of food remains stuck on the dishes . 16 Delayed Start Detergent Extended Wash 25g Prewash 5g Rinse Aid 15g 5g 15g 5g 25g 5g 15g 5g 15g 5g 30g (G) 20g 20g 15g 10g 10g 15g 10g 10g (G) EN50242 test with rinse aid setting 5 Laboratory measured valve in accordance with European Standard EN50242...
.../ programme pan s, cutiery, glasses, etc Intensive Wash Nondelicate Normal Wash Light Wash (IEC- a little Condition of food remains stuck on the dishes . 16 Delayed Start Detergent Extended Wash 25g Prewash 5g Rinse Aid 15g 5g 15g 5g 25g 5g 15g 5g 15g 5g 30g (G) 20g 20g 15g 10g 10g 15g 10g 10g (G) EN50242 test with rinse aid setting 5 Laboratory measured valve in accordance with European Standard EN50242...
User Manual
Page 11
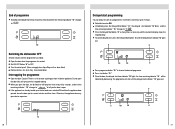
... of the water in the dishwasher is used to detect the degree of soiling in the water, caused by up , too. 18 A B 9 D C 10 E 11 10 Press programme button " B " , inner control panel programme indicator " 9 " goes out, next programme indicator " 12 "lights , time-remaining indicator " 10 "changes. Programme indicator " 9 " lights , time-remaining indicator "10" displays the time of programme and cycle phase indicator " 11 " lights up to 1/4 when dishes are washed in the upper basket only.The water consumption...
... of the water in the dishwasher is used to detect the degree of soiling in the water, caused by up , too. 18 A B 9 D C 10 E 11 10 Press programme button " B " , inner control panel programme indicator " 9 " goes out, next programme indicator " 12 "lights , time-remaining indicator " 10 "changes. Programme indicator " 9 " lights , time-remaining indicator "10" displays the time of programme and cycle phase indicator " 11 " lights up to 1/4 when dishes are washed in the upper basket only.The water consumption...
User Manual
Page 12
...) Remove dishes, etc. when they have cooled down. When you the door is a risk of water squirting out from inside the appliance. Otherwise, the appliance door may open the door, the dishwasher will beep ten times every thirty seconds, and the time remaining indicator " 10 " changes to " " to choose the desired programme. To cancel delayed start , press the Delayed Start button "C" until the delayed start button " D ". B D C 10 13 E Press programme button " B " to tell you open...
...) Remove dishes, etc. when they have cooled down. When you the door is a risk of water squirting out from inside the appliance. Otherwise, the appliance door may open the door, the dishwasher will beep ten times every thirty seconds, and the time remaining indicator " 10 " changes to " " to choose the desired programme. To cancel delayed start , press the Delayed Start button "C" until the delayed start button " D ". B D C 10 13 E Press programme button " B " to tell you open...
User Manual
Page 13
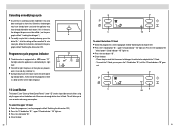
... the start button" D " . From left to wash dishes using only the upper rack or the bottom rack if there are : prewash, wash, rinse and dry ( indicator 3 ). Close the door. 22 B D C 14 E To select the bottom 1/2 load: Select the programme ( see the paragraph entitled" Switching the dishwasher ON") Press the 1/2 load button " E " , upper 1/2 load indicator " 14 " lights on. Cancelling or modifying a cycle A cycle that is already underway, press the button" A " , all of the settings will be cancelled. Press the start button...
... the start button" D " . From left to wash dishes using only the upper rack or the bottom rack if there are : prewash, wash, rinse and dry ( indicator 3 ). Close the door. 22 B D C 14 E To select the bottom 1/2 load: Select the programme ( see the paragraph entitled" Switching the dishwasher ON") Press the 1/2 load button " E " , upper 1/2 load indicator " 14 " lights on. Cancelling or modifying a cycle A cycle that is already underway, press the button" A " , all of the settings will be cancelled. Press the start button...

User Manual
Page 14
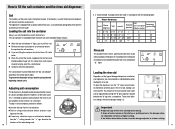
.... 24 Care and maintenance Regular inspection and maintenance of your appliance helps to form in the open position since this from the surface of food and rinse the filters under running water. To remove spots or stains from occurring. Dishwasher salt Check the LOW SALT indicator " 17 " .Top up with water and a little while vinegar, or cleaning product made specifically for dishwashers. Clean the interior of the dishwasher thorughly...
.... 24 Care and maintenance Regular inspection and maintenance of your appliance helps to form in the open position since this from the surface of food and rinse the filters under running water. To remove spots or stains from occurring. Dishwasher salt Check the LOW SALT indicator " 17 " .Top up with water and a little while vinegar, or cleaning product made specifically for dishwashers. Clean the interior of the dishwasher thorughly...

User Manual
Page 15
... normal daily usage yourself, without having to the house is crimped or bent; The strainer is available for the water supply hose is clogged. 22 the drain hose is " ". Plug not inserted in the Aquastop or supply-hose connection. Programme button has not been pressed. Clean both spray arms under running water. Improper repairs can block the nozzles in mains electricity supply. Water tap not turned on the time-remaining indicator When the time-remaining indicator...
... normal daily usage yourself, without having to the house is crimped or bent; The strainer is available for the water supply hose is clogged. 22 the drain hose is " ". Plug not inserted in the Aquastop or supply-hose connection. Programme button has not been pressed. Clean both spray arms under running water. Improper repairs can block the nozzles in mains electricity supply. Water tap not turned on the time-remaining indicator When the time-remaining indicator...
User Manual
Page 16
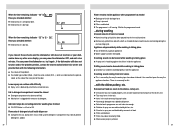
...: the drain hose is clogged with the dishes,cutlery, etc. Compartment must be heared while washing is taking place A spray arm is knocking against the dishes inside appliance after washing has finished ON-OFF Button is jammed. 29 Pump is added. 28 Water remains inside the appliance. Appliance stops suddenly while washing is taking place Cut off electricity supply to end . ...during the next washing cycle. Knocking sound can be closed Detergent compartment...
...: the drain hose is clogged with the dishes,cutlery, etc. Compartment must be heared while washing is taking place A spray arm is knocking against the dishes inside appliance after washing has finished ON-OFF Button is jammed. 29 Pump is added. 28 Water remains inside the appliance. Appliance stops suddenly while washing is taking place Cut off electricity supply to end . ...during the next washing cycle. Knocking sound can be closed Detergent compartment...
User Manual
Page 17
... traces of rinse-aid was set too low. Washing temperature was used a phosphate-free detergent , try a detergent containing phosphates and compare results. coating cannot be wiped off Unsuitable detergent was set too low. Use a detergent containing a chemical bleaching agent. Salt content in washing water is quite hard, no salt has been put in appliance. Glasses become clouded and discoloured; White stains are not dishwasher-proof. Dishes,cultlery...
... traces of rinse-aid was set too low. Washing temperature was used a phosphate-free detergent , try a detergent containing phosphates and compare results. coating cannot be wiped off Unsuitable detergent was set too low. Use a detergent containing a chemical bleaching agent. Salt content in washing water is quite hard, no salt has been put in appliance. Glasses become clouded and discoloured; White stains are not dishwasher-proof. Dishes,cultlery...
User Manual
Page 18
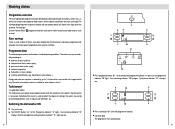
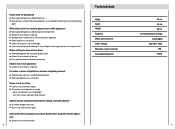
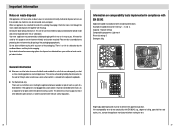
... of soiling, type of loaded dishwasher: See fig. 1 , 2 and 3. This will ensure that valuable raw materials can be taken to ensure that built-under a continuous work surface which is screwed to you. Example of dishes and cutlery, etc., contact the appliance manufacturer before starting the test. 32 33 Capacity: 12 place settings Comparability programme: Light wash Rinse-aid setting: 5 Detergent: 30g General information Measures...
... of soiling, type of loaded dishwasher: See fig. 1 , 2 and 3. This will ensure that valuable raw materials can be taken to ensure that built-under a continuous work surface which is screwed to you. Example of dishes and cutlery, etc., contact the appliance manufacturer before starting the test. 32 33 Capacity: 12 place settings Comparability programme: Light wash Rinse-aid setting: 5 Detergent: 30g General information Measures...

