
User Manual
Page 3
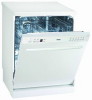
... installation, the power supply cord must not be performed, disconnect the appliance from the power supply. We discourage the use but contact your dishwasher. Do not touch the heating element during or after a wash cycle. The mains electricity supply must be connected to ensure that the domestic wiring is not operating properly or maintenance must conform to the rain and elements. After the appliance has been installed,the mains plug should...
... installation, the power supply cord must not be performed, disconnect the appliance from the power supply. We discourage the use but contact your dishwasher. Do not touch the heating element during or after a wash cycle. The mains electricity supply must be connected to ensure that the domestic wiring is not operating properly or maintenance must conform to the rain and elements. After the appliance has been installed,the mains plug should...
User Manual
Page 4
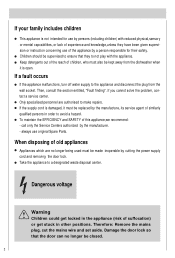
... closed. 3 Keep detergents out of the reach of the appliance by a person responsible for use by persons (including children) with the appliance. When disposing of this appliance,we recommend: - call only the Service Centers authorized by cutting the power supply cord and removing the door lock. Damage the door lock so that they have been given supervision or instruction concerning use original Spare Parts. If the supply cord...
... closed. 3 Keep detergents out of the reach of the appliance by a person responsible for use by persons (including children) with the appliance. When disposing of this appliance,we recommend: - call only the Service Centers authorized by cutting the power supply cord and removing the door lock. Damage the door lock so that they have been given supervision or instruction concerning use original Spare Parts. If the supply cord...
User Manual
Page 5
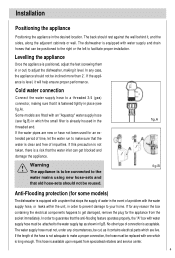
... adjust the dishwasher, making sure that stops the supply of water in the event of a problem with water supply and drain hoses that old hose-sets should not be connected to the water mains using new hose-sets and that can get damaged, remove the plug for any reason the box containing the electrical components happens to the water supply tap as it contains electrical parts which are fitted with a system that it level. Cold water connection Connect the water supply hose...
... adjust the dishwasher, making sure that stops the supply of water in the event of a problem with water supply and drain hoses that old hose-sets should not be connected to the water mains using new hose-sets and that can get damaged, remove the plug for any reason the box containing the electrical components happens to the water supply tap as it contains electrical parts which are fitted with a system that it level. Cold water connection Connect the water supply hose...

User Manual
Page 6
... prevent the drain hose from moving and allowing water to spill outside the drain. Electrical Connection After making sure to those on the rating plate (located on the rating plate, insert the plug into the sink, making sure that the voltage and frequency values for the plug, replace the whole cable, rather than using adaptors or the like as a built-in water. If the electrical socket...
... prevent the drain hose from moving and allowing water to spill outside the drain. Electrical Connection After making sure to those on the rating plate (located on the rating plate, insert the plug into the sink, making sure that the voltage and frequency values for the plug, replace the whole cable, rather than using adaptors or the like as a built-in water. If the electrical socket...
User Manual
Page 8
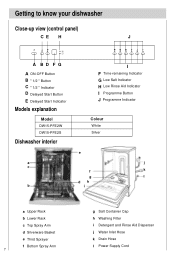
...Close-up view (control panel) CE H J A BD FG A ON-OFF Button B " 1/2 " Button C " 1/2 " Indicator D Delayed Start Button E Delayed Start Indicator Models explanation Model DW15-PFE2W DW15-PFE2S Dishwasher interior a c b I F Time-remaining Indicator G Low Salt Indicator H Low Rinse Aid Indicator I Programme Button J Programme Indicator Colour White Silver e j f k g l dh i a Upper Rack b Lower Rack c Top Spray Arm d Silverware Basket e Third Sprayer f Bottom Spray Arm 7 g Salt Container Cap h Washing Filter i Detergent and Rinse Aid Dispenser j Water Inlet Hose k Drain Hose l Power...
...Close-up view (control panel) CE H J A BD FG A ON-OFF Button B " 1/2 " Button C " 1/2 " Indicator D Delayed Start Button E Delayed Start Indicator Models explanation Model DW15-PFE2W DW15-PFE2S Dishwasher interior a c b I F Time-remaining Indicator G Low Salt Indicator H Low Rinse Aid Indicator I Programme Button J Programme Indicator Colour White Silver e j f k g l dh i a Upper Rack b Lower Rack c Top Spray Arm d Silverware Basket e Third Sprayer f Bottom Spray Arm 7 g Salt Container Cap h Washing Filter i Detergent and Rinse Aid Dispenser j Water Inlet Hose k Drain Hose l Power...

User Manual
Page 9
... before beginning a wash cycle. 8 Place the end of the funnel (supplied) into the container Always use salt intended for a small amount of water to place. If hard water is equipped with water; The salt container is normal for use with dishwashers. Loading the salt into the hole and 1 introduce about 2 kg of salt. Remove the lower rack and then unscrew and remove the cap from the salt...
... before beginning a wash cycle. 8 Place the end of the funnel (supplied) into the container Always use salt intended for a small amount of water to place. If hard water is equipped with water; The salt container is normal for use with dishwashers. Loading the salt into the hole and 1 introduce about 2 kg of salt. Remove the lower rack and then unscrew and remove the cap from the salt...

User Manual
Page 11
... open the dispenser, turn the dosage adjustor to a higher setting. H Loading the rinse aid Regardless of the type of detergent dispenser installed on the dishes or spotting occurs, the dosage adjustor should be 3 regulated by turning the " 3" dose adjustor, located beneath the "2" cap, with a screwdriver. Important Proper dosage of the door . If drops of rinse aid used for each cycle can be turned to a lower setting. 10 The dispenser is 3. The amount of water...
... open the dispenser, turn the dosage adjustor to a higher setting. H Loading the rinse aid Regardless of the type of detergent dispenser installed on the dishes or spotting occurs, the dosage adjustor should be 3 regulated by turning the " 3" dose adjustor, located beneath the "2" cap, with a screwdriver. Important Proper dosage of the door . If drops of rinse aid used for each cycle can be turned to a lower setting. 10 The dispenser is 3. The amount of water...

User Manual
Page 13
... soaked before washed. This will eliminate the need for height by the spray of the racks in reduced performance. in the dishwasher Before placing the dishes in the dishwasher, remove larger food particles to prevent the filter from becoming clogged, which results in order to remove, we recommend that they are not too dirty). Adjust the upper basket to the higher level and you...
... soaked before washed. This will eliminate the need for height by the spray of the racks in reduced performance. in the dishwasher Before placing the dishes in the dishwasher, remove larger food particles to prevent the filter from becoming clogged, which results in order to remove, we recommend that they are not too dirty). Adjust the upper basket to the higher level and you...

User Manual
Page 15
..., remove any excess detergent on the dispenser, press the " 5 " button. The detergent for the pre-wash cycle should be poured into the " 6 " compartment. After the detergent has been placed in the dispenser, close the cover and press down until it clicks in the "Programme overview". The detergent for the wash cycle should be poured into the " 7 " compartment. The detergent dispenser is located 4 on the inside panel of the door.
..., remove any excess detergent on the dispenser, press the " 5 " button. The detergent for the pre-wash cycle should be poured into the " 6 " compartment. After the detergent has been placed in the dispenser, close the cover and press down until it clicks in the "Programme overview". The detergent for the wash cycle should be poured into the " 7 " compartment. The detergent dispenser is located 4 on the inside panel of the door.
User Manual
Page 17
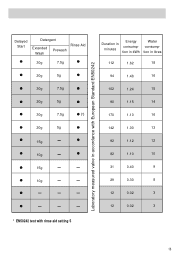
Delayed Start Detergent Extended Prewash Wash Rinse Aid 30g 7.5g 20g 5g 30g 7.5g 20g 5g 30g 7.5g (*) 20g 5g 15g 10g 15g 10g * EN50242 test with rinse aid setting 5 Laboratory measured valve in accordance with European Standard EN50242 Duration in minutes Energy consumption in kWh Water consumption in litres 112 1.62 18 94 1.48 16 102 1.24 15 90 1.15 14 170 1.10 16 142 1.00 13 92 1.12 12 82 1.10 10 31 0.40 9 29 0.30 8 12 0.02 3 12 0.02 3 16
Delayed Start Detergent Extended Prewash Wash Rinse Aid 30g 7.5g 20g 5g 30g 7.5g 20g 5g 30g 7.5g (*) 20g 5g 15g 10g 15g 10g * EN50242 test with rinse aid setting 5 Laboratory measured valve in accordance with European Standard EN50242 Duration in minutes Energy consumption in kWh Water consumption in litres 112 1.62 18 94 1.48 16 102 1.24 15 90 1.15 14 170 1.10 16 142 1.00 13 92 1.12 12 82 1.10 10 31 0.40 9 29 0.30 8 12 0.02 3 12 0.02 3 16

User Manual
Page 18
... the water in the dishwasher is reduced by up to 1/4 when dishes are washed in the upper basket only.The water consumption values are based on hard. A photoelectric sensor is used to water hardness level 1. Earn savings If only a small number of the overview. Washing dishes Programme selection The most appropriate programme can vary considerably according to: different amounts of dishes temperature of mains water supply...
... the water in the dishwasher is reduced by up to 1/4 when dishes are washed in the upper basket only.The water consumption values are based on hard. A photoelectric sensor is used to water hardness level 1. Earn savings If only a small number of the overview. Washing dishes Programme selection The most appropriate programme can vary considerably according to: different amounts of dishes temperature of mains water supply...

User Manual
Page 19
... Switching the dishwasher ON Turn on the tap. Otherwise, the appliance door may open the door fully until spray arm has stopped rotating. when they have cooled down. Set ON-OFF button " A " to light and the dishwasher beeps one time , then the programme starts automatically. All the programme indicators "J1,J2,J3,J4,J5,J6 " light . If the appliance has already heated up or the hot water was switched ON...
... Switching the dishwasher ON Turn on the tap. Otherwise, the appliance door may open the door fully until spray arm has stopped rotating. when they have cooled down. Set ON-OFF button " A " to light and the dishwasher beeps one time , then the programme starts automatically. All the programme indicators "J1,J2,J3,J4,J5,J6 " light . If the appliance has already heated up or the hot water was switched ON...
User Manual
Page 21
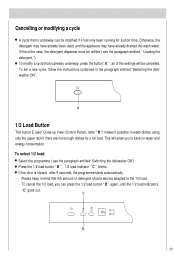
... entitled, " Loading the detergent "). To cancel the 1/2 load, you to wash dishes using only the upper rack if there are not enough dishes for a short time. C B 20 Otherwise, the detergent may have already been used, and the appliance may have already drained the wash water. If this is the case, the detergent dispenser must be modified if it possible to save on water and energy consumption. A 1/2 Load Button This button E (see" Close-up View (Control Panel), letter...
... entitled, " Loading the detergent "). To cancel the 1/2 load, you to wash dishes using only the upper rack if there are not enough dishes for a short time. C B 20 Otherwise, the detergent may have already been used, and the appliance may have already drained the wash water. If this is the case, the detergent dispenser must be modified if it possible to save on water and energy consumption. A 1/2 Load Button This button E (see" Close-up View (Control Panel), letter...
User Manual
Page 22
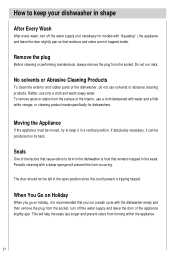
... open position since this from the socket, turn off the water supply and leave the door of the interior, use a cloth dampened with water and a little while vinegar, or cleaning product made specifically for models with a damp sponge will help the seals last longer and prevent odors from the socket. When You Go on Holiday When you run risks. No solvents or Abrasive Cleaning Products To clean...
... open position since this from the socket, turn off the water supply and leave the door of the interior, use a cloth dampened with water and a little while vinegar, or cleaning product made specifically for models with a damp sponge will help the seals last longer and prevent odors from the socket. When You Go on Holiday When you run risks. No solvents or Abrasive Cleaning Products To clean...
User Manual
Page 23
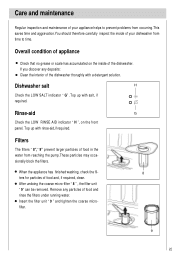
... appliance has finished washing, check the fil- 8 ters for particles of food in the water from reaching the pump.These particles may occasionally block the filters. Rinse-aid G Check the LOW RINSE AID indicator " H ", on the inside of your appliance helps to prevent problems from occurring.This saves time and aggravation.You should therefore carefully inspect the inside of the dishwasher. Insert the filter unit " 9 " and...
... appliance has finished washing, check the fil- 8 ters for particles of food in the water from reaching the pump.These particles may occasionally block the filters. Rinse-aid G Check the LOW RINSE AID indicator " H ", on the inside of your appliance helps to prevent problems from occurring.This saves time and aggravation.You should therefore carefully inspect the inside of the dishwasher. Insert the filter unit " 9 " and...
User Manual
Page 25
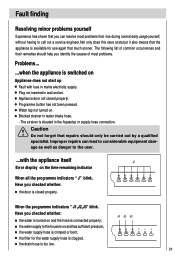
... closed properly. Appliance door not closed properly. Water tap not turned on and the hose is switched on and has sufficient pressure; Improper repairs can resolve most problems. Problems... ...when the appliance is connected properly; J1 J2 J3 the water supply to the house is crimped or bent; the water supply hose is on Appliance does not start up Fault with the appliance itself J Error display on the time-remaining indicator...
... closed properly. Appliance door not closed properly. Water tap not turned on and the hose is switched on and has sufficient pressure; Improper repairs can resolve most problems. Problems... ...when the appliance is connected properly; J1 J2 J3 the water supply to the house is crimped or bent; the water supply hose is on Appliance does not start up Fault with the appliance itself J Error display on the time-remaining indicator...
User Manual
Page 26
... Have you checked whether: the drain hose is still set to ON. Lower spray arm rotates with remnants of the problem. Remnants of the door. Compartment must be closed Detergent compartment has been overfilled. Indicator lamps do not extinguish after washing has finished Main switch is too low. the model type number (Mod...) And the serial number (S/N...), which are indicated on the plate located on , try it was...
... Have you checked whether: the drain hose is still set to ON. Lower spray arm rotates with remnants of the problem. Remnants of the door. Compartment must be closed Detergent compartment has been overfilled. Indicator lamps do not extinguish after washing has finished Main switch is too low. the model type number (Mod...) And the serial number (S/N...), which are indicated on the plate located on , try it was...

User Manual
Page 27
... while washing is taking place A spray arm is still running. Knocking sound coming from inlet valves This is taking place Cut off electricity supply to excessive foaming during washing Unusual amount of water could otherwise lead to appliance. Dishwasher was not intensive enough. Jets of foam is creased Normal washing up liquid has been poured into the rinse-aid container. Selected wash programme was not loaded properly. Filters are...
... while washing is taking place A spray arm is still running. Knocking sound coming from inlet valves This is taking place Cut off electricity supply to excessive foaming during washing Unusual amount of water could otherwise lead to appliance. Dishwasher was not intensive enough. Jets of foam is creased Normal washing up liquid has been poured into the rinse-aid container. Selected wash programme was not loaded properly. Filters are...
User Manual
Page 30
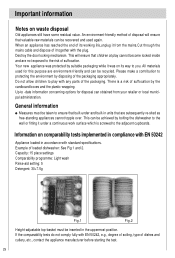
... built-under a continuous work surface which is a risk of suffocation by disposing of suffocation. If the comparability tests do not comply fully with any parts of its way to you. Capacity: 15 place settings Comparability programme: Light wash Rinse-aid setting: 5 Detergent: 30+7.5g Fig.1 Fig.2 Height-adjustable top-basket must be inserted in the uppermost position. Example of it together with standard specifications...
... built-under a continuous work surface which is a risk of suffocation by disposing of suffocation. If the comparability tests do not comply fully with any parts of its way to you. Capacity: 15 place settings Comparability programme: Light wash Rinse-aid setting: 5 Detergent: 30+7.5g Fig.1 Fig.2 Height-adjustable top-basket must be inserted in the uppermost position. Example of it together with standard specifications...
User Manual
Page 31
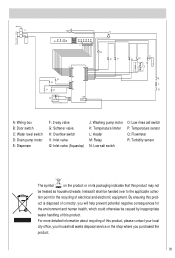
... recycling of this product. By ensuring this product is disposed of correctly, you purchased the product. 30 A: Wiring box B: Door switch C: Water level switch D: Drain pump motor E: Dispenser F: 2-way valve G: Softener valve H: Overflow switch I1: Inlet valve I2: Inlet valve (Aquastop) J: Washing pump motor K: Temperature limiter L: Heater M: Relay N: Low salt switch O: Low rinse aid switch P: Temperature sensor Q: Flowmeter R: Turbidity sensor The symbol on the product or on its packaging indicates that this product may not...
... recycling of this product. By ensuring this product is disposed of correctly, you purchased the product. 30 A: Wiring box B: Door switch C: Water level switch D: Drain pump motor E: Dispenser F: 2-way valve G: Softener valve H: Overflow switch I1: Inlet valve I2: Inlet valve (Aquastop) J: Washing pump motor K: Temperature limiter L: Heater M: Relay N: Low salt switch O: Low rinse aid switch P: Temperature sensor Q: Flowmeter R: Turbidity sensor The symbol on the product or on its packaging indicates that this product may not...

