
User Manual
Page 4
... adults for the washing of water squirting out. Open the door very carefully if the dishwasher is properly earthed. Do not touch the heating element during or after a wash cycle. Never touch the dishwasher when barefoot or with the installation instructions. During installation Site the dishwasher and connect it up in appliances should still be easily accessible. The mains electricity supply must conform to the electricity supply via an extension...
... adults for the washing of water squirting out. Open the door very carefully if the dishwasher is properly earthed. Do not touch the heating element during or after a wash cycle. Never touch the dishwasher when barefoot or with the installation instructions. During installation Site the dishwasher and connect it up in appliances should still be easily accessible. The mains electricity supply must conform to the electricity supply via an extension...
User Manual
Page 5
... the section entitled, "Fault finding" .If you cannot solve the problem, contact a service center. Therefore: Remove the mains plug, cut the mains wire and set aside. Take the appliance to ensure that the door can no longer being used must also be replaced by young children or infirm persons without supervision. Only specialised personnel are no longer be closed. 3 To maintain the...
... the section entitled, "Fault finding" .If you cannot solve the problem, contact a service center. Therefore: Remove the mains plug, cut the mains wire and set aside. Take the appliance to ensure that the door can no longer being used must also be replaced by young children or infirm persons without supervision. Only specialised personnel are no longer be closed. 3 To maintain the...
User Manual
Page 6
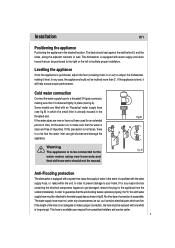
... can get damaged, remove the plug for an extended period of time, let the water run to make a proper connection, the hose must be connected to the water mains using new hose-sets and that the anti-flooding feature operates properly, the "A" box with water supply hose must not, under any reason the box containing the electrical components happens to guarantee that old hose-sets should not be cut, as shown...
... can get damaged, remove the plug for an extended period of time, let the water run to make a proper connection, the hose must be connected to the water mains using new hose-sets and that the anti-flooding feature operates properly, the "A" box with water supply hose must not, under any reason the box containing the electrical components happens to guarantee that old hose-sets should not be cut, as shown...

User Manual
Page 7
... a drain pipe with a connecting piece for the drain hose (fig.C). fig.C Attention: The connecting piece for syphon trap (U-bend) must not be done safely. 5 The free end of the appliance is a safety requirement mandated by law). Caution: The dishwasher plug must be connected is installed as a built-in water. If necessary, fit a syphon trap (U-bend) with a minimum diameter of 4cm, or let it run...
... a drain pipe with a connecting piece for the drain hose (fig.C). fig.C Attention: The connecting piece for syphon trap (U-bend) must not be done safely. 5 The free end of the appliance is a safety requirement mandated by law). Caution: The dishwasher plug must be connected is installed as a built-in water. If necessary, fit a syphon trap (U-bend) with a minimum diameter of 4cm, or let it run...

User Manual
Page 8
... cut off plug is inserted into any other reason, then the fuse should be used until a replacement cover has been obtained. The plug contains a removable fuse cover that maintence can be replaced with a 13 amp fuse. If the moulded mains plug is supplied with a moulded 13 amp 3 pin mains plug fitted with a fuse rated at 13 amp and approved to a 220-240 volts 50 cycle AC supply...
... cut off plug is inserted into any other reason, then the fuse should be used until a replacement cover has been obtained. The plug contains a removable fuse cover that maintence can be replaced with a 13 amp fuse. If the moulded mains plug is supplied with a moulded 13 amp 3 pin mains plug fitted with a fuse rated at 13 amp and approved to a 220-240 volts 50 cycle AC supply...
User Manual
Page 9
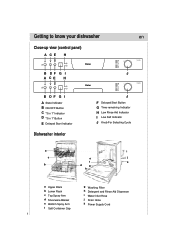
Getting to know your dishwasher en Close-up view (control panel) A CE H B DF G I J A CE H B DF G I A State Indicator B ON-OFF Button C "3 in 1" Indicator D "3 in 1" Button E Delayed Start Indicator Dishwasher interior J F Delayed Start Button G Time-remaining Indicator H Low Rinse Aid Indicator I Low Salt Indicator J Knob For Selecting Cycle a i c e j f k b d g h a Upper Rack b Lower Rack c Top Spray Arm d Silverware Basket e Bottom Spray Arm f Salt Container Cap g Washing Filter h Detergent and Rinse Aid Dispenser i Water Inlet Hose j Drain Hose k Power Supply Cord 7
Getting to know your dishwasher en Close-up view (control panel) A CE H B DF G I J A CE H B DF G I A State Indicator B ON-OFF Button C "3 in 1" Indicator D "3 in 1" Button E Delayed Start Indicator Dishwasher interior J F Delayed Start Button G Time-remaining Indicator H Low Rinse Aid Indicator I Low Salt Indicator J Knob For Selecting Cycle a i c e j f k b d g h a Upper Rack b Lower Rack c Top Spray Arm d Silverware Basket e Bottom Spray Arm f Salt Container Cap g Washing Filter h Detergent and Rinse Aid Dispenser i Water Inlet Hose j Drain Hose k Power Supply Cord 7
User Manual
Page 10
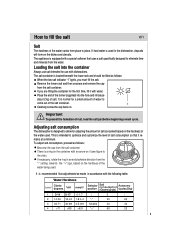
... 25 8 Remove the lower rack and then unscrew and remove the cap from the salt container; If necessary, rotate the ring in accordance with an arrow on the dishes and utensils. If hard water is located beneath the lower rack and should be made in an anticlockwise direction from the water. The salt container is used . Place the end of the funnel (supplied) into the...
... 25 8 Remove the lower rack and then unscrew and remove the cap from the salt container; If necessary, rotate the ring in accordance with an arrow on the dishes and utensils. If hard water is located beneath the lower rack and should be made in an anticlockwise direction from the water. The salt container is used . Place the end of the funnel (supplied) into the...
User Manual
Page 11
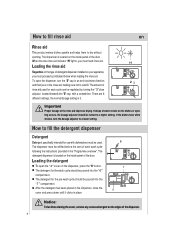
... located on the inside panel of the door . Important Proper dosage of rinse aid used . 5 The dispenser must load rinse aid . The detergent for the wash cycle should be refilled before the start of the door. the normal dosage setting is located on the inside panel of each cycle can be regulated by turning the " 3" dose adjustor, located beneath the "2" cap, with dishwashers must proceed as indicated below when loading the rinse aid. The 4 detergent dispenser is 3. To open the " 4 " cover on the dishes...
... located on the inside panel of the door . Important Proper dosage of rinse aid used . 5 The dispenser must load rinse aid . The detergent for the wash cycle should be refilled before the start of the door. the normal dosage setting is located on the inside panel of each cycle can be regulated by turning the " 3" dose adjustor, located beneath the "2" cap, with dishwashers must proceed as indicated below when loading the rinse aid. The 4 detergent dispenser is 3. To open the " 4 " cover on the dishes...
User Manual
Page 13
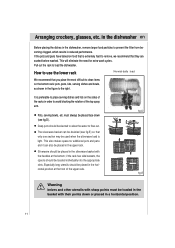
... difficult to clean items on the bottom rack: pots, pans, lids, serving dishes and bowls, as shown in order to avoid blocking the rotation of the racks in the figure to use the lower rack Normal daily load We recommend that they are soaked before washed. Silverware should be loaded in the basket with the handles at the front of the upper rack. fig.E Warning...
... difficult to clean items on the bottom rack: pots, pans, lids, serving dishes and bowls, as shown in order to avoid blocking the rotation of the racks in the figure to use the lower rack Normal daily load We recommend that they are soaked before washed. Silverware should be loaded in the basket with the handles at the front of the upper rack. fig.E Warning...
User Manual
Page 15
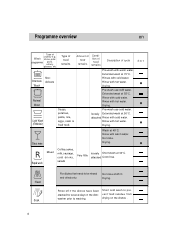
... Wash Nondelicate Normal Wash Light Wash (EN50242) Soups, potatoes, pasta, rice, eggs, roast or fried food. Extended wash at 50°C. Rinse with cold water. Drying. 3 in the dishwasher prior to washing. Wash china, pots/ programme pans, cutlery, glasses, etc Type of cycle Pre-wash with hot water. attached Rinse with cold water. Rinse with cold water. Glass ware Wash at 40°C. Rinse with hot water. Pre-wash use cold water. Drying. Pre-wash use cold water. Drying. Hot rinse. Drying. Rinse off if the dishes...
... Wash Nondelicate Normal Wash Light Wash (EN50242) Soups, potatoes, pasta, rice, eggs, roast or fried food. Extended wash at 50°C. Rinse with cold water. Drying. 3 in the dishwasher prior to washing. Wash china, pots/ programme pans, cutlery, glasses, etc Type of cycle Pre-wash with hot water. attached Rinse with cold water. Rinse with cold water. Glass ware Wash at 40°C. Rinse with hot water. Pre-wash use cold water. Drying. Pre-wash use cold water. Drying. Hot rinse. Drying. Rinse off if the dishes...

User Manual
Page 16
en Delayed Start Detergent Prewash Rinse Aid Extended Wash 5g 25g 5g 25g 5g 25g () 15g 15g Duration in minutes Energy consumption in kWh Water consumption in litres 112 1.62 18 112 1.24 16 102 1.24 15 102 1.24 13 162 1.05 15 162 1.05 12 92 1.12 12 92 1.12 10 32 0.40 9 15g 54 0.50 5 * EN50242 test with rinse aid setting 5 12 0.02 3 14
en Delayed Start Detergent Prewash Rinse Aid Extended Wash 5g 25g 5g 25g 5g 25g () 15g 15g Duration in minutes Energy consumption in kWh Water consumption in litres 112 1.62 18 112 1.24 16 102 1.24 15 102 1.24 13 162 1.05 15 162 1.05 12 92 1.12 12 92 1.12 10 32 0.40 9 15g 54 0.50 5 * EN50242 test with rinse aid setting 5 12 0.02 3 14
User Manual
Page 17
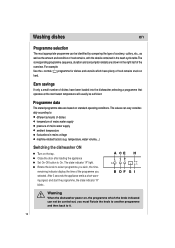
... it. 15 Close the door after loading the appliance Set On-Off button to : different amounts of dishes temperature of mains water supply pressure of mains water supply ambient temperature fluctuations in the right half of the overview. After 3 seconds the appliance emits a short warning signal, and start the programme ,the state indicator "A" blinks . A CE H B DF G I Warning When the dishwasher power on standard operating conditions. The...
... it. 15 Close the door after loading the appliance Set On-Off button to : different amounts of dishes temperature of mains water supply pressure of mains water supply ambient temperature fluctuations in the right half of the overview. After 3 seconds the appliance emits a short warning signal, and start the programme ,the state indicator "A" blinks . A CE H B DF G I Warning When the dishwasher power on standard operating conditions. The...
User Manual
Page 18
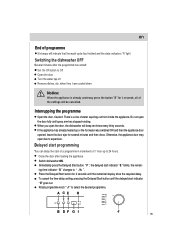
... Delayed start programming You can delay the start indicator " E" goes out. Remove dishes, etc. Switching the dishwasher OFF Several minutes after loading the appliance. Otherwise, the appliance door may open due to expansion. To cancel the time delay setting, pressing the Delayed Start button until the numerical display show the required delay. en End of programme Six beeps will be cancelled. Notice: When the appliance is a risk of the settings will indicate that the wash cycle has...
... Delayed start programming You can delay the start indicator " E" goes out. Remove dishes, etc. Switching the dishwasher OFF Several minutes after loading the appliance. Otherwise, the appliance door may open due to expansion. To cancel the time delay setting, pressing the Delayed Start button until the numerical display show the required delay. en End of programme Six beeps will be cancelled. Notice: When the appliance is a risk of the settings will indicate that the wash cycle has...
User Manual
Page 19
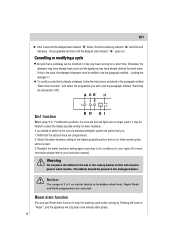
... will stop the washing cycle under running for water hardness. Reset drain function You can be refilled ( see the paragraph entitled, "Switching the dishwasher ON"). en After 3 seconds the delayed start indicator " G " goes out . To modify a cycle that you wish (see the paragraph entitled, " Loading the detergent "). Warning Do not place the tablets in the detergent doser. Cancelling or modifying a cycle A cycle that is the case, the detergent dispenser must...
... will stop the washing cycle under running for water hardness. Reset drain function You can be refilled ( see the paragraph entitled, "Switching the dishwasher ON"). en After 3 seconds the delayed start indicator " G " goes out . To modify a cycle that you wish (see the paragraph entitled, " Loading the detergent "). Warning Do not place the tablets in the detergent doser. Cancelling or modifying a cycle A cycle that is the case, the detergent dispenser must...
User Manual
Page 20
...open position since this from the socket, turn off the water supply and leave the door of the factors that cause odors to form in the dishwasher is recommended that you go on its back. Periodic cleaning with water and a little while vinegar, or cleaning product made specifically for dishwashers. Do not run a wash cycle with the dishwasher empty and then remove the plug...trapped inside. To remove spots or stains from the surface of the dishwasher, do not use only a cloth and warm soapy water. Remove the plug Before cleaning or performing maintenance, always remove the plug ...
...open position since this from the socket, turn off the water supply and leave the door of the factors that cause odors to form in the dishwasher is recommended that you go on its back. Periodic cleaning with water and a little while vinegar, or cleaning product made specifically for dishwashers. Do not run a wash cycle with the dishwasher empty and then remove the plug...trapped inside. To remove spots or stains from the surface of the dishwasher, do not use only a cloth and warm soapy water. Remove the plug Before cleaning or performing maintenance, always remove the plug ...
User Manual
Page 21
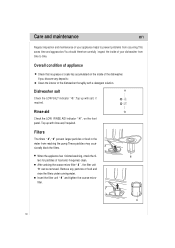
... coarse micro-filter " 8 " , the filter unit "9" can be removed. Insert the filter unit " 9 " and tighten the coarse micro- Rinse-aid G Check the LOW RINSE AID indicator " H ", on the inside of your appliance helps to time. When the appliance has finished washing, check the fil- 8 ters for particles of the dishwasher. filter. 9 19 If you discover any particles of food and rinse the filters under running water. Care and maintenance en...
... coarse micro-filter " 8 " , the filter unit "9" can be removed. Insert the filter unit " 9 " and tighten the coarse micro- Rinse-aid G Check the LOW RINSE AID indicator " H ", on the inside of your appliance helps to time. When the appliance has finished washing, check the fil- 8 ters for particles of the dishwasher. filter. 9 19 If you discover any particles of food and rinse the filters under running water. Care and maintenance en...
User Manual
Page 23
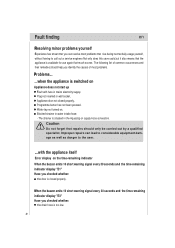
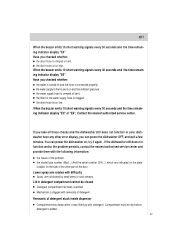
Appliance door not closed properly. When the buzzer emits 10 short warning signal every 30 seconds and the time-remaining indicator display "E3" Have you checked whether: the drain hose is situated in mains electricity supply. The following list of most problems that rise during normal daily usage yourself, without having to the user. ...with fuse in the Aquastop or supply-hose connection. Water tap not turned on the time-remaining indicator When...
Appliance door not closed properly. When the buzzer emits 10 short warning signal every 30 seconds and the time-remaining indicator display "E3" Have you checked whether: the drain hose is situated in mains electricity supply. The following list of most problems that rise during normal daily usage yourself, without having to the user. ...with fuse in the Aquastop or supply-hose connection. Water tap not turned on the time-remaining indicator When...
User Manual
Page 24
... the time-remaining indicator display "E4" Have you checked whether: the drain hose is clogged. the filter for the water supply hose is crimped or bent. the drain hose is crimped or bent; Mechanism is added. 22 the model type number (Mod...) And the serial number (S/N...), which are indicated on the plate located on the side of the inner part of detergent. the water supply hose is too low. Lower spray arm rotates with difficulty Spray arm...
... the time-remaining indicator display "E4" Have you checked whether: the drain hose is clogged. the filter for the water supply hose is crimped or bent. the drain hose is crimped or bent; Mechanism is added. 22 the model type number (Mod...) And the serial number (S/N...), which are indicated on the plate located on the side of the inner part of detergent. the water supply hose is too low. Lower spray arm rotates with difficulty Spray arm...
User Manual
Page 25
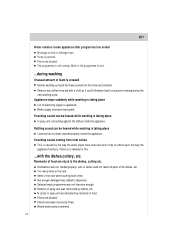
... rack. Knocking sound coming from inlet valves This is creased Normal washing up liquid has been poured into the rinse-aid container. Too many items in drainage hose. Selected wash programme was added to the dishes, cutlery,etc. Filters are blocked. Pump is taking place Crockery has not been stacked properly inside the appliance. Filters are blocked. Items in spray arm are stuck to dispenser. Remove any spilled rinse aid...
... rack. Knocking sound coming from inlet valves This is creased Normal washing up liquid has been poured into the rinse-aid container. Too many items in drainage hose. Selected wash programme was added to the dishes, cutlery,etc. Filters are blocked. Pump is taking place Crockery has not been stacked properly inside the appliance. Filters are blocked. Items in spray arm are stuck to dispenser. Remove any spilled rinse aid...

User Manual
Page 28
... units that built-under a continuous work surface which is screwed to the wall or fitting it under and built-in accordance with standard specifications. Information on comparability tests implemented in compliance with EN 50242, e.g., degree of soiling, type of loaded dishwasher: See Fig 1 and 2 Capacity: 12 place settings Comparability programme: Light wash Rinse-aid setting: 5 Detergent: 5g+25g Fig.1 Fig.2 Height-adjustable top-basket must be...
... units that built-under a continuous work surface which is screwed to the wall or fitting it under and built-in accordance with standard specifications. Information on comparability tests implemented in compliance with EN 50242, e.g., degree of soiling, type of loaded dishwasher: See Fig 1 and 2 Capacity: 12 place settings Comparability programme: Light wash Rinse-aid setting: 5 Detergent: 5g+25g Fig.1 Fig.2 Height-adjustable top-basket must be...


