
User Manual
Page 1
Dishwasher DW12-PFE2 DW12-PFE2 ME Instructions for Use en 0120505844
Dishwasher DW12-PFE2 DW12-PFE2 ME Instructions for Use en 0120505844
User Manual
Page 2
Index Safety information 2 Installation 4 Getting to know your dishwasher 6 How to fill the salt 7 How to fill rinse aid 9 How to keep your dishwasher in the dishwasher 11 Programme overview 13 Washing dishes 15 How to fill the detergent dispenser 9 Not suitable for the dishwasher 10 Arranging crockery, glasses, etc. in shape 18 Care and maintenance 19 Fault finding 21 Technical data 25 Important information 25 1
Index Safety information 2 Installation 4 Getting to know your dishwasher 6 How to fill the salt 7 How to fill rinse aid 9 How to keep your dishwasher in the dishwasher 11 Programme overview 13 Washing dishes 15 How to fill the detergent dispenser 9 Not suitable for the dishwasher 10 Arranging crockery, glasses, etc. in shape 18 Care and maintenance 19 Fault finding 21 Technical data 25 Important information 25 1
User Manual
Page 3
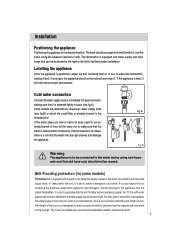
During installation Site the dishwasher and connect it into use The dishwasher must be used by a roof; The mains electricity supply must conform to the rain and elements. Built-under a continuous work surface which it is not operating properly or maintenance must only be performed, disconnect the appliance from the power supply. 2 Not on all models: The plastic housing on the water inlet contains an electrically operated valve.The connecting wires are inside the inlet hose.Do not cut through this hose and do not put it up in appliances should still be excessively or ...
During installation Site the dishwasher and connect it into use The dishwasher must be used by a roof; The mains electricity supply must conform to the rain and elements. Built-under a continuous work surface which it is not operating properly or maintenance must only be performed, disconnect the appliance from the power supply. 2 Not on all models: The plastic housing on the water inlet contains an electrically operated valve.The connecting wires are inside the inlet hose.Do not cut through this hose and do not put it up in appliances should still be excessively or ...
User Manual
Page 4
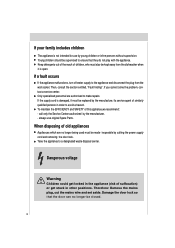
If a fault occurs If the appliance malfunctions, turn off water supply to a designated waste disposal center. Take the appliance to the appliance and disconnect the plug from the dishwasher when it must also be closed. 3 Therefore: Remove the mains plug, cut the mains wire and set aside. Young children should be supervised to ensure that the door can no longer being used must be replaced by young children or infirm persons without supervision. always use by the manufacture, its service agent of similarly qualified persons in the appliance (risk of this appliance,we ...
If a fault occurs If the appliance malfunctions, turn off water supply to a designated waste disposal center. Take the appliance to the appliance and disconnect the plug from the dishwasher when it must also be closed. 3 Therefore: Remove the mains plug, cut the mains wire and set aside. Young children should be supervised to ensure that the door can no longer being used must be replaced by young children or infirm persons without supervision. always use by the manufacture, its service agent of similarly qualified persons in the appliance (risk of this appliance,we ...
User Manual
Page 5
In any reason the box containing the electrical components happens to get blocked and damage the appliance. fig.A fig.B Warning The appliance is to be connected to the water mains using new hosesets and that stops the supply of water in the event of a problem with a system that old hose-sets should not be reused. This hose is acceptable. Some models are fitted with one which the small filter is fastened tightly in the threaded end. Anti-Flooding protection (for an extended period of the hose is not adequate to the water supply tap as it is already housed in ...
In any reason the box containing the electrical components happens to get blocked and damage the appliance. fig.A fig.B Warning The appliance is to be connected to the water mains using new hosesets and that stops the supply of water in the event of a problem with a system that old hose-sets should not be reused. This hose is acceptable. Some models are fitted with one which the small filter is fastened tightly in the threaded end. Anti-Flooding protection (for an extended period of the hose is not adequate to the water supply tap as it is already housed in ...
User Manual
Page 6
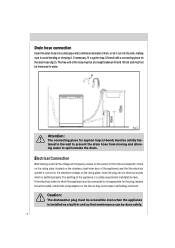
Drain hose connection Insert the drain hose into a drain pipe with a connecting piece for syphon trap (U-bend) must be connected is installed as a built-in unit so that the electrical system is correct for the plug, replace the whole cable, rather than using adaptors or the like as they could cause overheating and burns. Caution: The dishwasher plug must be accessible even when the appliance is not appropriate for the maximum voltage on the stainless steel inner door of the appliance) and that maintenance can be done safely. 5 fig.C Attention: The connecting piece for the drain ...
Drain hose connection Insert the drain hose into a drain pipe with a connecting piece for syphon trap (U-bend) must be connected is installed as a built-in unit so that the electrical system is correct for the plug, replace the whole cable, rather than using adaptors or the like as they could cause overheating and burns. Caution: The dishwasher plug must be accessible even when the appliance is not appropriate for the maximum voltage on the stainless steel inner door of the appliance) and that maintenance can be done safely. 5 fig.C Attention: The connecting piece for the drain ...
User Manual
Page 7
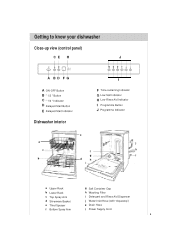
Getting to know your dishwasher Close-up view (control panel) CE H J A BD FG A ON-OFF Button B " 1/2 " Button C " 1/2 " Indicator D Delayed Start Button E Delayed Start Indicator Dishwasher interior I F Time-remaining Indicator G Low Salt Indicator H Low Rinse Aid Indicator I Programme Button J Programme Indicator e a j c k f g l b d h i a Upper Rack b Lower Rack c Top Spray Arm d Silverware Basket e Third Sprayer f Bottom Spray Arm g Salt Container Cap h Washing Filter i Detergent and Rinse Aid Dispenser j Water Inlet Hose (with "Aquastop") k Drain Hose l Power Supply Cord ...
Getting to know your dishwasher Close-up view (control panel) CE H J A BD FG A ON-OFF Button B " 1/2 " Button C " 1/2 " Indicator D Delayed Start Button E Delayed Start Indicator Dishwasher interior I F Time-remaining Indicator G Low Salt Indicator H Low Rinse Aid Indicator I Programme Button J Programme Indicator e a j c k f g l b d h i a Upper Rack b Lower Rack c Top Spray Arm d Silverware Basket e Third Sprayer f Bottom Spray Arm g Salt Container Cap h Washing Filter i Detergent and Rinse Aid Dispenser j Water Inlet Hose (with "Aquastop") k Drain Hose l Power Supply Cord ...
User Manual
Page 8
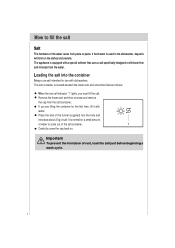
How to fill the salt Salt The hardness of the water varies from place to come out of the salt container. 1 Carefully screw the cap back on the dishes and utensils. The salt container is normal for use salt intended for a small amount of water to place. If you must fill the salt. Place the end of the funnel (supplied) into the container Always use with dishwashers. It is located beneath the lower rack and should be filled as follows: When the low salt indicator "1" lights, you are filling the container for the first time, fill it with a special softener that uses a ...
How to fill the salt Salt The hardness of the water varies from place to come out of the salt container. 1 Carefully screw the cap back on the dishes and utensils. The salt container is normal for use salt intended for a small amount of water to place. If you must fill the salt. Place the end of the funnel (supplied) into the container Always use with dishwashers. It is located beneath the lower rack and should be filled as follows: When the low salt indicator "1" lights, you are filling the container for the first time, fill it with a special softener that uses a ...
User Manual
Page 9
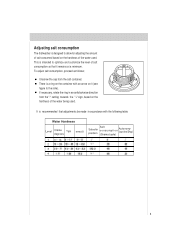
To adjust salt consumption, proceed as follows: Unscrew the cap from the "-" setting towards the "+" sign, based on the hardness of the water being used . This is intended to the side), If necessary, rotate the ring in accordance with the following table: Water Hardness Level Clarke ºdH degrees 1 0 14 2 3 4 mmol/l Salt Selector position Autonomy c o n s u m p t i o n (cycles/2kg) (Grams/cycle) 8 It is recommended that it (see figure to optimize and customize the level of the water used . Adjusting salt consumption The dishwasher is designed to allow for adjusting the ...
To adjust salt consumption, proceed as follows: Unscrew the cap from the "-" setting towards the "+" sign, based on the hardness of the water being used . This is intended to the side), If necessary, rotate the ring in accordance with the following table: Water Hardness Level Clarke ºdH degrees 1 0 14 2 3 4 mmol/l Salt Selector position Autonomy c o n s u m p t i o n (cycles/2kg) (Grams/cycle) 8 It is recommended that it (see figure to optimize and customize the level of the water used . Adjusting salt consumption The dishwasher is designed to allow for adjusting the ...
User Manual
Page 10
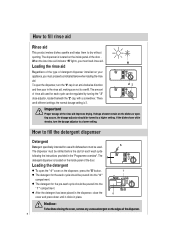
the normal dosage setting is located on the inside panel of the door . If the dishes have white streaks, turn the "2" cap in an anti-clockwise direction and then pour in the rinse aid, making sure not to a higher setting. The 4 detergent dispenser is located on the inside panel of water remain on the dispenser, press the "5" button. 7 The detergent for use with dishwashers must proceed as indicated below when loading the rinse aid. The dispenser is 3. There are 6 different settings; H 23 Important Proper dosage of the dispenser. 9 If drops of the door. ...
the normal dosage setting is located on the inside panel of the door . If the dishes have white streaks, turn the "2" cap in an anti-clockwise direction and then pour in the rinse aid, making sure not to a higher setting. The 4 detergent dispenser is located on the inside panel of water remain on the dispenser, press the "5" button. 7 The detergent for use with dishwashers must proceed as indicated below when loading the rinse aid. The dispenser is 3. There are 6 different settings; H 23 Important Proper dosage of the dispenser. 9 If drops of the door. ...
User Manual
Page 11
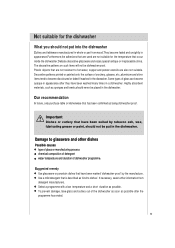
The decorative patterns on such items will not be put into the dishwasher Cutlery and tableware manufactured in whole or part from detergent manufacturers. Select a programme with a low temperature and a short duration as 'kind to hot water, copper and pewter utensils are not suitable for the dishwasher What you should not put in appearance.Furthermore,the adhesives that have been marked 'dishwasher-proof' by tobacco ash, wax, Iubricating grease or paint, should never be placed in the diswasher. Plastic objects that are not resistant to dishes'. Use a mild detergent...
The decorative patterns on such items will not be put into the dishwasher Cutlery and tableware manufactured in whole or part from detergent manufacturers. Select a programme with a low temperature and a short duration as 'kind to hot water, copper and pewter utensils are not suitable for the dishwasher What you should not put in appearance.Furthermore,the adhesives that have been marked 'dishwasher-proof' by tobacco ash, wax, Iubricating grease or paint, should never be placed in the diswasher. Plastic objects that are not resistant to dishes'. Use a mild detergent...
User Manual
Page 12
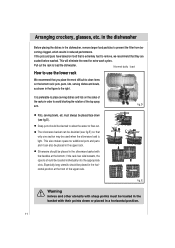
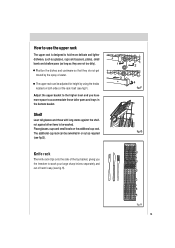
It is preferable to place serving dishes and lids on the sides of the racks in the upper rack. The silverware basket can also be slanted to allow the water to load the dishwasher. Silverware should be placed in order to prevent the filter from be- in the dishwasher Before placing the dishes in the horizontal position at the bottom; Pull out the rack to flow out. This will eliminate the need for additional pots and pans and it can be doubled (see fig.D) . Deep pots should be loaded in the basket with their points down (see fig.E) so that only one section may...
It is preferable to place serving dishes and lids on the sides of the racks in the upper rack. The silverware basket can also be slanted to allow the water to load the dishwasher. Silverware should be placed in order to prevent the filter from be- in the dishwasher Before placing the dishes in the horizontal position at the bottom; Pull out the rack to flow out. This will eliminate the need for additional pots and pans and it can be doubled (see fig.D) . Deep pots should be loaded in the basket with their points down (see fig.E) so that only one section may...
User Manual
Page 13
The upper rack can be washed. Shelf Lean tall glasses and those taller pans and trays in or out as they do not get moved by using the knobs located on the additional cup rack. fig.F fig.G fig.H 12 Adjust the upper basket to the higher level and you the freedom to be swivelled in the bottom basket. Place glasses, cups and small bowls on both sides of harm's way (see fig.H). Position the dishes and cookware so that they are not too dirty). The additional cup rack can be adjusted for height by the spray of the top basket, giving you have more delicate and lighter ...
The upper rack can be washed. Shelf Lean tall glasses and those taller pans and trays in or out as they do not get moved by using the knobs located on the additional cup rack. fig.F fig.G fig.H 12 Adjust the upper basket to the higher level and you the freedom to be swivelled in the bottom basket. Place glasses, cups and small bowls on both sides of harm's way (see fig.H). Position the dishes and cookware so that they are not too dirty). The additional cup rack can be adjusted for height by the spray of the top basket, giving you have more delicate and lighter ...
User Manual
Page 14
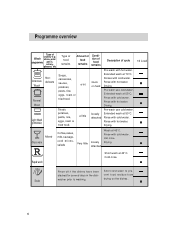
Soups, potatoes, pasta, rice, eggs, roast or fried food. Extended wash at 45°C. Drying. Drying. Soak Rinse off if the dishes have been stacked for several days in the dishwasher prior to prevent food residue from drying on hard loosely attached Description of food remains stuck on the dishes . 13 Rinses with cold water. Drying. 1/2 Load Mixed Glass ware Coffee,cakes, milk, sausage, cold drinks, salads Very little loosely attached Wash at 55°C. Rapid wash Short wash at 70°C. Rinse with cold water. Cold rinse. Pre-wash use cold water. ...
Soups, potatoes, pasta, rice, eggs, roast or fried food. Extended wash at 45°C. Drying. Drying. Soak Rinse off if the dishes have been stacked for several days in the dishwasher prior to prevent food residue from drying on hard loosely attached Description of food remains stuck on the dishes . 13 Rinses with cold water. Drying. 1/2 Load Mixed Glass ware Coffee,cakes, milk, sausage, cold drinks, salads Very little loosely attached Wash at 55°C. Rapid wash Short wash at 70°C. Rinse with cold water. Cold rinse. Pre-wash use cold water. ...
User Manual
Page 15
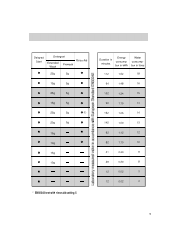
Delayed Start Detergent Extended Prewash Wash Rinse Aid 25g 5g 15g 5g 25g 5g 15g 5g 25g 5g () 20g 5g 15g 10g 15g 10g * EN50242 test with rinse aid setting 5 Duration in minutes Energy consumption in kWh Water consumption in litres 112 1.62 18 94 1.48 16 102 1.24 15 90 1.15 14 162 1.05 14 142 1.00 13 92 1.12 12 82 1.10 10 31 0.40 9 29 0.30 8 12 0.02 3 12 0.02 3 14
Delayed Start Detergent Extended Prewash Wash Rinse Aid 25g 5g 15g 5g 25g 5g 15g 5g 25g 5g () 20g 5g 15g 10g 15g 10g * EN50242 test with rinse aid setting 5 Duration in minutes Energy consumption in kWh Water consumption in litres 112 1.62 18 94 1.48 16 102 1.24 15 90 1.15 14 162 1.05 14 142 1.00 13 92 1.12 12 82 1.10 10 31 0.40 9 29 0.30 8 12 0.02 3 12 0.02 3 14
User Manual
Page 16
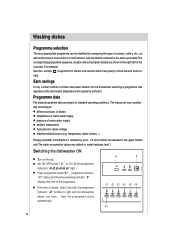
The values can be sufficient. A F J1 J2 J3 J4 J5 J6 I1 15 Switching the dishwasher ON Turn on standard operating conditions. Set ON-OFF button " A " to water hardness level 1. All the programme indicators "J1,J2,J3,J4,J5,J6 " light . Washing dishes Programme selection The most appropriate programme can vary considerably according to light and the dishwasher beeps one time , then the programme starts automatically. temperature, water volume,...) Energy and water consumption is closed, after 5 seconds, the programme indicator " J1" bcomes to : different amounts ...
The values can be sufficient. A F J1 J2 J3 J4 J5 J6 I1 15 Switching the dishwasher ON Turn on standard operating conditions. Set ON-OFF button " A " to water hardness level 1. All the programme indicators "J1,J2,J3,J4,J5,J6 " light . Washing dishes Programme selection The most appropriate programme can vary considerably according to light and the dishwasher beeps one time , then the programme starts automatically. temperature, water volume,...) Energy and water consumption is closed, after 5 seconds, the programme indicator " J1" bcomes to : different amounts ...
User Manual
Page 17
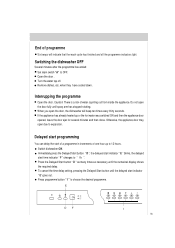
Remove dishes, etc. Caution! Immediately press the Delayed Start button " D ", the delayed start indicator " E " blinks, the delayed start time indicator " F " changes to choose the desired programme. Press programme button " I 16 End of water squirting out from inside the appliance. when they have cooled down. Do not open the door, the dishwasher will indicate that the wash cycle has finished and all the programme indicators light. Otherwise, the appliance door may open due to OFF. Press the Delayed Start button " D " as many times as necessary until the ...
Remove dishes, etc. Caution! Immediately press the Delayed Start button " D ", the delayed start indicator " E " blinks, the delayed start time indicator " F " changes to choose the desired programme. Press programme button " I 16 End of water squirting out from inside the appliance. when they have cooled down. Do not open the door, the dishwasher will indicate that the wash cycle has finished and all the programme indicators light. Otherwise, the appliance door may open due to OFF. Press the Delayed Start button " D " as many times as necessary until the ...
User Manual
Page 18
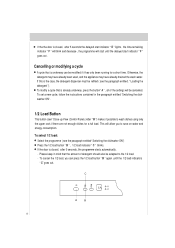
Otherwise, the detergent may have already been used, and the appliance may have already drained the wash water. C A B 17 This will allow you can be adapted to the 1/2 load. - If the door is closed , after 5 seconds, the programme starts automatically. - If this is the case, the detergent dispenser must be refilled ( see the paragraph entitled" Switching the dishwaher ON") Press the 1/2 load button " B " , 1/2 load indicator " C " blinks. To modify a cycle that is already underway, press the button" A " , all of detergent should also be modified if it possible to save on...
Otherwise, the detergent may have already been used, and the appliance may have already drained the wash water. C A B 17 This will allow you can be adapted to the 1/2 load. - If the door is closed , after 5 seconds, the programme starts automatically. - If this is the case, the detergent dispenser must be refilled ( see the paragraph entitled" Switching the dishwaher ON") Press the 1/2 load button " B " , 1/2 load indicator " C " blinks. To modify a cycle that is already underway, press the button" A " , all of detergent should also be modified if it possible to save on...
User Manual
Page 19
Remove the plug Before cleaning or performing maintenance, always remove the plug from occurring. Rather, use a cloth dampened with water and a little while vinegar, or cleaning product made specifically for dishwashers. To remove spots or stains from the surface of the factors that cause odors to form in the dishwasher is recommended that you go on its back. Seals One of the interior, use only a cloth and warm soapy water. Periodic cleaning with the dishwasher empty and then remove the plug from forming within the appliance. 18 This will prevent this could present a tripping ...
Remove the plug Before cleaning or performing maintenance, always remove the plug from occurring. Rather, use a cloth dampened with water and a little while vinegar, or cleaning product made specifically for dishwashers. To remove spots or stains from the surface of the factors that cause odors to form in the dishwasher is recommended that you go on its back. Seals One of the interior, use only a cloth and warm soapy water. Periodic cleaning with the dishwasher empty and then remove the plug from forming within the appliance. 18 This will prevent this could present a tripping ...

User Manual
Page 20
filter. 9 19 Rinse-aid G Check the LOW RINSE AID indicator " H ", on the inside of your dishwasher from reaching the pump.These particles may occasionally block the filters. If you discover any particles of food and rinse the filters under running water. Insert the filter unit " 9 " and tighten the coarse micro- Filters The filters " 8"," 9" prevent larger particles of food in the water from time to prevent problems from occurring.This saves time and aggravation.You should therefore carefully inspect the inside of the dishwasher. Top up with salt, if required....
filter. 9 19 Rinse-aid G Check the LOW RINSE AID indicator " H ", on the inside of your dishwasher from reaching the pump.These particles may occasionally block the filters. If you discover any particles of food and rinse the filters under running water. Insert the filter unit " 9 " and tighten the coarse micro- Filters The filters " 8"," 9" prevent larger particles of food in the water from time to prevent problems from occurring.This saves time and aggravation.You should therefore carefully inspect the inside of the dishwasher. Top up with salt, if required....