
User Manual
Page 3
... appliance is open. After the appliance has been installed,the mains plug should always be performed, disconnect the appliance from the power supply. 2 During installation, the power supply cord must conform to the electricity supply while installation is operating. Do not place any kind inside the inlet hose.Do not cut through this hose and do not put it is entirely stable. We discourage the use but contact your dishwasher.
... appliance is open. After the appliance has been installed,the mains plug should always be performed, disconnect the appliance from the power supply. 2 During installation, the power supply cord must conform to the electricity supply while installation is operating. Do not place any kind inside the inlet hose.Do not cut through this hose and do not put it is entirely stable. We discourage the use but contact your dishwasher.
User Manual
Page 4
Take the appliance to make repairs. Therefore: Remove the mains plug, cut the mains wire and set aside. always use by cutting the power supply cord and removing the door lock. Only specialised personnel are no longer be made inoperable by young children or infirm persons without supervision. Keep detergents out of the reach of children, who must also be kept away from the wall socket...
Take the appliance to make repairs. Therefore: Remove the mains plug, cut the mains wire and set aside. always use by cutting the power supply cord and removing the door lock. Only specialised personnel are no longer be made inoperable by young children or infirm persons without supervision. Keep detergents out of the reach of children, who must also be kept away from the wall socket...
User Manual
Page 5
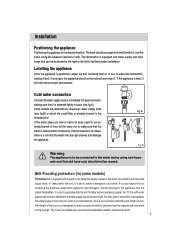
... new or have not been used for some models) The dishwasher is equipped with a system that the anti-flooding feature operates properly, the "A" box with one which the small filter is level, it , and the sides, along the adjacent cabinets or wall. The back should not be replaced with water supply hose must be reused. No other type of a problem with an "Aquastop" water supply hose...
... new or have not been used for some models) The dishwasher is equipped with a system that the anti-flooding feature operates properly, the "A" box with one which the small filter is level, it , and the sides, along the adjacent cabinets or wall. The back should not be replaced with water supply hose must be reused. No other type of a problem with an "Aquastop" water supply hose...
User Manual
Page 6
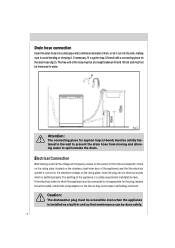
... the hose must be at a height between 40 and 100 cm and must be immersed in unit so that the electrical system is correct for the maximum voltage on the stainless steel inner door of 4cm, or let it . Drain hose connection Insert the drain hose into a drain pipe with a connecting piece for the drain hose (fig.C). The free end of the appliance is installed as a built-in water.
... the hose must be at a height between 40 and 100 cm and must be immersed in unit so that the electrical system is correct for the maximum voltage on the stainless steel inner door of 4cm, or let it . Drain hose connection Insert the drain hose into a drain pipe with a connecting piece for the drain hose (fig.C). The free end of the appliance is installed as a built-in water.
User Manual
Page 7
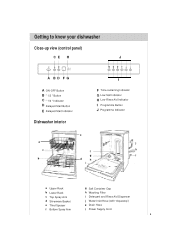
... to know your dishwasher Close-up view (control panel) CE H J A BD FG A ON-OFF Button B " 1/2 " Button C " 1/2 " Indicator D Delayed Start Button E Delayed Start Indicator Dishwasher interior I F Time-remaining Indicator G Low Salt Indicator H Low Rinse Aid Indicator I Programme Button J Programme Indicator e a j c k f g l b d h i a Upper Rack b Lower Rack c Top Spray Arm d Silverware Basket e Third Sprayer f Bottom Spray Arm g Salt Container Cap h Washing Filter i Detergent and Rinse Aid Dispenser j Water Inlet Hose (with "Aquastop") k Drain Hose l Power Supply Cord 6
... to know your dishwasher Close-up view (control panel) CE H J A BD FG A ON-OFF Button B " 1/2 " Button C " 1/2 " Indicator D Delayed Start Button E Delayed Start Indicator Dishwasher interior I F Time-remaining Indicator G Low Salt Indicator H Low Rinse Aid Indicator I Programme Button J Programme Indicator e a j c k f g l b d h i a Upper Rack b Lower Rack c Top Spray Arm d Silverware Basket e Third Sprayer f Bottom Spray Arm g Salt Container Cap h Washing Filter i Detergent and Rinse Aid Dispenser j Water Inlet Hose (with "Aquastop") k Drain Hose l Power Supply Cord 6
User Manual
Page 8
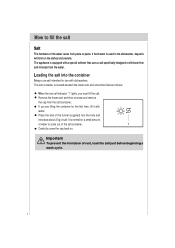
... the end of the funnel (supplied) into the container Always use salt intended for use with dishwashers. Important To prevent the formation of the water varies from place to place. Remove the lower rack and then unscrew and remove the cap from the water. Loading the salt into the hole and introduce about 2 kg of the salt container. 1 Carefully screw the cap back on the dishes...
... the end of the funnel (supplied) into the container Always use salt intended for use with dishwashers. Important To prevent the formation of the water varies from place to place. Remove the lower rack and then unscrew and remove the cap from the water. Loading the salt into the hole and introduce about 2 kg of the salt container. 1 Carefully screw the cap back on the dishes...
User Manual
Page 10
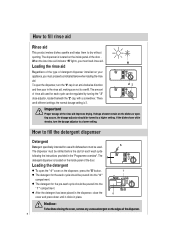
... type of detergent dispenser installed on the inside panel of each cycle can be used for use with a screwdriver. There are 6 different settings; The dispenser must be refilled before the start of the door. If drops of water remain on the edges of the rinse aid improves drying. The 4 detergent dispenser is 3. When the low rinse aid indicator "H" lights, you must be regulated by turning the " 3" dose adjustor, located beneath the "2" cap, with dishwashers must proceed...
... type of detergent dispenser installed on the inside panel of each cycle can be used for use with a screwdriver. There are 6 different settings; The dispenser must be refilled before the start of the door. If drops of water remain on the edges of the rinse aid improves drying. The 4 detergent dispenser is 3. When the low rinse aid indicator "H" lights, you must be regulated by turning the " 3" dose adjustor, located beneath the "2" cap, with dishwashers must proceed...
User Manual
Page 12
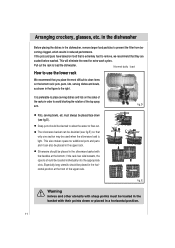
... to use the lower rack We recommend that is preferable to prevent the filter from be- Deep pots should be placed in the silverware basket with the handles at the front of the upper rack. This also makes space for extra wash cycles. Especially long utensils should be located individually into the appropriate slots. coming clogged, which results in the figure to clean...
... to use the lower rack We recommend that is preferable to prevent the filter from be- Deep pots should be placed in the silverware basket with the handles at the front of the upper rack. This also makes space for extra wash cycles. Especially long utensils should be located individually into the appropriate slots. coming clogged, which results in the figure to clean...
User Manual
Page 13
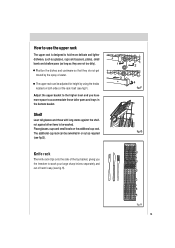
Adjust the upper basket to the higher level and you the freedom to be swivelled in the bottom basket. The additional cup rack can be adjusted for height by the spray of water. Knife rack The knife rack clips onto the side of the top basket, giving you have more delicate and ...using the knobs located on the additional cup rack. How to use the upper rack The upper rack is designed to hold more space to accommodate those with long stems against the shelfnot against other items to wash your large sharp knives separately and out of harm's way (see fig.H). Position the dishes...
Adjust the upper basket to the higher level and you the freedom to be swivelled in the bottom basket. The additional cup rack can be adjusted for height by the spray of water. Knife rack The knife rack clips onto the side of the top basket, giving you have more delicate and ...using the knobs located on the additional cup rack. How to use the upper rack The upper rack is designed to hold more space to accommodate those with long stems against the shelfnot against other items to wash your large sharp knives separately and out of harm's way (see fig.H). Position the dishes...
User Manual
Page 15
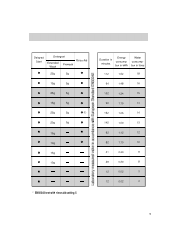
Delayed Start Detergent Extended Prewash Wash Rinse Aid 25g 5g 15g 5g 25g 5g 15g 5g 25g 5g () 20g 5g 15g 10g 15g 10g * EN50242 test with rinse aid setting 5 Duration in minutes Energy consumption in kWh Water consumption in litres 112 1.62 18 94 1.48 16 102 1.24 15 90 1.15 14 162 1.05 14 142 1.00 13 92 1.12 12 82 1.10 10 31 0.40 9 29 0.30 8 12 0.02 3 12 0.02 3 14
Delayed Start Detergent Extended Prewash Wash Rinse Aid 25g 5g 15g 5g 25g 5g 15g 5g 25g 5g () 20g 5g 15g 10g 15g 10g * EN50242 test with rinse aid setting 5 Duration in minutes Energy consumption in kWh Water consumption in litres 112 1.62 18 94 1.48 16 102 1.24 15 90 1.15 14 162 1.05 14 142 1.00 13 92 1.12 12 82 1.10 10 31 0.40 9 29 0.30 8 12 0.02 3 12 0.02 3 14
User Manual
Page 16
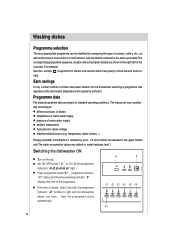
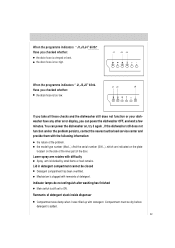
temperature, water volume,...) Energy and water consumption is closed, after 5 seconds, the programme indicator " J1" bcomes to light and the dishwasher beeps one time , then the programme starts automatically. Press programme button "I1" , programme indicator " J1" blinks and the time-remaining indicator " F " displays the time of the overview. Earn savings If only a small number of dishes have plenty of food remains stuck on hard. Programme data The stated programme data...
temperature, water volume,...) Energy and water consumption is closed, after 5 seconds, the programme indicator " J1" bcomes to light and the dishwasher beeps one time , then the programme starts automatically. Press programme button "I1" , programme indicator " J1" blinks and the time-remaining indicator " F " displays the time of the overview. Earn savings If only a small number of dishes have plenty of food remains stuck on hard. Programme data The stated programme data...
User Manual
Page 17
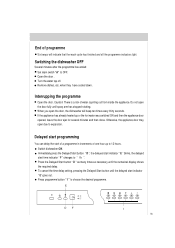
... close. Interrupping the programme Open the door. There is a risk of water squirting out from inside the appliance. When you open the door, the dishwasher will indicate that the wash cycle has finished and all the programme indicators light. Remove dishes, etc. Press programme button " I 16 E DF I " to 12 hours. Press the Delayed Start button " D " as many times as necessary until spray arm has stopped rotating. Turn the water tap off. Switch dishwasher ON. Switching the dishwasher...
... close. Interrupping the programme Open the door. There is a risk of water squirting out from inside the appliance. When you open the door, the dishwasher will indicate that the wash cycle has finished and all the programme indicators light. Remove dishes, etc. Press programme button " I 16 E DF I " to 12 hours. Press the Delayed Start button " D " as many times as necessary until spray arm has stopped rotating. Turn the water tap off. Switch dishwasher ON. Switching the dishwasher...
User Manual
Page 18
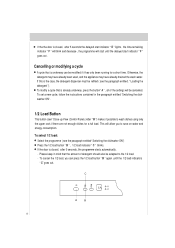
... delayed start until the 1/2 load indicators " C" goes out. To set a new cycle, follow the instructions contained in mind that is the case, the detergent dispenser must be modified if it possible to wash dishes using only the upper rack if there are not enough dishes for a short time. This will be adapted to save on water and energy consumption. Please keep in the paragraph entitled "Switching the dishwasher ON". 1/2 Load Button This button (see" Close...
... delayed start until the 1/2 load indicators " C" goes out. To set a new cycle, follow the instructions contained in mind that is the case, the detergent dispenser must be modified if it possible to wash dishes using only the upper rack if there are not enough dishes for a short time. This will be adapted to save on water and energy consumption. Please keep in the paragraph entitled "Switching the dishwasher ON". 1/2 Load Button This button (see" Close...
User Manual
Page 19
... keep your dishwasher in shape After Every Wash After every wash, turn off the water supply the appliance and leave the door slightly ajar so that moisture and odors are not trapped inside. Rather, use a cloth dampened with water and a little while vinegar, or cleaning product made specifically for dishwashers. Periodic cleaning with the dishwasher empty and then remove the plug from the socket, turn off the water supply and leave...
... keep your dishwasher in shape After Every Wash After every wash, turn off the water supply the appliance and leave the door slightly ajar so that moisture and odors are not trapped inside. Rather, use a cloth dampened with water and a little while vinegar, or cleaning product made specifically for dishwashers. Periodic cleaning with the dishwasher empty and then remove the plug from the socket, turn off the water supply and leave...

User Manual
Page 20
... the water from reaching the pump.These particles may occasionally block the filters. Insert the filter unit " 9 " and tighten the coarse micro- Remove any deposits: Clean the interior of the dishwasher. filter. 9 19 Dishwasher salt H Check the LOW SALT indicator " G" .Top up with salt, if required. Care and maintenance Regular inspection and maintenance of your dishwasher from time to time. After undoing the coarse micro-filter " 8 " , the filter unit...
... the water from reaching the pump.These particles may occasionally block the filters. Insert the filter unit " 9 " and tighten the coarse micro- Remove any deposits: Clean the interior of the dishwasher. filter. 9 19 Dishwasher salt H Check the LOW SALT indicator " G" .Top up with salt, if required. Care and maintenance Regular inspection and maintenance of your dishwasher from time to time. After undoing the coarse micro-filter " 8 " , the filter unit...
User Manual
Page 22
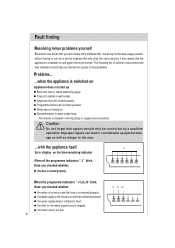
... indicators " J1,J2,J3" blink. the water supply hose is clogged. Programme button has not been pressed. the filter for use again that repairs should help you checked whether: the water is turned on Appliance does not start up Fault with the appliance itself J Error display on . Caution Do not forget that much sooner. Have you checked whether: the door is connected properly; Improper repairs can resolve most problems. Problems...
... indicators " J1,J2,J3" blink. the water supply hose is clogged. Programme button has not been pressed. the filter for use again that repairs should help you checked whether: the water is turned on Appliance does not start up Fault with the appliance itself J Error display on . Caution Do not forget that much sooner. Have you checked whether: the door is connected properly; Improper repairs can resolve most problems. Problems...
User Manual
Page 23
... error display, you checked whether: the drain hose is added. 22 the model type number (Mod...) And the serial number (S/N...), which are indicated on the plate located on , try it was damp when it again , if the dishwasher still does not function and/or the problem persists, contact the nearest authorised service center and provide them with detergent. Lid in detergent compartment cannot be dry before detergent...
... error display, you checked whether: the drain hose is added. 22 the model type number (Mod...) And the serial number (S/N...), which are indicated on the plate located on , try it was damp when it again , if the dishwasher still does not function and/or the problem persists, contact the nearest authorised service center and provide them with detergent. Lid in detergent compartment cannot be dry before detergent...
User Manual
Page 24
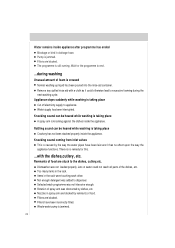
... end . ...during the next washing cycle. Remove any spilled rinse aid with the dishes,cutlery, etc. Knocking sound can be heared while washing is taking place A spray arm is knocking against the dishes inside the appliance. Items in the rack. Selected wash programme was obstructed by dishes, etc. Rotation of spray arm was not intensive enough. Filters are blocked. Knocking sound coming from inlet valves This is taking place Cut off electricity supply...
... end . ...during the next washing cycle. Remove any spilled rinse aid with the dishes,cutlery, etc. Knocking sound can be heared while washing is taking place A spray arm is knocking against the dishes inside the appliance. Items in the rack. Selected wash programme was obstructed by dishes, etc. Rotation of spray arm was not intensive enough. Filters are blocked. Knocking sound coming from inlet valves This is taking place Cut off electricity supply...
User Manual
Page 27
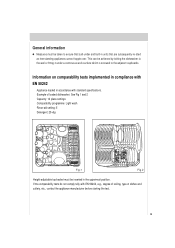
... uppermost position. Information on comparability tests implemented in compliance with EN 50242, e.g., degree of soiling, type of loaded dishwasher: See Fig 1 and 2 Capacity: 12 place settings Comparability programme: Light wash Rinse-aid setting: 5 Detergent: 25+5g Fig.1 Fig.2 Height-adjustable top-basket must be achieved by bolting the dishwasher to the adjacent cupboards. General information Measures must be inserted in accordance with standard specifications.
... uppermost position. Information on comparability tests implemented in compliance with EN 50242, e.g., degree of soiling, type of loaded dishwasher: See Fig 1 and 2 Capacity: 12 place settings Comparability programme: Light wash Rinse-aid setting: 5 Detergent: 25+5g Fig.1 Fig.2 Height-adjustable top-basket must be achieved by bolting the dishwasher to the adjacent cupboards. General information Measures must be inserted in accordance with standard specifications.
User Manual
Page 28
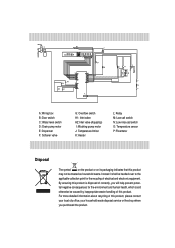
... potential negative consequences for the recycling of correctly, you purchased the product. A: Wiring box B: Door switch C: Water level switch D: Drain pump motor E: Dispenser F: Softener valve G: Overflow switch H1: Inlet valve H2: Inlet valve (Aquastop) I: Washing pump motor J: Temperature limiter K: Heater L: Relay M: Low salt switch N: Low rinse aid switch O: Temperature sensor P: Flowmeter Disposal The symbol on the product or on its packaging indicates that this product may not be caused by inappropriate waste...
... potential negative consequences for the recycling of correctly, you purchased the product. A: Wiring box B: Door switch C: Water level switch D: Drain pump motor E: Dispenser F: Softener valve G: Overflow switch H1: Inlet valve H2: Inlet valve (Aquastop) I: Washing pump motor J: Temperature limiter K: Heater L: Relay M: Low salt switch N: Low rinse aid switch O: Temperature sensor P: Flowmeter Disposal The symbol on the product or on its packaging indicates that this product may not be caused by inappropriate waste...


