
User Manual
Page 1
Dishwasher DW12-PFE2 DW12-PFE2 ME Instructions for Use en 0120505844
Dishwasher DW12-PFE2 DW12-PFE2 ME Instructions for Use en 0120505844
User Manual
Page 2
in the dishwasher 11 Programme overview 13 Washing dishes 15 How to fill the detergent dispenser 9 Not suitable for the dishwasher 10 Arranging crockery, glasses, etc. Index Safety information 2 Installation 4 Getting to know your dishwasher 6 How to fill the salt 7 How to fill rinse aid 9 How to keep your dishwasher in shape 18 Care and maintenance 19 Fault finding 21 Technical data 25 Important information 25 1
in the dishwasher 11 Programme overview 13 Washing dishes 15 How to fill the detergent dispenser 9 Not suitable for the dishwasher 10 Arranging crockery, glasses, etc. Index Safety information 2 Installation 4 Getting to know your dishwasher 6 How to fill the salt 7 How to fill rinse aid 9 How to keep your dishwasher in shape 18 Care and maintenance 19 Fault finding 21 Technical data 25 Important information 25 1
User Manual
Page 3
... installation is properly earthed. The water inside your supplier or customer service without delay. Open the door very carefully if the dishwasher is open. The dishwasher must conform to follow when using the appliance: - Built-under a continuous work surface which it is installed is also very... not be performed, disconnect the appliance from the power supply. 2 The appliance could cause an explosion danger. Do not connect the dishwasher to the rain and elements. If the appliance is not suitable for signs of transport damage. During installation, the power supply cord ...
... installation is properly earthed. The water inside your supplier or customer service without delay. Open the door very carefully if the dishwasher is open. The dishwasher must conform to follow when using the appliance: - Built-under a continuous work surface which it is installed is also very... not be performed, disconnect the appliance from the power supply. 2 The appliance could cause an explosion danger. Do not connect the dishwasher to the rain and elements. If the appliance is not suitable for signs of transport damage. During installation, the power supply cord ...
User Manual
Page 4
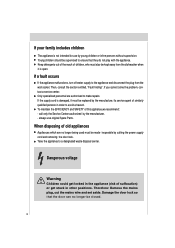
... children The appliance is open. If a fault occurs If the appliance malfunctions, turn off water supply to the appliance and disconnect the plug from the dishwasher when it must be closed. 3 Only specialised personnel are no longer be replaced by the manufacturer. - To maintain the EFFICIENCY and SAFETY of similarly qualified...
... children The appliance is open. If a fault occurs If the appliance malfunctions, turn off water supply to the appliance and disconnect the plug from the dishwasher when it must be closed. 3 Only specialised personnel are no longer be replaced by the manufacturer. - To maintain the EFFICIENCY and SAFETY of similarly qualified...
User Manual
Page 5
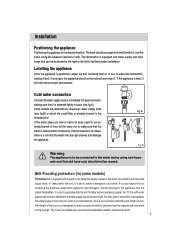
...socket immediately. If for any circumstances, be cut, as shown in the desired location. Anti-Flooding protection (for some models) The dishwasher is long enough. In order to facilitate proper installation. If the length of connection is positioned, adjust the feet (screwing them ... are live. Installation Positioning the appliance Positioning the appliance in fig.B. Cold water connection Connect the water supply hose to your home. The dishwasher is fastened tightly in place (see fig.B) in order to prevent damage to a threaded 3/4 (gas) connector, making it , and ...
...socket immediately. If for any circumstances, be cut, as shown in the desired location. Anti-Flooding protection (for some models) The dishwasher is long enough. In order to facilitate proper installation. If the length of connection is positioned, adjust the feet (screwing them ... are live. Installation Positioning the appliance Positioning the appliance in fig.B. Cold water connection Connect the water supply hose to your home. The dishwasher is fastened tightly in place (see fig.B) in order to prevent damage to a threaded 3/4 (gas) connector, making it , and ...
User Manual
Page 6
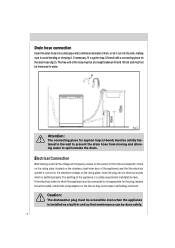
... plug, replace the whole cable, rather than using adaptors or the like as a built-in the home correspond to spill outside the drain. Caution: The dishwasher plug must be immersed in water. If necessary, fit a syphon trap (U-bend) with a minimum diameter of 4cm, or let it . The free end of the...
... plug, replace the whole cable, rather than using adaptors or the like as a built-in the home correspond to spill outside the drain. Caution: The dishwasher plug must be immersed in water. If necessary, fit a syphon trap (U-bend) with a minimum diameter of 4cm, or let it . The free end of the...
User Manual
Page 7
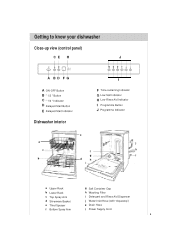
...-up view (control panel) CE H J A BD FG A ON-OFF Button B " 1/2 " Button C " 1/2 " Indicator D Delayed Start Button E Delayed Start Indicator Dishwasher interior I F Time-remaining Indicator G Low Salt Indicator H Low Rinse Aid Indicator I Programme Button J Programme Indicator e a j c k f g l b d h i a Upper Rack b Lower Rack c Top Spray Arm d Silverware Basket e Third ...
...-up view (control panel) CE H J A BD FG A ON-OFF Button B " 1/2 " Button C " 1/2 " Indicator D Delayed Start Button E Delayed Start Indicator Dishwasher interior I F Time-remaining Indicator G Low Salt Indicator H Low Rinse Aid Indicator I Programme Button J Programme Indicator e a j c k f g l b d h i a Upper Rack b Lower Rack c Top Spray Arm d Silverware Basket e Third ...
User Manual
Page 8
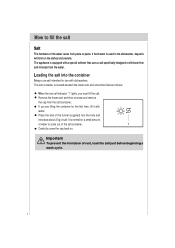
... lower rack and should be filled as follows: When the low salt indicator "1" lights, you are filling the container for use with dishwashers. The salt container is used in the dishwasher, deposits will form on . Remove the lower rack and then unscrew and remove the cap from the water. Loading the salt...
... lower rack and should be filled as follows: When the low salt indicator "1" lights, you are filling the container for use with dishwashers. The salt container is used in the dishwasher, deposits will form on . Remove the lower rack and then unscrew and remove the cap from the water. Loading the salt...
User Manual
Page 9
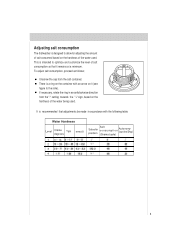
... adjust salt consumption, proceed as follows: Unscrew the cap from the "-" setting towards the "+" sign, based on it remains at a minimum. Adjusting salt consumption The dishwasher is recommended that it (see figure to optimize and customize the level of the water being used . There is intended to the side), If necessary...
... adjust salt consumption, proceed as follows: Unscrew the cap from the "-" setting towards the "+" sign, based on it remains at a minimum. Adjusting salt consumption The dishwasher is recommended that it (see figure to optimize and customize the level of the water being used . There is intended to the side), If necessary...
User Manual
Page 10
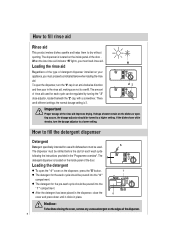
... setting. The dispenser is located on the inside panel of each cycle can be regulated by turning the " 3" dose adjustor, located beneath the "2" cap, with dishwashers must load rinse aid . H 23 Important Proper dosage of the dispenser. 9 The dispenser must proceed as indicated below when loading the rinse aid. If the...
... setting. The dispenser is located on the inside panel of each cycle can be regulated by turning the " 3" dose adjustor, located beneath the "2" cap, with dishwashers must load rinse aid . H 23 Important Proper dosage of the dispenser. 9 The dispenser must proceed as indicated below when loading the rinse aid. If the...
User Manual
Page 11
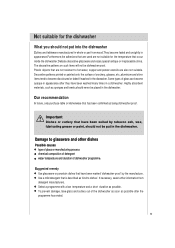
... In future, only purchase table or kitchenware that is described as possible after they have been marked 'dishwasher-proof' by tobacco ash, wax, Iubricating grease or paint, should not be dishwasher-proof. To prevent damage, take glass and cutlery out of glass can become discoloured or faded if... that have been washed many times in the diswasher. The decorative patterns on such items will not be put into the dishwasher Cutlery and tableware manufactured in whole or part from detergent manufacturers. Suggested remedy Use glassware or porcelain dishes that occur inside the...
... In future, only purchase table or kitchenware that is described as possible after they have been marked 'dishwasher-proof' by tobacco ash, wax, Iubricating grease or paint, should not be dishwasher-proof. To prevent damage, take glass and cutlery out of glass can become discoloured or faded if... that have been washed many times in the diswasher. The decorative patterns on such items will not be put into the dishwasher Cutlery and tableware manufactured in whole or part from detergent manufacturers. Suggested remedy Use glassware or porcelain dishes that occur inside the...
User Manual
Page 12
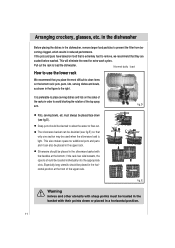
Arranging crockery, glasses, etc. in the dishwasher Before placing the dishes in the figure to clean items on the sides of the racks in the horizontal position at the ... is preferable to place serving dishes and lids on the bottom rack: pots, pans, lids, serving dishes and bowls, as shown in the dishwasher, remove larger food particles to flow out. Especially long utensils should be placed face down or placed in reduced performance. Pull out the rack...to allow the water to prevent the filter from be- The silverware basket can also be placed in order to load the dishwasher.
Arranging crockery, glasses, etc. in the dishwasher Before placing the dishes in the figure to clean items on the sides of the racks in the horizontal position at the ... is preferable to place serving dishes and lids on the bottom rack: pots, pans, lids, serving dishes and bowls, as shown in the dishwasher, remove larger food particles to flow out. Especially long utensils should be placed face down or placed in reduced performance. Pull out the rack...to allow the water to prevent the filter from be- The silverware basket can also be placed in order to load the dishwasher.
User Manual
Page 14
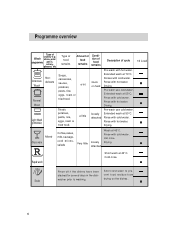
.... Extended wash at 40°C. Rinse with cold water. Cold rinse. Soak Rinse off if the dishes have been stacked for several days in the dishwasher prior to prevent food residue from drying on hard loosely attached Description of cycle Pre-wash with cold water. Drying. Hot rinse. Rapid wash Short...
.... Extended wash at 40°C. Rinse with cold water. Cold rinse. Soak Rinse off if the dishes have been stacked for several days in the dishwasher prior to prevent food residue from drying on hard loosely attached Description of cycle Pre-wash with cold water. Drying. Hot rinse. Rapid wash Short...
User Manual
Page 16
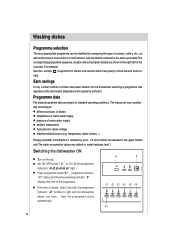
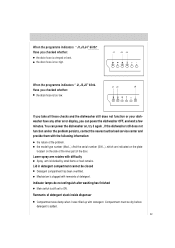
...up to water hardness level 1. Programme data The stated programme data are washed in the right half of food remains stuck on hard. Switching the dishwasher ON Turn on standard operating conditions. Press programme button "I1" , programme indicator " J1" blinks and the time-remaining indicator " F " ...mains voltage machine-related factors (e.g. A F J1 J2 J3 J4 J5 J6 I1 15 Set ON-OFF button " A " to light and the dishwasher beeps one time , then the programme starts automatically. The values can be sufficient. Earn savings If only a small number of dishes have plenty ...
...up to water hardness level 1. Programme data The stated programme data are washed in the right half of food remains stuck on hard. Switching the dishwasher ON Turn on standard operating conditions. Press programme button "I1" , programme indicator " J1" blinks and the time-remaining indicator " F " ...mains voltage machine-related factors (e.g. A F J1 J2 J3 J4 J5 J6 I1 15 Set ON-OFF button " A " to light and the dishwasher beeps one time , then the programme starts automatically. The values can be sufficient. Earn savings If only a small number of dishes have plenty ...
User Manual
Page 17
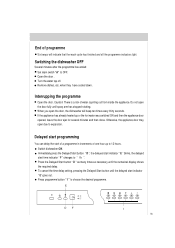
Open the door . There is a risk of water squirting out from inside the appliance. Otherwise, the appliance door may open the door, the dishwasher will indicate that the wash cycle has finished and all the programme indicators light. Press the Delayed Start button " D " as many times as necessary until ... can delay the start indicator " E" goes out. E DF I " to " ". when they have cooled down. If the appliance has already heated up to OFF. Switching the dishwasher OFF Several minutes after the programme has ended: Set main switch "A" to 12 hours. Switch...
Open the door . There is a risk of water squirting out from inside the appliance. Otherwise, the appliance door may open the door, the dishwasher will indicate that the wash cycle has finished and all the programme indicators light. Press the Delayed Start button " D " as many times as necessary until ... can delay the start indicator " E" goes out. E DF I " to " ". when they have cooled down. If the appliance has already heated up to OFF. Switching the dishwasher OFF Several minutes after the programme has ended: Set main switch "A" to 12 hours. Switch...
User Manual
Page 18
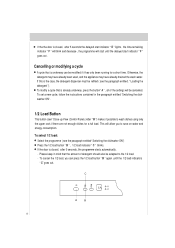
... to wash dishes using only the upper rack if there are not enough dishes for a short time. Please keep in the paragraph entitled "Switching the dishwasher ON". 1/2 Load Button This button (see" Close-up View (Control Panel), letter " B ") makes it has only been running for a full load. Otherwise, the detergent may...
... to wash dishes using only the upper rack if there are not enough dishes for a short time. Please keep in the paragraph entitled "Switching the dishwasher ON". 1/2 Load Button This button (see" Close-up View (Control Panel), letter " B ") makes it has only been running for a full load. Otherwise, the detergent may...
User Manual
Page 19
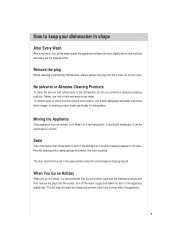
...remove the plug from the socket, turn off the water supply and leave the door of the factors that cause odors to form in the dishwasher is recommended that remains trapped in shape After Every Wash After every wash, turn off the water supply the appliance and leave the door slightly... open position since this from forming within the appliance. 18 No solvents or Abrasive Cleaning Products To clean the exterior and rubber parts of the dishwasher, do not use only a cloth and warm soapy water. To remove spots or stains from the surface of the interior, use a cloth dampened with ...
...remove the plug from the socket, turn off the water supply and leave the door of the factors that cause odors to form in the dishwasher is recommended that remains trapped in shape After Every Wash After every wash, turn off the water supply the appliance and leave the door slightly... open position since this from forming within the appliance. 18 No solvents or Abrasive Cleaning Products To clean the exterior and rubber parts of the dishwasher, do not use only a cloth and warm soapy water. To remove spots or stains from the surface of the interior, use a cloth dampened with ...

User Manual
Page 20
...no grease or scale has accumulated on the front panel. Top up with salt, if required. Insert the filter unit " 9 " and tighten the coarse micro- Dishwasher salt H Check the LOW SALT indicator " G" .Top up with a detergent solution. After undoing the coarse micro-filter " 8 " , the filter unit ... washing, check the fil- 8 ters for particles of food and, if required, clean. Remove any deposits: Clean the interior of the dishwasher thorughly with rinse-aid,if required. Filters The filters " 8"," 9" prevent larger particles of food in the water from time to prevent problems...
...no grease or scale has accumulated on the front panel. Top up with salt, if required. Insert the filter unit " 9 " and tighten the coarse micro- Dishwasher salt H Check the LOW SALT indicator " G" .Top up with a detergent solution. After undoing the coarse micro-filter " 8 " , the filter unit ... washing, check the fil- 8 ters for particles of food and, if required, clean. Remove any deposits: Clean the interior of the dishwasher thorughly with rinse-aid,if required. Filters The filters " 8"," 9" prevent larger particles of food in the water from time to prevent problems...
User Manual
Page 23
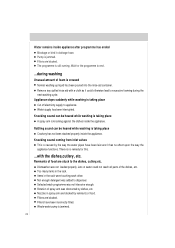
... number (Mod...) And the serial number (S/N...), which are indicated on the plate located on , try it was damp when it again , if the dishwasher still does not function and/or the problem persists, contact the nearest authorised service center and provide them with difficulty Spray arm is added. 22.... J1 J2 J6 Have you checked whether: the drain hose is clogged with detergent. Mechanism is too low. Have you can power the dishwasher on the side of the inner part of detergent stuck inside dispenser Compartment was filled up with remnants of the problem. If you take all...
... number (Mod...) And the serial number (S/N...), which are indicated on the plate located on , try it was damp when it again , if the dishwasher still does not function and/or the problem persists, contact the nearest authorised service center and provide them with difficulty Spray arm is added. 22.... J1 J2 J6 Have you checked whether: the drain hose is clogged with detergent. Mechanism is too low. Have you can power the dishwasher on the side of the inner part of detergent stuck inside dispenser Compartment was filled up with remnants of the problem. If you take all...
User Manual
Page 24
... no effect upon the way the appliance functions. Pump is jammed. 23 Filters are blocked. Remove any spilled rinse aid with the dishes,cutlery, etc. Dishwasher was obstructed by remnants of food are stuck to excessive foaming during washing Unusual amount of foam is knocking against the dishes inside the appliance...
... no effect upon the way the appliance functions. Pump is jammed. 23 Filters are blocked. Remove any spilled rinse aid with the dishes,cutlery, etc. Dishwasher was obstructed by remnants of food are stuck to excessive foaming during washing Unusual amount of foam is knocking against the dishes inside the appliance...


