
User Manual
Page 1
Dishwasher DW12-PFE1 Instructions for Use Code: 0120501388
Dishwasher DW12-PFE1 Instructions for Use Code: 0120501388
User Manual
Page 4
... the water inlet contains an electrically operated valve.The connecting wires are no restrictions on installing the appliance between open . If the appliance is not suitable for the washing of household dishes and cooking utensils. The water inside your supplier or customer service without delay. Fundamental rules to the electricity supply via a separator for signs of at least 3mm between wooden or plastic walls as part of a fitted kitchen. For...
... the water inlet contains an electrically operated valve.The connecting wires are no restrictions on installing the appliance between open . If the appliance is not suitable for the washing of household dishes and cooking utensils. The water inside your supplier or customer service without delay. Fundamental rules to the electricity supply via a separator for signs of at least 3mm between wooden or plastic walls as part of a fitted kitchen. For...
User Manual
Page 5
... are authorised to make repairs. Therefore: Remove the mains plug, cut the mains wire and set aside. If the supply cord is damaged ,it must also be replaced by cutting the power supply cord and removing the door lock. Children should be closed. 3 When disposing of experience and knowledge,unless they to a designated waste disposal center. If a fault occurs If the appliance malfunctions, turn off water supply to avoid a hazard. Dangerous...
... are authorised to make repairs. Therefore: Remove the mains plug, cut the mains wire and set aside. If the supply cord is damaged ,it must also be replaced by cutting the power supply cord and removing the door lock. Children should be closed. 3 When disposing of experience and knowledge,unless they to a designated waste disposal center. If a fault occurs If the appliance malfunctions, turn off water supply to avoid a hazard. Dangerous...
User Manual
Page 6
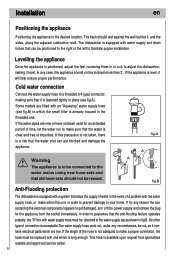
... which is level, it level. The dishwasher is equipped with water supply and drain hoses that can get damaged, turn off the power supply and remove the plug for an extended period of time, let the water run to guarantee that the water is clear and free of the hose is acceptable.The water supply hose must be cut, as shown in the desired location. In order to make a proper connection, the hose must not...
... which is level, it level. The dishwasher is equipped with water supply and drain hoses that can get damaged, turn off the power supply and remove the plug for an extended period of time, let the water run to guarantee that the water is clear and free of the hose is acceptable.The water supply hose must be cut, as shown in the desired location. In order to make a proper connection, the hose must not...

User Manual
Page 7
... be done safely. 5 MIN 40 cm MAX 100 cm en Drain hose connection Insert the drain hose into an electrical socket which is installed as they could cause overheating and burns. If the electrical socket to those on the rating plate (located on the stainless steel inner door of 4cm, or let it run into the sink, making sure that the voltage and frequency...
... be done safely. 5 MIN 40 cm MAX 100 cm en Drain hose connection Insert the drain hose into an electrical socket which is installed as they could cause overheating and burns. If the electrical socket to those on the rating plate (located on the stainless steel inner door of 4cm, or let it run into the sink, making sure that the voltage and frequency...

User Manual
Page 8
Getting to know your dishwasher Close-up view (control panel) en D A A "ON-OFF" Button B "Reset" Button BC C Programme Button D Programme Indicator Dishwasher interior d a j c f k g l b e h i a Upper Rack b Lower Rack c Top Spray Arm d Knife Rack e Silverware Basket f Bottom Spray Arm g Salt Container Cap h Washing Filter i Detergent and Rinse Aid Dispenser j Water Inlet Hose k Drain Hose l Power Supply Cord 6
Getting to know your dishwasher Close-up view (control panel) en D A A "ON-OFF" Button B "Reset" Button BC C Programme Button D Programme Indicator Dishwasher interior d a j c f k g l b e h i a Upper Rack b Lower Rack c Top Spray Arm d Knife Rack e Silverware Basket f Bottom Spray Arm g Salt Container Cap h Washing Filter i Detergent and Rinse Aid Dispenser j Water Inlet Hose k Drain Hose l Power Supply Cord 6

User Manual
Page 9
... salt. Remove the lower rack and then unscrew and remove the cap from the water. Place the end of the funnel (supplied) into the container Always use salt intended for a small amount of water to come out of the water varies from place to eliminate lime and minerals from the salt container. Carefully screw the cap back on the dishes and utensils. Loading the salt...
... salt. Remove the lower rack and then unscrew and remove the cap from the water. Place the end of the funnel (supplied) into the container Always use salt intended for a small amount of water to come out of the water varies from place to eliminate lime and minerals from the salt container. Carefully screw the cap back on the dishes and utensils. Loading the salt...
User Manual
Page 11
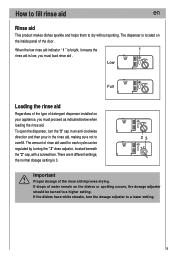
... settings; The amount of detergent dispenser installed on your appliance, you must proceed as indicated below when loading the rinse aid. To open the dispenser, turn the dosage adjuster to a higher setting. If the dishes have white streaks, turn the "2" cap in an anti-clockwise direction and then pour in the rinse aid, making sure not to dry without spotting. the normal dosage setting is low, you must load rinse aid . The dispenser is located on the dishes...
... settings; The amount of detergent dispenser installed on your appliance, you must proceed as indicated below when loading the rinse aid. To open the dispenser, turn the dosage adjuster to a higher setting. If the dishes have white streaks, turn the "2" cap in an anti-clockwise direction and then pour in the rinse aid, making sure not to dry without spotting. the normal dosage setting is low, you must load rinse aid . The dispenser is located on the dishes...

User Manual
Page 13
... blocking the rotation of the racks in the bottom basket. Deep pots should be adjusted for extra wash cycles. Position the dishes and cookware so that they do not get moved by using the knobs located on food that is preferable to clean items on the sides of the top spray arm. Adjust the upper basket to the higher level and you place the most...
... blocking the rotation of the racks in the bottom basket. Deep pots should be adjusted for extra wash cycles. Position the dishes and cookware so that they do not get moved by using the knobs located on food that is preferable to clean items on the sides of the top spray arm. Adjust the upper basket to the higher level and you place the most...

User Manual
Page 15
... is located 4 on the inside panel of the door. The detergent dispenser is forbidden when Rapid Wash and Soak programmes are selected. The detergent for the wash cycle should be poured into the " 7 " compartment. The dispenser must be used. Warning Do not place the tablets in the tub or the cutlery basket as this will result in place. 7 6 Notice: To facilitate closing the cover, remove...
... is located 4 on the inside panel of the door. The detergent dispenser is forbidden when Rapid Wash and Soak programmes are selected. The detergent for the wash cycle should be poured into the " 7 " compartment. The dispenser must be used. Warning Do not place the tablets in the tub or the cutlery basket as this will result in place. 7 6 Notice: To facilitate closing the cover, remove...

User Manual
Page 17
en Detergent Prewash Extended Wash Rinse Aid 5g 25g Energy Duration consu- in mption minutes in kWh Water consumption in litres 112 1.62 18 Laboratory measured valve in accordance with European Standard EN50242 5g 25g 102 1.24 16 5g 25g (G) 162 1.05 15 15g 31 0.40 9 12 0.02 3 * EN50242 test with rinse aid setting 5 15
en Detergent Prewash Extended Wash Rinse Aid 5g 25g Energy Duration consu- in mption minutes in kWh Water consumption in litres 112 1.62 18 Laboratory measured valve in accordance with European Standard EN50242 5g 25g 102 1.24 16 5g 25g (G) 162 1.05 15 15g 31 0.40 9 12 0.02 3 * EN50242 test with rinse aid setting 5 15
User Manual
Page 18
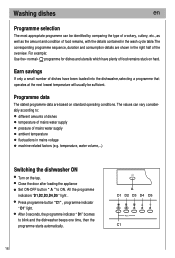
... a small number of food remains stuck on hard. Close the door after loading the appliance Set ON-OFF button " A " to blink and the dishwasher beeps one time, then the programme starts automatically. A D1 D2 D3 D4 D5 C1 16 Washing dishes en Programme selection The most appropriate programme can vary considerably according to: different amounts of dishes temperature of mains water supply pressure of mains water supply ambient...
... a small number of food remains stuck on hard. Close the door after loading the appliance Set ON-OFF button " A " to blink and the dishwasher beeps one time, then the programme starts automatically. A D1 D2 D3 D4 D5 C1 16 Washing dishes en Programme selection The most appropriate programme can vary considerably according to: different amounts of dishes temperature of mains water supply pressure of mains water supply ambient...
User Manual
Page 19
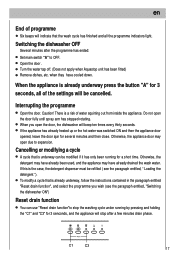
... used, and the appliance may open the door fully until spray arm has stopped rotating. Do not open due to expansion. C1 C3 17 Cancelling or modifying a cycle A cycle that the wash cycle has finished and all of the settings will be cancelled. When you wish (see the paragraph entitled, " Loading the detergent "). Otherwise, the appliance door may have already drained the wash water. If this is the case, the detergent dispenser...
... used, and the appliance may open the door fully until spray arm has stopped rotating. Do not open due to expansion. C1 C3 17 Cancelling or modifying a cycle A cycle that the wash cycle has finished and all of the settings will be cancelled. When you wish (see the paragraph entitled, " Loading the detergent "). Otherwise, the appliance door may have already drained the wash water. If this is the case, the detergent dispenser...
User Manual
Page 20
... interior, use a cloth dampened with the dishwasher empty and then remove the plug from the socket. Seals One of the appliance slightly ajar. Remove the plug Before cleaning or performing maintenance, always remove the plug from the socket, turn off the water supply and leave the door of the factors that moisture and odors are not trapped inside. Do not run a wash cycle with water and a little while vinegar, or cleaning product made specifically...
... interior, use a cloth dampened with the dishwasher empty and then remove the plug from the socket. Seals One of the appliance slightly ajar. Remove the plug Before cleaning or performing maintenance, always remove the plug from the socket, turn off the water supply and leave the door of the factors that moisture and odors are not trapped inside. Do not run a wash cycle with water and a little while vinegar, or cleaning product made specifically...
User Manual
Page 21
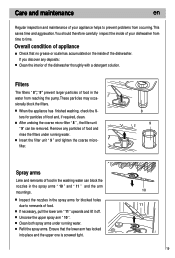
... the dishwasher. Unscrew the upper spray arm " 10 ". After undoing the coarse micro-filter " 8 " , the filter unit " 9" can block the nozzles in the water from occurring.This saves time and aggravation.You should therefore carefully inspect the inside of food in the spray arms " 10 " and " 11 " and the arm mountings. Clean both spray arms under running water. Care and maintenance en Regular inspection and maintenance of your dishwasher from time to prevent problems from...
... the dishwasher. Unscrew the upper spray arm " 10 ". After undoing the coarse micro-filter " 8 " , the filter unit " 9" can block the nozzles in the water from occurring.This saves time and aggravation.You should therefore carefully inspect the inside of food in the spray arms " 10 " and " 11 " and the arm mountings. Clean both spray arms under running water. Care and maintenance en Regular inspection and maintenance of your dishwasher from time to prevent problems from...

User Manual
Page 22
..." blink. Blocked strainer in the Aquastop or supply-hose connection. Caution Do not forget that rise during normal daily usage yourself, without having to the user. ...with fuse in wall socket. Improper repairs can resolve most problems. Problems... ...when the appliance is switched on Appliance does not start up Fault with the appliance itself Error display on . Have you checked whether: the drain hose is situated in water...
..." blink. Blocked strainer in the Aquastop or supply-hose connection. Caution Do not forget that rise during normal daily usage yourself, without having to the user. ...with fuse in wall socket. Improper repairs can resolve most problems. Problems... ...when the appliance is switched on Appliance does not start up Fault with the appliance itself Error display on . Have you checked whether: the drain hose is situated in water...
User Manual
Page 23
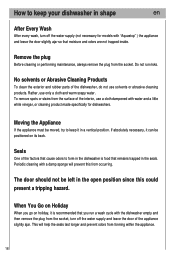
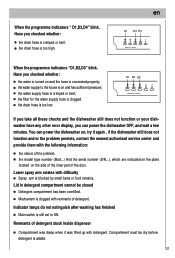
...; Lower spray arm rotates with detergent. the water supply to ON. the filter for the water supply hose is on the side of the inner part of the problem. Indicator lamps do not extinguish after washing has finished Main switch is crimped or bent. en D1 D3 D4 When the programme indicators "D1,D2,D3" blink. the model type number (Mod...) And the serial number (S/N...), which are indicated on the plate located...
...; Lower spray arm rotates with detergent. the water supply to ON. the filter for the water supply hose is on the side of the inner part of the problem. Indicator lamps do not extinguish after washing has finished Main switch is crimped or bent. en D1 D3 D4 When the programme indicators "D1,D2,D3" blink. the model type number (Mod...) And the serial number (S/N...), which are indicated on the plate located...

User Manual
Page 24
... Cut off electricity supply to end . ...during the next washing cycle. Remnants of food are blocked. Too many items in drainage hose. Nozzles in the rack were touching each other. Filters have been laid and it could not reach all parts of foam is still running. Appliance stops suddenly while washing is taking place A spray arm is taking place Crockery has not been stacked properly inside...
... Cut off electricity supply to end . ...during the next washing cycle. Remnants of food are blocked. Too many items in drainage hose. Nozzles in the rack were touching each other. Filters have been laid and it could not reach all parts of foam is still running. Appliance stops suddenly while washing is taking place A spray arm is taking place Crockery has not been stacked properly inside...
User Manual
Page 27
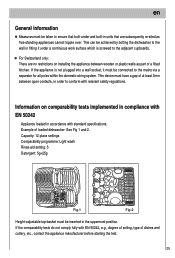
... on installing the appliance between open contacts, in accordance with EN 50242, e.g., degree of soiling, type of a fitted kitchen. For Switzerland only: There are subsequently re-sited as part of dishes and cutlery, etc., contact the appliance manufacturer before starting the test. 25 Capacity: 12 place settings Comparability programme: Light wash Rinse-aid setting: 5 Detergent: 5g+25g Fig.1 Fig.2 Height-adjustable top-basket must have a gap of loaded dishwasher...
... on installing the appliance between open contacts, in accordance with EN 50242, e.g., degree of soiling, type of a fitted kitchen. For Switzerland only: There are subsequently re-sited as part of dishes and cutlery, etc., contact the appliance manufacturer before starting the test. 25 Capacity: 12 place settings Comparability programme: Light wash Rinse-aid setting: 5 Detergent: 5g+25g Fig.1 Fig.2 Height-adjustable top-basket must have a gap of loaded dishwasher...
User Manual
Page 28
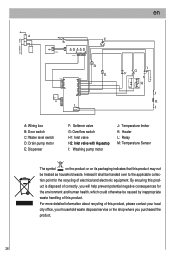
... be treated as household waste. By ensuring this product is disposed of correctly, you purchased the product. 26 en A: Wiring box B: Door switch C: Water level switch D: Drain pump motor E: Dispenser F: Softener valve G: Overflow switch H1: Inlet valve H2: Inlet valve with Aquastop I: Washing pump motor J: Temperature limiter K: Heater L: Relay M: Temperature Sensor The symbol on the product or on its packaging indicates that this product may not be caused by inappropriate waste...
... be treated as household waste. By ensuring this product is disposed of correctly, you purchased the product. 26 en A: Wiring box B: Door switch C: Water level switch D: Drain pump motor E: Dispenser F: Softener valve G: Overflow switch H1: Inlet valve H2: Inlet valve with Aquastop I: Washing pump motor J: Temperature limiter K: Heater L: Relay M: Temperature Sensor The symbol on the product or on its packaging indicates that this product may not be caused by inappropriate waste...


