
User Manual
Page 1
Dishwasher DW12-LFE S DW12-LFE SS Instructions for Use GB DE FR IT ES PT NL 0120505105
Dishwasher DW12-LFE S DW12-LFE SS Instructions for Use GB DE FR IT ES PT NL 0120505105

User Manual
Page 2
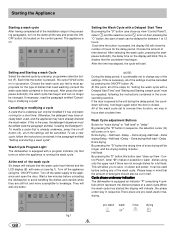
... supply cord is covered by a special cord or assembly available from the power supply. GB This appliance complies with wet hands or feet; * We discourage the use original Spare Parts Close-up View (Control Panel) D F HG Q I P A CB E A ON-OFF Button B LCD Display C Delayed Start Button D Button For "Extra Drying" or "Half Load" or "Delay" E Start/Pause Button F Program Button G Program indicator L M NO H Extra drying indicator I Half load indicator L Delayed start indicator M Time-remaining and delayed start indicator N Low rinse aid indicator O Low salt indicator P Cycle...
... supply cord is covered by a special cord or assembly available from the power supply. GB This appliance complies with wet hands or feet; * We discourage the use original Spare Parts Close-up View (Control Panel) D F HG Q I P A CB E A ON-OFF Button B LCD Display C Delayed Start Button D Button For "Extra Drying" or "Half Load" or "Delay" E Start/Pause Button F Program Button G Program indicator L M NO H Extra drying indicator I Half load indicator L Delayed start indicator M Time-remaining and delayed start indicator N Low rinse aid indicator O Low salt indicator P Cycle...
User Manual
Page 3
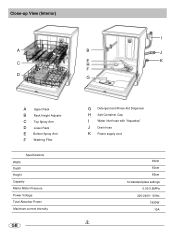
Close-up View (Interior) I A B J C E H K F D G A Upper Rack B Rack Height Adjustor C Top Spray Arm D Lower Rack E Bottom Spray Arm F Washing Filter Specifications Width Depth Height Capacity Mains Water Pressure Power Voltage Total Absorber Power Maximum current intensity GB G Detergent and Rinse Aid Dispenser H Salt Container Cap I Water inlet hose with "Aquastop" J Drain hose K Power supply cord 60cm 60cm 85cm 12 standard place settings 0.03-0.6MPa 220-240V~ 50Hz 1950W 10A .2.
Close-up View (Interior) I A B J C E H K F D G A Upper Rack B Rack Height Adjustor C Top Spray Arm D Lower Rack E Bottom Spray Arm F Washing Filter Specifications Width Depth Height Capacity Mains Water Pressure Power Voltage Total Absorber Power Maximum current intensity GB G Detergent and Rinse Aid Dispenser H Salt Container Cap I Water inlet hose with "Aquastop" J Drain hose K Power supply cord 60cm 60cm 85cm 12 standard place settings 0.03-0.6MPa 220-240V~ 50Hz 1950W 10A .2.

User Manual
Page 4
... unscrew and remove the cap from the salt container; - Unscrew the cap from the salt container; - To prevent the formation of rust, load the salt just before beginning a wash cycle. Loading the Salt into the hole and append about 2 kg of salt. There is located beneath the lower rack and should be filled when the "low salt" indicator light (located on the control panel) comes...
... unscrew and remove the cap from the salt container; - Unscrew the cap from the salt container; - To prevent the formation of rust, load the salt just before beginning a wash cycle. Loading the Salt into the hole and append about 2 kg of salt. There is located beneath the lower rack and should be filled when the "low salt" indicator light (located on the control panel) comes...
User Manual
Page 5
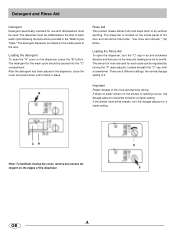
... "Wash Cycle Table." CA Note: To facilitate closing the cover, remove any excess detergent on the dispenser, press the "B" button. C F .4. the normal dosage setting is located on the dishes or spotting occurs, the dosage adjustor should be filled after "low rinse aid indicator " (N) blinks.. B If drops of the door. The detergent dispenser is 3. There are 6 different settings; The dispenser is located on the inside panel of water remain on the inside panel of rinse aid used . Detergent and Rinse Aid Detergent Detergent specifically intended for use...
... "Wash Cycle Table." CA Note: To facilitate closing the cover, remove any excess detergent on the dispenser, press the "B" button. C F .4. the normal dosage setting is located on the dishes or spotting occurs, the dosage adjustor should be filled after "low rinse aid indicator " (N) blinks.. B If drops of the door. The detergent dispenser is 3. There are 6 different settings; The dispenser is located on the inside panel of water remain on the inside panel of rinse aid used . Detergent and Rinse Aid Detergent Detergent specifically intended for use...
User Manual
Page 6
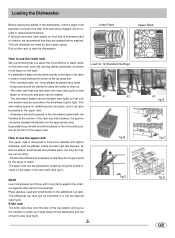
... using the knobs located on the sides of the top spray arm. - It is preferable to place serving dishes and lids on the additional cup rack. The silverware basket can also be loaded. - Loading the Dishwasher Before placing the dishes in the dishwasher, remove larger food particles to prevent the filter from becoming clogged, which results in the figure on the lower rack: pots, lids, serving dishes...
... using the knobs located on the sides of the top spray arm. - It is preferable to place serving dishes and lids on the additional cup rack. The silverware basket can also be loaded. - Loading the Dishwasher Before placing the dishes in the dishwasher, remove larger food particles to prevent the filter from becoming clogged, which results in the figure on the lower rack: pots, lids, serving dishes...
User Manual
Page 7
... "Cancelling or modifying a cycle" Cancelling or modifying a cycle A cycle that is opened to breakage. Otherwise, the detergent may have already drained the wash water. Wash Cycle Program Light The dishwasher is running for a short time. Turn off the appliance using only the upper rack if there are still hot and more susceptible to the unit during the delay period, the countdown will stop. Wash Cycle adjustment Buttons Button for a full load. Control Panel", letter "D") makes it possible to avoid handling the dishes and...
... "Cancelling or modifying a cycle" Cancelling or modifying a cycle A cycle that is opened to breakage. Otherwise, the detergent may have already drained the wash water. Wash Cycle Program Light The dishwasher is running for a short time. Turn off the appliance using only the upper rack if there are still hot and more susceptible to the unit during the delay period, the countdown will stop. Wash Cycle adjustment Buttons Button for a full load. Control Panel", letter "D") makes it possible to avoid handling the dishes and...
User Manual
Page 8
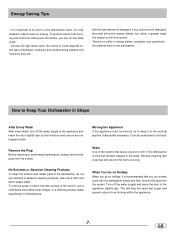
... detergent: if you run the soak cycle. - Use only a cloth and warm soapy water. Seals One of the appliance slightly ajar. Turn off the water supply to form in Shape After Every Wash After every wash, turn off the water supply and leave the door of the factors that cause odours to the appliance and leave the door slightly ajar so that you use solvents or abrasive cleaning products. Energy...
... detergent: if you run the soak cycle. - Use only a cloth and warm soapy water. Seals One of the appliance slightly ajar. Turn off the water supply to form in Shape After Every Wash After every wash, turn off the water supply and leave the door of the factors that cause odours to the appliance and leave the door slightly ajar so that you use solvents or abrasive cleaning products. Energy...

User Manual
Page 9
...;C. Pre-wash with cold water. Extended wash at 40 °C after they are used. Rinse with cold water. Hot rinse . Rinse with hot water . Detergent Rinse Aid 30g 30g 25+5g ERF 15g Rapid Wash Economic, fast cycle to be used for the load to be completed after dishes are sensitive to higher. Rinse with cold water. Rinse Soak For dishes that need to be rinsed and dried only Hot rinse at 60 °C. Drying. Drying. Pre-wash with hot water. Light Wash (IEC-EN50242...
...;C. Pre-wash with cold water. Extended wash at 40 °C after they are used. Rinse with cold water. Hot rinse . Rinse with hot water . Detergent Rinse Aid 30g 30g 25+5g ERF 15g Rapid Wash Economic, fast cycle to be used for the load to be completed after dishes are sensitive to higher. Rinse with cold water. Rinse Soak For dishes that need to be rinsed and dried only Hot rinse at 60 °C. Drying. Drying. Pre-wash with hot water. Light Wash (IEC-EN50242...

User Manual
Page 10
... used without the filters. Cleaning the Water Inlet Filter Periodically clean the water inlet filter located on unauthorised technicians and refuse to allow parts to be installed that the dishwasher does not function or does not function properly. the rinse aid dosage is clogged. the nature of the door. the model type number (Mod...) and the serial number (S/N...), which are not original spare parts. .9. Cleaning and Special Maintenance Filter Assembly For best performance and results, the filter assembly...
... used without the filters. Cleaning the Water Inlet Filter Periodically clean the water inlet filter located on unauthorised technicians and refuse to allow parts to be installed that the dishwasher does not function or does not function properly. the rinse aid dosage is clogged. the nature of the door. the model type number (Mod...) and the serial number (S/N...), which are not original spare parts. .9. Cleaning and Special Maintenance Filter Assembly For best performance and results, the filter assembly...
User Manual
Page 11
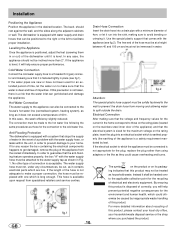
... cold water line. If this product. Electrical Connection In this product, please contact your local city office, your home. on the stainless steel inner door of this precaution is not taken, fig.2 there is level, it will help ensure proper performance. The water supply hose must be replaced with water supply and drain hoses that the Anti-Flooding Protection The dishwasher is a safety requirement mandated by inappropriate waste handling of...
... cold water line. If this product. Electrical Connection In this product, please contact your local city office, your home. on the stainless steel inner door of this precaution is not taken, fig.2 there is level, it will help ensure proper performance. The water supply hose must be replaced with water supply and drain hoses that the Anti-Flooding Protection The dishwasher is a safety requirement mandated by inappropriate waste handling of...

