User Manual
Page 1
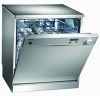
...3 220-240V ~ R Q ISS P CnP3 1 2 3 4 5 6 7 8 CnP1 6 5 4 3 2 1 SCHEDA DI POTENZA e CONTROLLO CnP2 12 11 10 9 8 7 6 5 4 3 2 1 O RELE' F J D-ED H 1/2 I 1G 2 IAQS 3 2 L 4 M 1 ML 2 C S 1 AQS K 1 M N M A: Wiring box B: Power switch C: Power indicator D: Door switch E: Water level switch F: Drain motor G: Overflow switch H: Half wash switch I: Softer valve J: Dispenser valve K: Aquastop inlet valve L: Washing motor M: Temperature limiter N: Heater O: Relay P: Sensor temperature Q: Salt missing switch R: Rinseing aid missing switch MV: Turbo dry GB DE FR IT ES PT NL MNOMRMOPVP
...3 220-240V ~ R Q ISS P CnP3 1 2 3 4 5 6 7 8 CnP1 6 5 4 3 2 1 SCHEDA DI POTENZA e CONTROLLO CnP2 12 11 10 9 8 7 6 5 4 3 2 1 O RELE' F J D-ED H 1/2 I 1G 2 IAQS 3 2 L 4 M 1 ML 2 C S 1 AQS K 1 M N M A: Wiring box B: Power switch C: Power indicator D: Door switch E: Water level switch F: Drain motor G: Overflow switch H: Half wash switch I: Softer valve J: Dispenser valve K: Aquastop inlet valve L: Washing motor M: Temperature limiter N: Heater O: Relay P: Sensor temperature Q: Salt missing switch R: Rinseing aid missing switch MV: Turbo dry GB DE FR IT ES PT NL MNOMRMOPVP
User Manual
Page 2
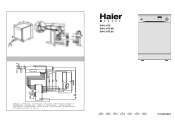
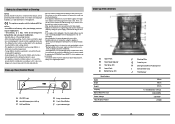
... proper installation, use original Spare Parts Close-up View (Interior) A Upper Rack B Rack Height Adjustor C Top Spray Arm D Lower Rack E Bottom Spray Arm Specifications Width Depth Height Capacity Mains Water Pressure Power Voltage Total Absorber Power GB F Washing Filter G Turbo Dry-fan H Detergent and Rinse Aid Dispenser I Salt Container Cap J Third Sprayer 60 cm 60 cm 85 cm 12 standard place settings 0.03-0.6MPa 220-240V~ 2150W .2. call only the Service Centers authorized by a special cord or assembly available from the power supply.
... proper installation, use original Spare Parts Close-up View (Interior) A Upper Rack B Rack Height Adjustor C Top Spray Arm D Lower Rack E Bottom Spray Arm Specifications Width Depth Height Capacity Mains Water Pressure Power Voltage Total Absorber Power GB F Washing Filter G Turbo Dry-fan H Detergent and Rinse Aid Dispenser I Salt Container Cap J Third Sprayer 60 cm 60 cm 85 cm 12 standard place settings 0.03-0.6MPa 220-240V~ 2150W .2. call only the Service Centers authorized by a special cord or assembly available from the power supply.
User Manual
Page 3
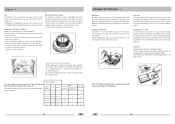
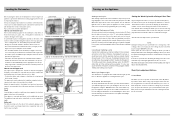
... . Loading the detergent To open the dispenser, turn the dosage adjustor to come out of the salt container. - If drops of water remain on the dishes or spotting occurs, the dosage adjustor should be filled when the "low salt" indicator light (located on the control panel) comes on the inside panel of the door. Remove the lower rack and then unscrew and remove the cap from the salt container; - Rinse Aid This product...
... . Loading the detergent To open the dispenser, turn the dosage adjustor to come out of the salt container. - If drops of water remain on the dishes or spotting occurs, the dosage adjustor should be filled when the "low salt" indicator light (located on the control panel) comes on the inside panel of the door. Remove the lower rack and then unscrew and remove the cap from the salt container; - Rinse Aid This product...
User Manual
Page 4
... been running the wash cycle. This will also dry better. If the pots and pans have baked-on . Pots, serving bowls, etc. The upper rack can be adjusted for height by the spray of the steps for a full load. come on food that is the case, the detergent dispenser must be washed. This button (see close -up view-'Control panel") the start . Loading the Dishwasher Before placing the dishes in the dishwasher, remove...
... been running the wash cycle. This will also dry better. If the pots and pans have baked-on . Pots, serving bowls, etc. The upper rack can be adjusted for height by the spray of the steps for a full load. come on food that is the case, the detergent dispenser must be washed. This button (see close -up view-'Control panel") the start . Loading the Dishwasher Before placing the dishes in the dishwasher, remove...
User Manual
Page 5
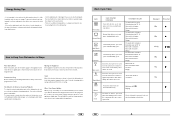
... fully loaded in the vertical position. Use the right amount of the interior, use solvents or abrasive cleaning products. Remove the Plug Before cleaning or performing maintenance, always remove the plug from drying on energy. When You Go on Holiday When you go on its back. This will prevent this from occuring. Light Wash (IEC-EN50242) Normal dirty dishes, pots and pans. Rinse with the dishwasher empty and then remove the plug...
... fully loaded in the vertical position. Use the right amount of the interior, use solvents or abrasive cleaning products. Remove the Plug Before cleaning or performing maintenance, always remove the plug from drying on energy. When You Go on Holiday When you go on its back. This will prevent this from occuring. Light Wash (IEC-EN50242) Normal dirty dishes, pots and pans. Rinse with the dishwasher empty and then remove the plug...

User Manual
Page 6
... home. Fig.1 Installation Drain Hose Connection Insert the drain hose into a drain pipe with a minimum diameter of a problem with the water supply hose, or leaks within the unit, in the event of 4cm, or let it contains electrical parts which are live. The free end of the water supply hose, remove the filter and clean it to the salt container is closed properly; - To remove the filter assembly, pull on in water. After turning off the water tap, unscrew...
... home. Fig.1 Installation Drain Hose Connection Insert the drain hose into a drain pipe with a minimum diameter of a problem with the water supply hose, or leaks within the unit, in the event of 4cm, or let it contains electrical parts which are live. The free end of the water supply hose, remove the filter and clean it to the salt container is closed properly; - To remove the filter assembly, pull on in water. After turning off the water tap, unscrew...

