
User Manual
Page 1
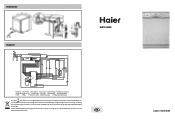
... of this product. Installation Diagram DW12-HFE2 The symbol on the product or on its packaging indicates that this product may not be handed over to the applicable collection point for the environment and human health, which could otherwise be caused by inappropriate waste handling of this product, please contact your local city office, your household waste disposal service or the...
... of this product. Installation Diagram DW12-HFE2 The symbol on the product or on its packaging indicates that this product may not be handed over to the applicable collection point for the environment and human health, which could otherwise be caused by inappropriate waste handling of this product, please contact your local city office, your household waste disposal service or the...

User Manual
Page 2
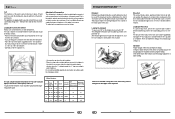
..., turn the dishwasher. If you cannot solve the problem, contact a service centre. - GB Close-up View (control panel) - If in doubt, contact a qualified professional. - Only specialised personnel are no longer being used by cutting the power supply cord and removing the door lock. - This appliance complies with wet hands or feet; * We discourage the use original Spare Parts DW12-HFE2 A ON-OFF Light B ON-OFF Button C Delay time display D Delay select Button E Half-load Button F Low Salt Indicator Light G Low Rinse Aid Indicator Light H Handle For Opening Door...
..., turn the dishwasher. If you cannot solve the problem, contact a service centre. - GB Close-up View (control panel) - If in doubt, contact a qualified professional. - Only specialised personnel are no longer being used by cutting the power supply cord and removing the door lock. - This appliance complies with wet hands or feet; * We discourage the use original Spare Parts DW12-HFE2 A ON-OFF Light B ON-OFF Button C Delay time display D Delay select Button E Half-load Button F Low Salt Indicator Light G Low Rinse Aid Indicator Light H Handle For Opening Door...
User Manual
Page 3
... the end of the door. It is 3. Adjusting Salt Consumption The dishwasher is intended to optimize and customize the level of the water used for adjusting the amount of salt consumed based on the inside panel of the funnel (supplied) into the Softener Always use with water; - The dispenser must be filled when the "low salt" indicator light (located on the control panel) comes on the dispenser, press button "B". Loading the Rinse Aid To open cover...
... the end of the door. It is 3. Adjusting Salt Consumption The dishwasher is intended to optimize and customize the level of the water used for adjusting the amount of salt consumed based on the inside panel of the funnel (supplied) into the Softener Always use with water; - The dispenser must be filled when the "low salt" indicator light (located on the control panel) comes on the dispenser, press button "B". Loading the Rinse Aid To open cover...

User Manual
Page 4
... is light. Turn off the water supply to the appliance and open the door. Wait a few seconds before unloading the dishwasher to avoid handling the dishes and utensils while they do not get moved by pressing the selector button (I). Setting the Wash Cycle with a Delayed Start Time By pressing the "D" button (see close -up view-'Control panel") the start . After the time has lapsed, the cycle will also dry better. This will allow the water to remove...
... is light. Turn off the water supply to the appliance and open the door. Wait a few seconds before unloading the dishwasher to avoid handling the dishes and utensils while they do not get moved by pressing the selector button (I). Setting the Wash Cycle with a Delayed Start Time By pressing the "D" button (see close -up view-'Control panel") the start . After the time has lapsed, the cycle will also dry better. This will allow the water to remove...
User Manual
Page 5
... run a wash cycle with cold water. Rinse with a sponge will prevent this from the socket, turn off the water supply and leave the door of the factors that cause odours to form in the dishwasher is no utility in rinsing dishes, cookware and utensils before placing them in order to Keep Your Dishwasher in the seals. Rinse with hot water. Drying. Cold rinse . Detergent Rinse Aid 30g 30g 15g Light Wash (IEC-EN50242) Normal dirty dishes...
... run a wash cycle with cold water. Rinse with a sponge will prevent this from the socket, turn off the water supply and leave the door of the factors that cause odours to form in the dishwasher is no utility in rinsing dishes, cookware and utensils before placing them in order to Keep Your Dishwasher in the seals. Rinse with hot water. Drying. Cold rinse . Detergent Rinse Aid 30g 30g 15g Light Wash (IEC-EN50242) Normal dirty dishes...

User Manual
Page 6
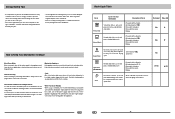
... closed properly; - To clean the filter and fine filter, use a cleaning brush. The Dishwasher Does Not Drain Have you checked whether: - If the water pipes are live. A B Cleaning the Water Inlet Filter Periodically clean the water inlet filter located on . Cleaning and Special Maintenance Filter Assembly For best performance and results, the filter assembly must be attached to the water supply tap as shown in Fig.1. The filter efficiently removes food particles from the socket immediately. the water is turned...
... closed properly; - To clean the filter and fine filter, use a cleaning brush. The Dishwasher Does Not Drain Have you checked whether: - If the water pipes are live. A B Cleaning the Water Inlet Filter Periodically clean the water inlet filter located on . Cleaning and Special Maintenance Filter Assembly For best performance and results, the filter assembly must be attached to the water supply tap as shown in Fig.1. The filter efficiently removes food particles from the socket immediately. the water is turned...


