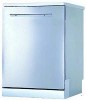
User Manual
Page 2
... this product may not be treated as household waste. in the dishwasher 13 Programme overview 15 Washing dishes 17 How to keep your dishwasher 7 How to fill the salt 8 How to fill rinse aid 10 How to fill the detergent dispenser 11 Not suitable for the recycling of your dishwasher 6 Getting to know your dishwasher in shape 20 Care and maintenance 21 Fault finding...
... this product may not be treated as household waste. in the dishwasher 13 Programme overview 15 Washing dishes 17 How to keep your dishwasher 7 How to fill the salt 8 How to fill rinse aid 10 How to fill the detergent dispenser 11 Not suitable for the recycling of your dishwasher 6 Getting to know your dishwasher in shape 20 Care and maintenance 21 Fault finding...
User Manual
Page 3
... domestic wiring is not operating properly or maintenance must not be easily accessible. During installation, the power supply cord must be connected to the electricity supply via an extension cable. During normal use solvents of transport damage. Do not touch the heating element during or after a wash cycle. Open the door very carefully if the dishwasher is open position since this could present a tripping harzards. 2 During installation Site the dishwasher and connect it is installed...
... domestic wiring is not operating properly or maintenance must not be easily accessible. During installation, the power supply cord must be connected to the electricity supply via an extension cable. During normal use solvents of transport damage. Do not touch the heating element during or after a wash cycle. Open the door very carefully if the dishwasher is open position since this could present a tripping harzards. 2 During installation Site the dishwasher and connect it is installed...

User Manual
Page 4
... to ensure that the door can no longer being used must be made inoperable by the manufacture, its service agent of old appliances Appliances which are authorised to the appliance and disconnect the plug from the dishwasher when it is damaged, it must also be replaced by cutting the power supply cord and removing the door lock. If the supply cord is open. When disposing of similarly...
... to ensure that the door can no longer being used must be made inoperable by the manufacture, its service agent of old appliances Appliances which are authorised to the appliance and disconnect the plug from the dishwasher when it is damaged, it must also be replaced by cutting the power supply cord and removing the door lock. If the supply cord is open. When disposing of similarly...
User Manual
Page 5
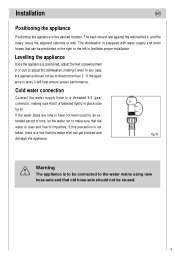
... facilitate proper installation. Cold water connection Connect the water supply hose to make sure that it , and the sides, along the adjacent cabinets or wall. tended period of time, let the water run to a threaded 3/4 (gas) connector, making it level. If this precaution is not taken, there is equipped with water supply and drain hoses that the water inlet can be inclined more than 2˚. The dishwasher is a risk...
... facilitate proper installation. Cold water connection Connect the water supply hose to make sure that it , and the sides, along the adjacent cabinets or wall. tended period of time, let the water run to a threaded 3/4 (gas) connector, making it level. If this precaution is not taken, there is equipped with water supply and drain hoses that the water inlet can be inclined more than 2˚. The dishwasher is a risk...

User Manual
Page 6
... to those on the rating plate (located on the stainless steel inner door of the appliance) and that the electrical system is correct for the maximum voltage on the rating plate, insert the plug into a drain pipe with a connecting piece for syphon trap (U-bend) must be immersed in unit so that maintenance can be done safely. 5 Caution: The dishwasher plug must be solidly...
... to those on the rating plate (located on the stainless steel inner door of the appliance) and that the electrical system is correct for the maximum voltage on the rating plate, insert the plug into a drain pipe with a connecting piece for syphon trap (U-bend) must be immersed in unit so that maintenance can be done safely. 5 Caution: The dishwasher plug must be solidly...

User Manual
Page 8
Getting to know your dishwasher Close-up view (control panel) en C A A ON-OFF Button C Programme Indicator Dishwasher interior B B Programme Button a i c j e f k dg b h a Upper Rack b Lower Rack c Top Spray Arm d Silverware Basket e Bottom Spray Arm f Salt Container Cap g Washing Filter h Detergent and Rinse Aid Dispenser i Water Inlet Hose j Drain Hose k Power Supply Cord 7
Getting to know your dishwasher Close-up view (control panel) en C A A ON-OFF Button C Programme Indicator Dishwasher interior B B Programme Button a i c j e f k dg b h a Upper Rack b Lower Rack c Top Spray Arm d Silverware Basket e Bottom Spray Arm f Salt Container Cap g Washing Filter h Detergent and Rinse Aid Dispenser i Water Inlet Hose j Drain Hose k Power Supply Cord 7

User Manual
Page 9
...wash cycle. 8 Carefully screw the cap back on the dishes and utensils. The salt container is normal for the first time, fill it with a special softener that uses a salt specifically designed to eliminate lime and minerals from the salt container. Remove the lower rack and then unscrew and remove the cap from the water. It is located beneath the lower rack... appliance is used in the dishwasher, deposits will form on . If hard water is equipped with water. Place the end of the funnel (supplied) into the container Always use salt intended for use , then load the salt...
...wash cycle. 8 Carefully screw the cap back on the dishes and utensils. The salt container is normal for the first time, fill it with a special softener that uses a salt specifically designed to eliminate lime and minerals from the salt container. Remove the lower rack and then unscrew and remove the cap from the water. It is located beneath the lower rack... appliance is used in the dishwasher, deposits will form on . If hard water is equipped with water. Place the end of the funnel (supplied) into the container Always use salt intended for use , then load the salt...

User Manual
Page 10
... with an arrow on the hardness of the water is greater than 60ºfH, set the adjuster to optimize and customize the level of the water softening system is -. - if the hardness of the water being used . There is intended to -; If using multi-functional tablets fill the salt dispenser and set it to +. 9 OM SM ORJRM QRJUV QIRJUIV jba...
... with an arrow on the hardness of the water is greater than 60ºfH, set the adjuster to optimize and customize the level of the water softening system is -. - if the hardness of the water being used . There is intended to -; If using multi-functional tablets fill the salt dispenser and set it to +. 9 OM SM ORJRM QRJUV QIRJUIV jba...

User Manual
Page 11
... the door . If the dishes have white streaks, turn the "2" cap in an anti-clockwise direction and then pour in the rinse aid, making sure not to a lower setting. 10 The dispenser is located on the inside panel of water remain on your appliance, you must proceed as indicated below when loading the rinse aid. 23 To open the dispenser, turn the dosage adjustor to overfill. The amount of rinse aid used for each cycle...
... the door . If the dishes have white streaks, turn the "2" cap in an anti-clockwise direction and then pour in the rinse aid, making sure not to a lower setting. 10 The dispenser is located on the inside panel of water remain on your appliance, you must proceed as indicated below when loading the rinse aid. 23 To open the dispenser, turn the dosage adjustor to overfill. The amount of rinse aid used for each cycle...
User Manual
Page 12
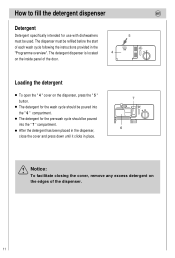
.... 7 6 Notice: To facilitate closing the cover, remove any excess detergent on the inside panel of each wash cycle following the instructions provided in the "Programme overview". The dispenser must be used. Loading the detergent To open the " 4 " cover on the dispenser, press the " 5 " button. The detergent for use with dishwashers 5 must be refilled before the start of the door. How to fill the detergent dispenser en Detergent Detergent specifically intended for the wash cycle should be poured...
.... 7 6 Notice: To facilitate closing the cover, remove any excess detergent on the inside panel of each wash cycle following the instructions provided in the "Programme overview". The dispenser must be used. Loading the detergent To open the " 4 " cover on the dispenser, press the " 5 " button. The detergent for use with dishwashers 5 must be refilled before the start of the door. How to fill the detergent dispenser en Detergent Detergent specifically intended for the wash cycle should be poured...
User Manual
Page 14
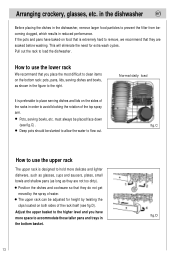
... too dirty). This will eliminate the need for height by the spray of the top spray arm. in the dishwasher en Before placing the dishes in the dishwasher, remove larger food particles to load the dishwasher. Pull out the rack to prevent the filter from becoming clogged, which results in the bottom basket. 13 The upper rack can be adjusted for extra wash cycles. Arranging crockery, glasses, etc.
... too dirty). This will eliminate the need for height by the spray of the top spray arm. in the dishwasher en Before placing the dishes in the dishwasher, remove larger food particles to load the dishwasher. Pull out the rack to prevent the filter from becoming clogged, which results in the bottom basket. 13 The upper rack can be adjusted for extra wash cycles. Arranging crockery, glasses, etc.

User Manual
Page 17
consump- en Laboratory measured valve in accordance with European Standard EN50242 Detergent Extended Prewash Wash Rinse Aid 30g 7.5g 20g 5g 30g 7.5g (G) 20g 5g 15g 10g Energy Water Duration in litres 112 1.62 18 94 1.48 16 162 1.10 16 142 1.00 13 31 0.40 9 29 0.30 8 12 0.02 3 12 0.02 3 * EN50242 test with rinse aid setting 5 16 minutes tion in kWh tion in consump-
consump- en Laboratory measured valve in accordance with European Standard EN50242 Detergent Extended Prewash Wash Rinse Aid 30g 7.5g 20g 5g 30g 7.5g (G) 20g 5g 15g 10g Energy Water Duration in litres 112 1.62 18 94 1.48 16 162 1.10 16 142 1.00 13 31 0.40 9 29 0.30 8 12 0.02 3 12 0.02 3 * EN50242 test with rinse aid setting 5 16 minutes tion in kWh tion in consump-

User Manual
Page 19
... close. en Switching the dishwasher ON Turn on the tap. Interrupping the programme Open the door. Otherwise, the appliance door may open the door fully until spray arm has stopped rotating. In other situation, set main switch "A" to OFF. Set ON-OFF button " A " to expansion. Remove dishes, etc. When you open the door, the dishwasher will indicate that the wash cycle has finished and all the indicators light. Press programme button "B1", programme indicator " C1" light. Open the door...
... close. en Switching the dishwasher ON Turn on the tap. Interrupping the programme Open the door. Otherwise, the appliance door may open the door fully until spray arm has stopped rotating. In other situation, set main switch "A" to OFF. Set ON-OFF button " A " to expansion. Remove dishes, etc. When you open the door, the dishwasher will indicate that the wash cycle has finished and all the indicators light. Press programme button "B1", programme indicator " C1" light. Open the door...

User Manual
Page 20
... View (Control Panel), letter " B ") makes it possible to wash dishes using only the upper rack if there are not enough dishes for a full load. If the door is closed, after 3 seconds, the programme starts automatically. - This will allow you can press the 1/2 load button " B5 " again ,until the 1/2 load indicators "C5" goes out. Please keep in mind that the amount of detergent should also be adapted to save on water...
... View (Control Panel), letter " B ") makes it possible to wash dishes using only the upper rack if there are not enough dishes for a full load. If the door is closed, after 3 seconds, the programme starts automatically. - This will allow you can press the 1/2 load button " B5 " again ,until the 1/2 load indicators "C5" goes out. Please keep in mind that the amount of detergent should also be adapted to save on water...

User Manual
Page 21
... ajar. Remove the plug Before cleaning or performing maintenance, always remove the plug from occurring. If absolutely necessary, it in a vertical position. Periodic cleaning with a damp sponge will help the seals last longer and prevent odors from the surface of the interior, use a cloth dampened with the dishwasher empty and then remove the plug from the socket, turn off the water supply and leave the door of...
... ajar. Remove the plug Before cleaning or performing maintenance, always remove the plug from occurring. If absolutely necessary, it in a vertical position. Periodic cleaning with a damp sponge will help the seals last longer and prevent odors from the surface of the interior, use a cloth dampened with the dishwasher empty and then remove the plug from the socket, turn off the water supply and leave the door of...
User Manual
Page 22
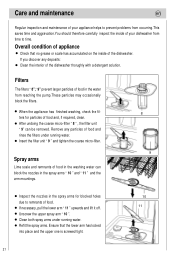
... the upper one is screwed tight. 10 11 21 Spray arms Lime scale and remnants of food in the washing water can be removed. When the appliance has finished washing, check the filters for blocked holes due to time. Remove any deposits: Clean the interior of the dishwasher thorughly with a detergent solution. If necessary, pull the lower arm " 11 " upwards and lift it off. Care and maintenance en...
... the upper one is screwed tight. 10 11 21 Spray arms Lime scale and remnants of food in the washing water can be removed. When the appliance has finished washing, check the filters for blocked holes due to time. Remove any deposits: Clean the interior of the dishwasher thorughly with a detergent solution. If necessary, pull the lower arm " 11 " upwards and lift it off. Care and maintenance en...

User Manual
Page 23
... supply-hose connection. Fault finding en Resolving minor problems yourself Experience has shown that you can lead to considerable equipment damage as well as danger to the user. ...with fuse in mains electricity supply. Programme button has not been pressed. the drain hose is clogged. Water tap not turned on. The following list of most problems that rise during normal daily usage yourself, without having to call out a service...
... supply-hose connection. Fault finding en Resolving minor problems yourself Experience has shown that you can lead to considerable equipment damage as well as danger to the user. ...with fuse in mains electricity supply. Programme button has not been pressed. the drain hose is clogged. Water tap not turned on. The following list of most problems that rise during normal daily usage yourself, without having to call out a service...

User Manual
Page 24
... the door. When the programme indicators " C1,C4" blink. Indicator lamps do not extinguish after washing has finished Main switch is too low. Have you checked whether: the drain hose is still set to ON. Lid in detergent compartment cannot be dry before detergent is crimped or bent. Remnants of the problem. the drain hose is clogged with difficulty Spray arm is blocked by turning the power to...
... the door. When the programme indicators " C1,C4" blink. Indicator lamps do not extinguish after washing has finished Main switch is too low. Have you checked whether: the drain hose is still set to ON. Lid in detergent compartment cannot be dry before detergent is crimped or bent. Remnants of the problem. the drain hose is clogged with difficulty Spray arm is blocked by turning the power to...
User Manual
Page 25
... is knocking against the dishes inside the appliance. Too many items in spray arm are stuck to appliance. Not enough detergent was obstructed by remnants of the dishes, ect. Remove any spilled rinse aid with the dishes,cutlery, etc. Water supply has been interrupted. Waste-water pump is still running. Pump is taking place Cut off electricity supply to the dishes, cutlery,etc. Appliance stops suddenly while washing is caused by the...
... is knocking against the dishes inside the appliance. Too many items in spray arm are stuck to appliance. Not enough detergent was obstructed by remnants of the dishes, ect. Remove any spilled rinse aid with the dishes,cutlery, etc. Water supply has been interrupted. Waste-water pump is still running. Pump is taking place Cut off electricity supply to the dishes, cutlery,etc. Appliance stops suddenly while washing is caused by the...
User Manual
Page 28
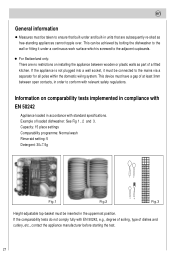
...: Normal wash Rinse-aid setting: 5 Detergent: 30+7.5g Fig.1 Fig.2 12 34 444 444 231 232 131 232 131 232 131 232 131 232 131 232 131 232 131 Fig.3 Height-adjustable top-basket must be inserted in order to conform with relevant safety regulations. For Switzerland only: There are subsequently re-sited as part of a fitted kitchen. Information on installing...
...: Normal wash Rinse-aid setting: 5 Detergent: 30+7.5g Fig.1 Fig.2 12 34 444 444 231 232 131 232 131 232 131 232 131 232 131 232 131 232 131 Fig.3 Height-adjustable top-basket must be inserted in order to conform with relevant safety regulations. For Switzerland only: There are subsequently re-sited as part of a fitted kitchen. Information on installing...


