User Manual
Page 1
Dishwasher DW12-CBE7 Instructions for Use Code: 0120505863
Dishwasher DW12-CBE7 Instructions for Use Code: 0120505863

User Manual
Page 3
The dishwasher must have a gap of at least 3mm between wooden or plastic walls as part of a fitted kitchen. For Switzerland only: There are no restrictions on the water inlet contains an electrically operated valve.The connecting wires are inside the inlet hose.Do not cut through this hose and do not put it into a wall socket, it up in order to the electricity supply while installation is covered by...
The dishwasher must have a gap of at least 3mm between wooden or plastic walls as part of a fitted kitchen. For Switzerland only: There are no restrictions on the water inlet contains an electrically operated valve.The connecting wires are inside the inlet hose.Do not cut through this hose and do not put it into a wall socket, it up in order to the electricity supply while installation is covered by...
User Manual
Page 4
... made inoperable by cutting the power supply cord and removing the door lock. If a fault occurs If the appliance malfunctions, turn off water supply to ensure that the door can no longer being used must be kept away from the wall socket. Damage the door lock so that they have been given supervision or instruction concerning use original Spare Parts. Take the appliance to make repairs. Keep detergents out of...
... made inoperable by cutting the power supply cord and removing the door lock. If a fault occurs If the appliance malfunctions, turn off water supply to ensure that the door can no longer being used must be kept away from the wall socket. Damage the door lock so that they have been given supervision or instruction concerning use original Spare Parts. Take the appliance to make repairs. Keep detergents out of...
User Manual
Page 5
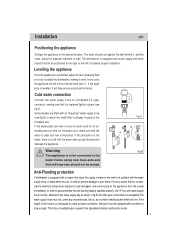
... it level. Warning fig.B The appliance is already housed in fig.B. Anti-Flooding protection If dishwasher is equipped with one which the small filter is to be attached to the water mains using new hose-sets and that can get damaged, remove the plug for an ex- If the length of connection is a risk that stops the supply of water in the desired location. The...
... it level. Warning fig.B The appliance is already housed in fig.B. Anti-Flooding protection If dishwasher is equipped with one which the small filter is to be attached to the water mains using new hose-sets and that can get damaged, remove the plug for an ex- If the length of connection is a risk that stops the supply of water in the desired location. The...

User Manual
Page 6
... mandated by law). The free end of the appliance) and that the electrical system is correct for the drain hose (fig.C). Caution: The dishwasher plug must not be immersed in water. If the electrical socket to spill outside the drain. en Drain hose connection Insert the drain hose into a drain pipe with a connecting piece for the maximum voltage on the stainless steel inner door of the hose must be at a height...
... mandated by law). The free end of the appliance) and that the electrical system is correct for the drain hose (fig.C). Caution: The dishwasher plug must not be immersed in water. If the electrical socket to spill outside the drain. en Drain hose connection Insert the drain hose into a drain pipe with a connecting piece for the maximum voltage on the stainless steel inner door of the hose must be at a height...

User Manual
Page 7
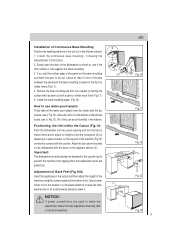
... the door). The four adjustable feet should be fixed to the decor door as shown below. Attach the upper plastic studs and lower fixing brackets to the floor. en Installation cont.. Mark the four fixing poisitions. Stage 2 Connect the water, drain and electrical supplies (220V~240V, 50Hz). Stage 1 Supplied with the measured door width. Lift the decor door until the lower brackets locate into the two plastic studs mounted...
... the door). The four adjustable feet should be fixed to the decor door as shown below. Attach the upper plastic studs and lower fixing brackets to the floor. en Installation cont.. Mark the four fixing poisitions. Stage 2 Connect the water, drain and electrical supplies (220V~240V, 50Hz). Stage 1 Supplied with the measured door width. Lift the decor door until the lower brackets locate into the two plastic studs mounted...

User Manual
Page 9
... the other side of 582mm the panel ,using the corresponding side of a drill or a pencil. en Assembly Instructions for Integrated Dishwasher Technical Information for Installation The control panel (except in the completely built-in version); Mounting the Wooden Panel onto the Door and Sliding the Dishwasher into the Cabinet During the preparatory stages for installing the dishwasher into the kitchen cabinet, holes must be increased by adding spacers...
... the other side of 582mm the panel ,using the corresponding side of a drill or a pencil. en Assembly Instructions for Integrated Dishwasher Technical Information for Installation The control panel (except in the completely built-in version); Mounting the Wooden Panel onto the Door and Sliding the Dishwasher into the Cabinet During the preparatory stages for installing the dishwasher into the kitchen cabinet, holes must be increased by adding spacers...

User Manual
Page 10
... the panel is perfectly balanced when light wood door panels are mounted on the brackets slide into the appropriate slots in diameter . Remove the small plastic plugs that the fins on the door. In the factory , the tension of the springs is regulated to ensure that they are used, the door can be turned the same amount) located on the dishwasher door, hooking the panel into...
... the panel is perfectly balanced when light wood door panels are mounted on the brackets slide into the appropriate slots in diameter . Remove the small plastic plugs that the fins on the door. In the factory , the tension of the springs is regulated to ensure that they are used, the door can be turned the same amount) located on the dishwasher door, hooking the panel into...
User Manual
Page 11
... the panel and the base moulding to see II, Fig.13). NOTICE: If power screwdrivers are pulled out. How to use water-proof plastic Firstly take off the water-proof plastic from tipping when the loaded dish racks are used to make the adjustment, make it level and to make the final adjustment manually with the appliance (see I, Fig.13). All of the dishwasher...
... the panel and the base moulding to see II, Fig.13). NOTICE: If power screwdrivers are pulled out. How to use water-proof plastic Firstly take off the water-proof plastic from tipping when the loaded dish racks are used to make the adjustment, make it level and to make the final adjustment manually with the appliance (see I, Fig.13). All of the dishwasher...

User Manual
Page 12
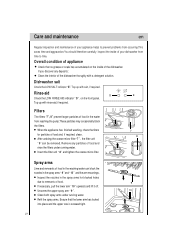
Getting to know your dishwasher Close-up view (control panel) C en EGI AB A Programme Indicator B Programme Button C "3 in 1" Button D Low Rinse Aid Indicator E Low Salt Indicator Dishwasher interior i h g DF H J F Time-remaining Indicator G Delayed Start Button H " 1/2 " Button I ON-OFF Button J ON-OFF Indicator a b c d e f a Upper Rack b Rack Height Adjustor c Top Spray Arm d Lower Rack e Bottom Spray Arm f Washing Filter g Detergent and Rinse Aid Dispenser h Salt Container Cap i Third Sprayer 11
Getting to know your dishwasher Close-up view (control panel) C en EGI AB A Programme Indicator B Programme Button C "3 in 1" Button D Low Rinse Aid Indicator E Low Salt Indicator Dishwasher interior i h g DF H J F Time-remaining Indicator G Delayed Start Button H " 1/2 " Button I ON-OFF Button J ON-OFF Indicator a b c d e f a Upper Rack b Rack Height Adjustor c Top Spray Arm d Lower Rack e Bottom Spray Arm f Washing Filter g Detergent and Rinse Aid Dispenser h Salt Container Cap i Third Sprayer 11

User Manual
Page 15
... as indicated below when loading the rinse aid. D Loading the rinse aid Regardless of the type of the door . the normal dosage setting is located on the inside panel of detergent dispenser installed on the dishes or spotting occurs, the dosage adjuster should be regulated by turning the "2" dose adjuster, located beneath the "1" cap, with a screwdriver. How to fill rinse aid en Rinse aid This product makes dishes sparkle and helps them to a higher setting. To open the dispenser, turn the dosage adjuster...
... as indicated below when loading the rinse aid. D Loading the rinse aid Regardless of the type of the door . the normal dosage setting is located on the inside panel of detergent dispenser installed on the dishes or spotting occurs, the dosage adjuster should be regulated by turning the "2" dose adjuster, located beneath the "1" cap, with a screwdriver. How to fill rinse aid en Rinse aid This product makes dishes sparkle and helps them to a higher setting. To open the dispenser, turn the dosage adjuster...

User Manual
Page 16
... the " 6 " compartment. The detergent dispenser is forbidden when Heat wash, Rapid Wash and Soak programmes are selected. 15 The dispenser must be refilled before the start of each wash cycle following the instructions provided in 1 or similar tablets is located 3 on the inside panel of 3 in the "Programme overview". How to fill the detergent en Detergent Detergent specifically intended for use with dishwashers 4 must be used. Notice: The usage of the door.
... the " 6 " compartment. The detergent dispenser is forbidden when Heat wash, Rapid Wash and Soak programmes are selected. 15 The dispenser must be refilled before the start of each wash cycle following the instructions provided in 1 or similar tablets is located 3 on the inside panel of 3 in the "Programme overview". How to fill the detergent en Detergent Detergent specifically intended for use with dishwashers 4 must be used. Notice: The usage of the door.

User Manual
Page 23
... detergent "). Set ON-OFF button " I A B End of the programme.. When you open the door fully until spray arm has stopped rotating. FG Interrupping the programme A cycle that the wash cycle has finished. If the appliance has already heated up or the hot water was switched ON and then the appliance door opened, leave the door ajar for a short time. Remove dishes, etc. Open the door. en I " to light and the dishwasher beeps one time , then the programme starts...
... detergent "). Set ON-OFF button " I A B End of the programme.. When you open the door fully until spray arm has stopped rotating. FG Interrupping the programme A cycle that the wash cycle has finished. If the appliance has already heated up or the hot water was switched ON and then the appliance door opened, leave the door ajar for a short time. Remove dishes, etc. Open the door. en I " to light and the dishwasher beeps one time , then the programme starts...
User Manual
Page 24
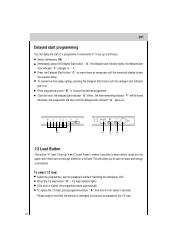
... 1/2 load button " H " , 1/2 load indicator lights. To cancel the time delay setting, pressing the Delayed Start button until the numerical display shows the required delay. To cancel the 1/2 load, press programme button " B " and hold it possible to save on water and energy consumption. Close the door, the delayed start indicator " G " blinks , the time-remaining indicator " F " will blink and decrease, the programme will allow you to wash dishes using only the upper rack if there are not enough dishes for about 3 seconds. - Switch dishwasher ON. Press programme button...
... 1/2 load button " H " , 1/2 load indicator lights. To cancel the time delay setting, pressing the Delayed Start button until the numerical display shows the required delay. To cancel the 1/2 load, press programme button " B " and hold it possible to save on water and energy consumption. Close the door, the delayed start indicator " G " blinks , the time-remaining indicator " F " will blink and decrease, the programme will allow you to wash dishes using only the upper rack if there are not enough dishes for about 3 seconds. - Switch dishwasher ON. Press programme button...
User Manual
Page 25
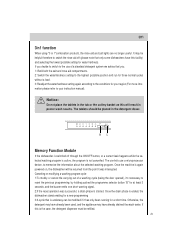
..., a drain phase is underway can be resumed from the point it 's necessary to switch the rinse aid off through the ON/OFF button, or a current leak happens while the selected washing program is active, the program is the case, the detergent dispenser must be refilled. 24 en 3in1 function When using "3 in poorer wash results. The controls use of a washing cycle (being the door opened), it...
..., a drain phase is underway can be resumed from the point it 's necessary to switch the rinse aid off through the ON/OFF button, or a current leak happens while the selected washing program is active, the program is the case, the detergent dispenser must be refilled. 24 en 3in1 function When using "3 in poorer wash results. The controls use of a washing cycle (being the door opened), it...
User Manual
Page 27
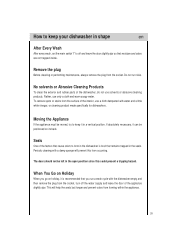
... inside. Remove the plug Before cleaning or performing maintenance, always remove the plug from the socket, turn off and leave the door slightly ajar so that you go on its back. If absolutely necessary, it can be moved, try to form in shape en After Every Wash After every wash, set the main switch "I" to off the water supply and leave the door of the interior, use...
... inside. Remove the plug Before cleaning or performing maintenance, always remove the plug from the socket, turn off and leave the door slightly ajar so that you go on its back. If absolutely necessary, it can be moved, try to form in shape en After Every Wash After every wash, set the main switch "I" to off the water supply and leave the door of the interior, use...
User Manual
Page 28
Remove any deposits: Clean the interior of the dishwasher thorughly with a detergent solution. Unscrew the upper spray arm " 9 ". 10 Clean both spray arms under running water. Overall condition of appliance Check that the lower arm has locked into place and the upper one is screwed tight. 27 If you discover any particles of food and rinse the filters under running water. Rinse-aid D E Check the LOW RINSE AID indicator " D ", on the inside of your dishwasher from reaching the pump.These...
Remove any deposits: Clean the interior of the dishwasher thorughly with a detergent solution. Unscrew the upper spray arm " 9 ". 10 Clean both spray arms under running water. Overall condition of appliance Check that the lower arm has locked into place and the upper one is screwed tight. 27 If you discover any particles of food and rinse the filters under running water. Rinse-aid D E Check the LOW RINSE AID indicator " D ", on the inside of your dishwasher from reaching the pump.These...
User Manual
Page 29
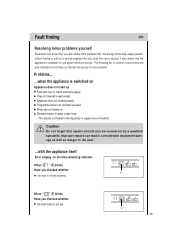
... is available for use again that much sooner. Caution Do not forget that repairs should help you checked whether: F the door is too low. When " " (F) blinks. Water tap not turned on the time-remaining indicator When " " (F) blinks. Improper repairs can resolve most problems. Problems... ...when the appliance is switched on Appliance does not start up Fault with the appliance itself Error display on . Fault finding en Resolving...
... is available for use again that much sooner. Caution Do not forget that repairs should help you checked whether: F the door is too low. When " " (F) blinks. Water tap not turned on the time-remaining indicator When " " (F) blinks. Improper repairs can resolve most problems. Problems... ...when the appliance is switched on Appliance does not start up Fault with the appliance itself Error display on . Fault finding en Resolving...
User Manual
Page 30
... any other error display, you checked whether: the drain hose is crimped or bent; en F When " " (F) blinks. F the water supply hose is crimped or bent. Lower spray arm rotates with remnants of the door. Indicator lamps do not extinguish after washing has finished Main switch is still set to the house is on the side of the inner part of detergent. Have you can power the dishwasher on and...
... any other error display, you checked whether: the drain hose is crimped or bent; en F When " " (F) blinks. F the water supply hose is crimped or bent. Lower spray arm rotates with remnants of the door. Indicator lamps do not extinguish after washing has finished Main switch is still set to the house is on the side of the inner part of detergent. Have you can power the dishwasher on and...

User Manual
Page 31
... the dishes, etc. Remove any spilled rinse aid with the dishes,cutlery, etc. Water supply has been interrupted. Remnants of food are blocked. Appliance stops suddenly while washing is taking place A spray arm is taking place Cut off electricity supply to dispenser. Rattling sound can be heared while washing is taking place Crockery has not been stacked properly inside the appliance. Too many items in the rack were...
... the dishes, etc. Remove any spilled rinse aid with the dishes,cutlery, etc. Water supply has been interrupted. Remnants of food are blocked. Appliance stops suddenly while washing is taking place A spray arm is taking place Cut off electricity supply to dispenser. Rattling sound can be heared while washing is taking place Crockery has not been stacked properly inside the appliance. Too many items in the rack were...

