User Manual
Page 1
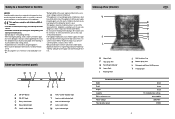
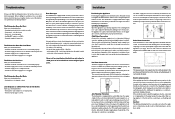
Installation Domestic Dishwasher DW12-CBE6 Diagram 220-240V ~ 50Hz Wiring box N L Power switch 3(1) 1(2) IG 4(2) 2(1) LS Power indicator F IS Door switch 1 23456 78 CnL1 Rinsing agent missing switch Salt missing switch ISS Temperature sensor CnP3 1 2 3 4 5 6 7 8 CnP1 6 5 4 3 2 1 Control panel CnP2 12 11 10 9 8 7 6 5 4 3 2 1 RELE' Relay Water level switch 1 1 2 3 Drain pump Dispenser D-ED EV1/2 1/2 washing valve Softener Overflow valve switch EV2 1 IAQS 32 Washing pump 4 1 ML 2 S C EV1 AQS Inlet valve EV1 Temperature limiter Heater Temperature limiter ...
Installation Domestic Dishwasher DW12-CBE6 Diagram 220-240V ~ 50Hz Wiring box N L Power switch 3(1) 1(2) IG 4(2) 2(1) LS Power indicator F IS Door switch 1 23456 78 CnL1 Rinsing agent missing switch Salt missing switch ISS Temperature sensor CnP3 1 2 3 4 5 6 7 8 CnP1 6 5 4 3 2 1 Control panel CnP2 12 11 10 9 8 7 6 5 4 3 2 1 RELE' Relay Water level switch 1 1 2 3 Drain pump Dispenser D-ED EV1/2 1/2 washing valve Softener Overflow valve switch EV2 1 IAQS 32 Washing pump 4 1 ML 2 S C EV1 AQS Inlet valve EV1 Temperature limiter Heater Temperature limiter ...
User Manual
Page 2
... button M Cycle indicator light .1. Carefully dispose of the appliance. Close-up View (Interior) V V J J L L GB E G F H K I E Upper Rack F Top Spray Arm G Rack Height Adjustor H Lower Rack I Washing Filter Technical characteristics Width Depth Height Capacity Mains water pressure Power voltage Total absorber power J Salt Container Cap K Bottom Spray Arm L Detergent and Rinse Aid Dispenser V Third Sprayer 60 cm 58 cm 82 cm 12 standard place settings 0.03-0.6MPa 220-240V~ 2150W .2. Do not lean or sit on the door when it is installed...
... button M Cycle indicator light .1. Carefully dispose of the appliance. Close-up View (Interior) V V J J L L GB E G F H K I E Upper Rack F Top Spray Arm G Rack Height Adjustor H Lower Rack I Washing Filter Technical characteristics Width Depth Height Capacity Mains water pressure Power voltage Total absorber power J Salt Container Cap K Bottom Spray Arm L Detergent and Rinse Aid Dispenser V Third Sprayer 60 cm 58 cm 82 cm 12 standard place settings 0.03-0.6MPa 220-240V~ 2150W .2. Do not lean or sit on the door when it is installed...
User Manual
Page 3
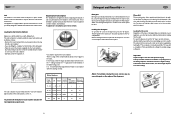
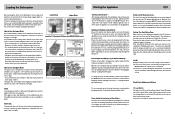
... container must be filled as indicated below when loading the rinse aid. Loading the detergent To open the dispenser, turn the dosage adjustor to a higher setting. The amount of rinse aid used . If drops of water remain on the dishes or spotting occurs, the dosage adjustor should be filled after every 80 wash cycles (or when the "low rinse aid" indicator light comes on the inside panel the door. Salt GB Salt The hardness...
... container must be filled as indicated below when loading the rinse aid. Loading the detergent To open the dispenser, turn the dosage adjustor to a higher setting. The amount of rinse aid used . If drops of water remain on the dishes or spotting occurs, the dosage adjustor should be filled after every 80 wash cycles (or when the "low rinse aid" indicator light comes on the inside panel the door. Salt GB Salt The hardness...
User Manual
Page 4
... on the lower rack: pots, lids, serving dishes and bowls, as required(see Fig. "The end of the rack itself (see " Close-up View" Control Panel"). Cancelling or modifying a cycle while underway... Setting The Start Delay Time Open the door of the wash cycle... After selecting the delay time, the wash cycle can also be cancelled by six acoustic sound, and the indicator light "M" will blink. Close the door and at this manual, especially when first using only the upper rack if there...
... on the lower rack: pots, lids, serving dishes and bowls, as required(see Fig. "The end of the rack itself (see " Close-up View" Control Panel"). Cancelling or modifying a cycle while underway... Setting The Start Delay Time Open the door of the wash cycle... After selecting the delay time, the wash cycle can also be cancelled by six acoustic sound, and the indicator light "M" will blink. Close the door and at this manual, especially when first using only the upper rack if there...
User Manual
Page 5
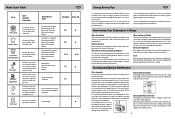
... needed. A B Cleaning the Water Inlet Filter Periodically clean the water inlet filter (see figure) located on its back. Standard daily cycle. Extended wash at 50 K Rinse with hot waterK Drying. Energy Saving Tips GB -It is important to try to keep Your Dishwasher in the dishwasher is no advantage in the dishwasher. Remove the plug Before cleaning or performing maintenance, always remove the plug from drying on the environment. -There is food that you use too much detergent...
... needed. A B Cleaning the Water Inlet Filter Periodically clean the water inlet filter (see figure) located on its back. Standard daily cycle. Extended wash at 50 K Rinse with hot waterK Drying. Energy Saving Tips GB -It is important to try to keep Your Dishwasher in the dishwasher is no advantage in the dishwasher. Remove the plug Before cleaning or performing maintenance, always remove the plug from drying on the environment. -There is food that you use too much detergent...
User Manual
Page 6
....2). Some models are not original spare parts. Anti-Flooding Protection If the electrical socket to the hot water line following information: - No other indicator lights begins to blink rapidly, turn off the appliance and call for the water supply hose is able to the salt container is crimped or bent. the power is installed as those on the rating plate (located on the stainless steel inner door of the hose must...
....2). Some models are not original spare parts. Anti-Flooding Protection If the electrical socket to the hot water line following information: - No other indicator lights begins to blink rapidly, turn off the appliance and call for the water supply hose is able to the salt container is crimped or bent. the power is installed as those on the rating plate (located on the stainless steel inner door of the hose must...

