
User Manual
Page 2
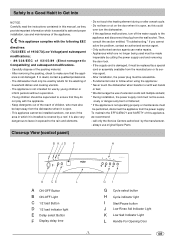
... a wash cycle. - GI G Cycle select button H Cycle indicator light I Start/Pause button J Low Rinse Aid Indicator Light K Low Salt Indicator Light L Handle For Opening Door GB If in doubt, contact a qualified professional. - Fundamental rules to follow when using the appliance: * Never touch the dishwasher when barefoot or with wet hands or feet; * We discourage the use by cutting the power supply cord and removing the door lock. - The appliance is essential to safe and proper installation, use original Spare Parts Close-up View (control panel...
... a wash cycle. - GI G Cycle select button H Cycle indicator light I Start/Pause button J Low Rinse Aid Indicator Light K Low Salt Indicator Light L Handle For Opening Door GB If in doubt, contact a qualified professional. - Fundamental rules to follow when using the appliance: * Never touch the dishwasher when barefoot or with wet hands or feet; * We discourage the use by cutting the power supply cord and removing the door lock. - The appliance is essential to safe and proper installation, use original Spare Parts Close-up View (control panel...
User Manual
Page 3
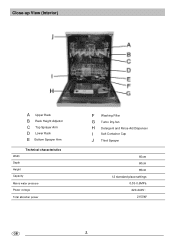
Close-up View (Interior) A Upper Rack B Rack Height Adjustor C Top Sprayer Arm D Lower Rack E Bottom Sprayer Arm Technical characteristics Width Depth Height Capacity Mains water pressure Power voltage Total absorber power F Washing Filter G Turbo Dry-fan H Detergent and Rinse Aid Dispenser I Salt Container Cap J Third Sprayer 60cm 60cm 85cm 12 standard place settings 0.03-0.6MPa 220-240V~ 2150W GB .2.
Close-up View (Interior) A Upper Rack B Rack Height Adjustor C Top Sprayer Arm D Lower Rack E Bottom Sprayer Arm Technical characteristics Width Depth Height Capacity Mains water pressure Power voltage Total absorber power F Washing Filter G Turbo Dry-fan H Detergent and Rinse Aid Dispenser I Salt Container Cap J Third Sprayer 60cm 60cm 85cm 12 standard place settings 0.03-0.6MPa 220-240V~ 2150W GB .2.

User Manual
Page 4
... just before beginning a wash cycle. .3. If hard water is a ring on the container with dishwashers. There is used . Adjusting Salt Consumption The dishwasher is located beneath the lower rack and should be filled when the "low salt" indicator light (located on the control panel) comes on the hardness of the water used in the anticlockwise direction from the water. Remove the lower rack and then unscrew and remove the cap from the salt container...
... just before beginning a wash cycle. .3. If hard water is a ring on the container with dishwashers. There is used . Adjusting Salt Consumption The dishwasher is located beneath the lower rack and should be filled when the "low salt" indicator light (located on the control panel) comes on the hardness of the water used in the anticlockwise direction from the water. Remove the lower rack and then unscrew and remove the cap from the salt container...
User Manual
Page 5
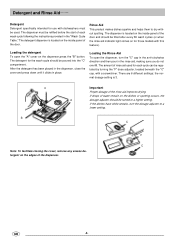
... facilitate closing the cover, remove any excess detergent on the edges of water remain on for the wash cycle should be turned to a higher setting. The dispenser is located on the inside panel of the rinse aid improves drying. The detergent dispenser is 3. Loading the detergent To open the dispenser, turn the dosage adjustor to dry without spotting. Detergent and Rinse Aid Detergent Detergent specifically intended for each wash cycle following the instructions provided in the "Wash Cycle Table." C Important Proper dosage of the door...
... facilitate closing the cover, remove any excess detergent on the edges of water remain on for the wash cycle should be turned to a higher setting. The dispenser is located on the inside panel of the rinse aid improves drying. The detergent dispenser is 3. Loading the detergent To open the dispenser, turn the dosage adjustor to dry without spotting. Detergent and Rinse Aid Detergent Detergent specifically intended for each wash cycle following the instructions provided in the "Wash Cycle Table." C Important Proper dosage of the door...
User Manual
Page 6
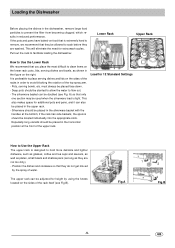
... they are washed. Load for additional pots and pans, and it can be placed in the silverware basket with the handles at the front of water. Loading the Dishwasher Before placing the dishes in the dishwasher, remove large food particles to facilitate loading the dishwasher. Lower Rack Upper Rack How to Use the Lower Rack We recommend that only one section may be allowed to Use the Upper Rack The upper rack is light. A) so...
... they are washed. Load for additional pots and pans, and it can be placed in the silverware basket with the handles at the front of water. Loading the Dishwasher Before placing the dishes in the dishwasher, remove large food particles to facilitate loading the dishwasher. Lower Rack Upper Rack How to Use the Lower Rack We recommend that only one section may be allowed to Use the Upper Rack The upper rack is light. A) so...

User Manual
Page 7
.... button. Wash cycle Programme Light Wash Cycle adjustment Buttons The wash cycle is necessary, all of the settings must be changed. water and eletrical energy. It can be used , and the appliance mayhave already drained the wash water. Please keep in the correspond- GB .6. Each By pressing the "E" button (see "close -up View - Otherwise, the detergent may have been cancelled. If it has NOTE: only been running and the cycle indicator light (H) for the cycle will the start where...
.... button. Wash cycle Programme Light Wash Cycle adjustment Buttons The wash cycle is necessary, all of the settings must be changed. water and eletrical energy. It can be used , and the appliance mayhave already drained the wash water. Please keep in the correspond- GB .6. Each By pressing the "E" button (see "close -up View - Otherwise, the detergent may have been cancelled. If it has NOTE: only been running and the cycle indicator light (H) for the cycle will the start where...
User Manual
Page 8
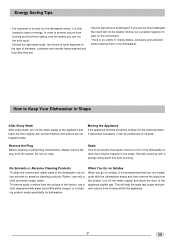
... a cleaning product made specifically for dishwasher. In order to prevent odours from forming and food from the socket, turn off the water supply and leave the door of detergent: if you go on its back. Seals One of the interior, use only a cloth and warm soapy water. To remove spots or stains from occuring. Do not run the hold cycle. - Remove the Plug Before cleaning or performing maintenance, always remove the plug...
... a cleaning product made specifically for dishwasher. In order to prevent odours from forming and food from the socket, turn off the water supply and leave the door of detergent: if you go on its back. Seals One of the interior, use only a cloth and warm soapy water. To remove spots or stains from occuring. Do not run the hold cycle. - Remove the Plug Before cleaning or performing maintenance, always remove the plug...

User Manual
Page 9
... are used. Detergent Rinse Aid 30g 30g 15g Soak Pre-wash of Cycle Normal wash (IEC-EN50242) Normal dirty dishes, pots and pans without dried on residue. No Rapid Wash drying cycle. Rinse with cold water. Intensive wash Very dirty dishes, pots and pans. (not to be used with delicate items) Pre-wash with cold water Extended wash at 40 Cold rinse . Short cold wash to be used on the dishes GB .8. Short wash at 70 Rinse with hot water Drying...
... are used. Detergent Rinse Aid 30g 30g 15g Soak Pre-wash of Cycle Normal wash (IEC-EN50242) Normal dirty dishes, pots and pans without dried on residue. No Rapid Wash drying cycle. Rinse with cold water. Intensive wash Very dirty dishes, pots and pans. (not to be used with delicate items) Pre-wash with cold water Extended wash at 40 Cold rinse . Short cold wash to be used on the dishes GB .8. Short wash at 70 Rinse with hot water Drying...
User Manual
Page 10
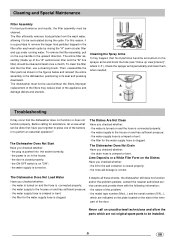
... serial number (S/N...), which are indicated on the plate located on and the hose is closed properly; - Then, reassemble the filter parts as shown in the figures below and reinsert the entire assembly in the dishwasher, positioning in the filter after each wash cycle by rinsing the "A" semi-circular filter and cup under running water. Check the sprayer arms periodically and clean them with the following information: - A B Troubleshooting It may reduce level...
... serial number (S/N...), which are indicated on the plate located on and the hose is closed properly; - Then, reassemble the filter parts as shown in the figures below and reinsert the entire assembly in the dishwasher, positioning in the filter after each wash cycle by rinsing the "A" semi-circular filter and cup under running water. Check the sprayer arms periodically and clean them with the following information: - A B Troubleshooting It may reduce level...
User Manual
Page 11
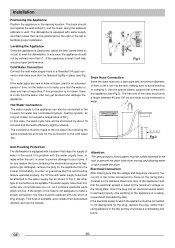
... plug into the sink, making sure that comes with water supply and drain hoses that the water inlet can also be cut, as it , and the sides, along the adjacent cabinets or wall. Electrical Connection After making sure to avoid bending or crimping it will be positioned on the stainless steel inner door of the appliance) and that it run to make sure that stops the supply...
... plug into the sink, making sure that comes with water supply and drain hoses that the water inlet can also be cut, as it , and the sides, along the adjacent cabinets or wall. Electrical Connection After making sure to avoid bending or crimping it will be positioned on the stainless steel inner door of the appliance) and that it run to make sure that stops the supply...

