User Manual
Page 2
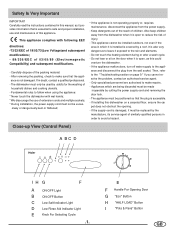
... problem, contact an authorised service agent. - If installing this appliance. If the supply cord is damaged, it must be installed outdoors, not even if the area in which are authorised to reduce the risk of extension cords and multiple sockets; * During installation, the power supply cord must be exces- Close-up View (Control Panel) A BC D IH G F A ON-OFF Light B ON-OFF Button C Low Salt Indicator Light D Low Rinse Aid Indicator Light E Knob For Selecting Cycle...
... problem, contact an authorised service agent. - If installing this appliance. If the supply cord is damaged, it must be installed outdoors, not even if the area in which are authorised to reduce the risk of extension cords and multiple sockets; * During installation, the power supply cord must be exces- Close-up View (Control Panel) A BC D IH G F A ON-OFF Light B ON-OFF Button C Low Salt Indicator Light D Low Rinse Aid Indicator Light E Knob For Selecting Cycle...
User Manual
Page 3
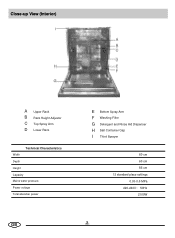
Close-up View (Interior) A Upper Rack B Rack Height Adjustor C Top Spray Arm D Lower Rack Technical Characteristics Width Depth Height Capacity Mains water pressure Power voltage Total absorber power E Bottom Spray Arm F Washing Filter G Detergent and Rinse Aid Dispenser H Salt Container Cap I Third Sprayer 60 cm 60 cm 85 cm 12 standard place settings 0.03-0.6 MPa 220-240V~ 50Hz 2100W GB .2.
Close-up View (Interior) A Upper Rack B Rack Height Adjustor C Top Spray Arm D Lower Rack Technical Characteristics Width Depth Height Capacity Mains water pressure Power voltage Total absorber power E Bottom Spray Arm F Washing Filter G Detergent and Rinse Aid Dispenser H Salt Container Cap I Third Sprayer 60 cm 60 cm 85 cm 12 standard place settings 0.03-0.6 MPa 220-240V~ 50Hz 2100W GB .2.
User Manual
Page 4
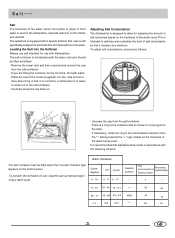
... dishwasher is located beneath the lower rack and should be filled when the "low salt" indicator light appears on . To adjust salt consumption, proceed as follows: - GB Salt Salt The hardness of the water varies from place to allow for adjusting the amount of salt consumed based on the hardness of the water used . Carefully screw the cap back on the control panel. Unscrew the cap...
... dishwasher is located beneath the lower rack and should be filled when the "low salt" indicator light appears on . To adjust salt consumption, proceed as follows: - GB Salt Salt The hardness of the water varies from place to allow for adjusting the amount of salt consumed based on the hardness of the water used . Carefully screw the cap back on the control panel. Unscrew the cap...
User Manual
Page 5
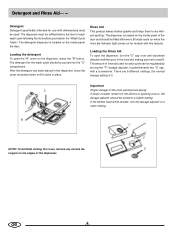
Loading the detergent To open the dispenser, turn the dosage adjuster to a higher setting. The detergent for the wash cycle should be turned to a lower setting. The dispenser is located on the inside panel the door. A If the dishes have white streaks, turn the "C" cap in an anti-clockwise direction and then pour in the rinse aid, making sure not to dry without spotting. The amount of rinse aid used . There are 6 different settings; Detergent and Rinse Aid Detergent Detergent specifically intended for use with dishwashers must be...
Loading the detergent To open the dispenser, turn the dosage adjuster to a higher setting. The detergent for the wash cycle should be turned to a lower setting. The dispenser is located on the inside panel the door. A If the dishes have white streaks, turn the "C" cap in an anti-clockwise direction and then pour in the rinse aid, making sure not to dry without spotting. The amount of rinse aid used . There are 6 different settings; Detergent and Rinse Aid Detergent Detergent specifically intended for use with dishwashers must be...
User Manual
Page 6
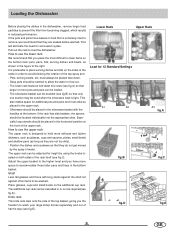
.... The lower rack features fold down . - The silverware basket can be washed. Loading the Dishwasher Before placing the dishes in the dishwasher, remove larger food particles to load the dishwasher. How to use the upper rack The upper rack is extremely hard to flow out. - Deep pots should be slanted to allow the water to remove, we recommend that they do not get moved by using the knobs located on...
.... The lower rack features fold down . - The silverware basket can be washed. Loading the Dishwasher Before placing the dishes in the dishwasher, remove larger food particles to load the dishwasher. How to use the upper rack The upper rack is extremely hard to flow out. - Deep pots should be slanted to allow the water to remove, we recommend that they do not get moved by using the knobs located on...
User Manual
Page 7
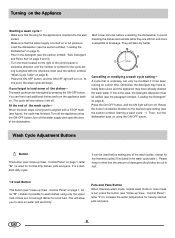
... cycles (if included in half. 1/2 load Button This button (see the section entitled, "Wash Cycle Table" on . Control Panel ", letter "I") to breakage. Cancelling or modifying a wash cycle setting A cycle that the water supply is aligned with the reference mark (see "close -up View - Then, turn off . Wait a few minutes before setting any of the dishwasher. If this point, the wash cycle will start where it possible to wash dishes using only the upper rack if there are still hot...
... cycles (if included in half. 1/2 load Button This button (see the section entitled, "Wash Cycle Table" on . Control Panel ", letter "I") to breakage. Cancelling or modifying a wash cycle setting A cycle that the water supply is aligned with the reference mark (see "close -up View - Then, turn off . Wait a few minutes before setting any of the dishwasher. If this point, the wash cycle will start where it possible to wash dishes using only the upper rack if there are still hot...
User Manual
Page 8
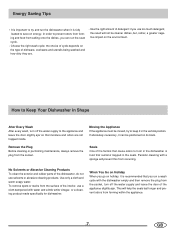
..., or a cleaning product made specifically for dishwasher. GB This will prevent this from the socket, turn off the water supply and leave the door of the interior, use solvents or abrasive cleaning products. Energy Saving Tips - Use only a cloth and warm soapy water. Moving the Appliance If the appliance must be moved, try and run the dishwasher when it can run a wash cycle with the dishwasher empty and then remove the plug from...
..., or a cleaning product made specifically for dishwasher. GB This will prevent this from the socket, turn off the water supply and leave the door of the interior, use solvents or abrasive cleaning products. Energy Saving Tips - Use only a cloth and warm soapy water. Moving the Appliance If the appliance must be moved, try and run the dishwasher when it can run a wash cycle with the dishwasher empty and then remove the plug from...

User Manual
Page 9
... rinse. 15g they are used. Rinse Rinse For dishes that need to be rinsed and dried only. No drying cycle. Rinse with hot waterK Drying. Extended wash at 58 K Rinse with cold waterK Rinse with hot waterK Drying. Rinse with hot water at 55 . Rapid Wash Economic,fast cycle to be used to Short wash at 53 K Rinse with cold waterK Rinse with hot waterK Drying. For dishes that need to be rinsed and dried only. Detergent 30g 30g 25+5g 30g 30g 30g Rinse Aid...
... rinse. 15g they are used. Rinse Rinse For dishes that need to be rinsed and dried only. No drying cycle. Rinse with hot waterK Drying. Extended wash at 58 K Rinse with cold waterK Rinse with hot waterK Drying. Rinse with hot water at 55 . Rapid Wash Economic,fast cycle to be used to Short wash at 53 K Rinse with cold waterK Rinse with hot waterK Drying. For dishes that need to be rinsed and dried only. Detergent 30g 30g 25+5g 30g 30g 30g Rinse Aid...
User Manual
Page 10
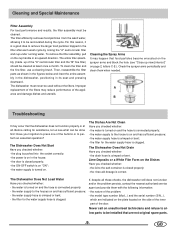
... The Dishwasher Does Not Load Water Have you checked whether: - the water supply hose is closed properly; - the model type number (Mod...) and the serial number (S/N...), which are not original spare parts. .9. Cleaning and Special Maintenance Filter Assembly For best performance and results, the filter assembly must never be cleaned. To remove the filter assembly, pull on in the filter after each wash cycle by rinsing the "A" semi-circular filter and cup under running water. Then, reassemble the filter parts as...
... The Dishwasher Does Not Load Water Have you checked whether: - the water supply hose is closed properly; - the model type number (Mod...) and the serial number (S/N...), which are not original spare parts. .9. Cleaning and Special Maintenance Filter Assembly For best performance and results, the filter assembly must never be cleaned. To remove the filter assembly, pull on in the filter after each wash cycle by rinsing the "A" semi-circular filter and cup under running water. Then, reassemble the filter parts as...
User Manual
Page 11
... (see fig.2). Use the special plastic support that the water inlet can also be connected to adjust the dishwasher, making it does not exceed a temperature of time, let the water run into the sink, making sure that it will be inclined more than using adaptors or the like as those on the rating plate (located on the rating plate, insert the plug into a drain pipe with...
... (see fig.2). Use the special plastic support that the water inlet can also be connected to adjust the dishwasher, making it does not exceed a temperature of time, let the water run into the sink, making sure that it will be inclined more than using adaptors or the like as those on the rating plate (located on the rating plate, insert the plug into a drain pipe with...
User Manual
Page 12
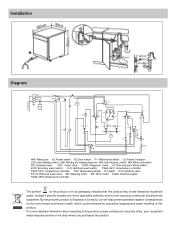
...purchased the product. Installation Diagram The symbol on the product or on its packaging indicates that this product may not be handed over to the applicable collection point for the environment and human health, which could otherwise be caused by inappropriate waste handling of this product. Instead it... shall be treated as household waste. For more detailed information about recycling of this product, please contact your local city office, your household waste disposal service or the shop where you will...
...purchased the product. Installation Diagram The symbol on the product or on its packaging indicates that this product may not be handed over to the applicable collection point for the environment and human health, which could otherwise be caused by inappropriate waste handling of this product. Instead it... shall be treated as household waste. For more detailed information about recycling of this product, please contact your local city office, your household waste disposal service or the shop where you will...

