User Manual
Page 1
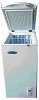
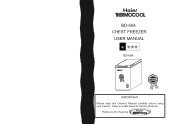
Thank you for future reference. Keep in a safe place for choosing BD-66A CHEST FREEZER USER MANUAL BD-66A 12 Y 12 Y S S MO NTH WARRAN T MO NTH WARRAN T IMPORTANT Please read this Owner's Manual carefully before using your freezer.
Thank you for future reference. Keep in a safe place for choosing BD-66A CHEST FREEZER USER MANUAL BD-66A 12 Y 12 Y S S MO NTH WARRAN T MO NTH WARRAN T IMPORTANT Please read this Owner's Manual carefully before using your freezer.
User Manual
Page 2
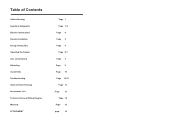
Table of Contents Outline Drawing Important Safeguards Electric Control panel Freezer Installation Energy Saving Tips Operating the Freezer Care and Cleaning Defrosting Useful Hints Troubleshooting Guide to Home Freezing Accessories List Technical Data and Wiring Diagram Warranty ATTACHMENT Page 1 Page 2-3 Page 4 Page 5 Page 6 Page 6-7 Page 8 Page 9 Page 10 Page 10-11 Page 12 Page 13 Page 14 Page 15 page 16
Table of Contents Outline Drawing Important Safeguards Electric Control panel Freezer Installation Energy Saving Tips Operating the Freezer Care and Cleaning Defrosting Useful Hints Troubleshooting Guide to Home Freezing Accessories List Technical Data and Wiring Diagram Warranty ATTACHMENT Page 1 Page 2-3 Page 4 Page 5 Page 6 Page 6-7 Page 8 Page 9 Page 10 Page 10-11 Page 12 Page 13 Page 14 Page 15 page 16
User Manual
Page 4
... it should be installed properly in accordance with the installation instructions before it straight from the outlet. 8) Replace or repair immediately all instructions before using this appliance, always exercise basic safety precautions, including the following: 1) Use this guide. 2) Remove all packaging before making any repairs. See grounding instructions in the installation section. 4) This freezer is designed for its length or at either the plug or connector end...
... it should be installed properly in accordance with the installation instructions before it straight from the outlet. 8) Replace or repair immediately all instructions before using this appliance, always exercise basic safety precautions, including the following: 1) Use this guide. 2) Remove all packaging before making any repairs. See grounding instructions in the installation section. 4) This freezer is designed for its length or at either the plug or connector end...
User Manual
Page 5
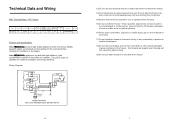
...Do not put water directly in to defrost the freezer. 13)Food should be placed inside the freezer 8 hours after the freezer has been turned on to avoid wasting power and over working the compressor. 14)Ensure that hot food is allowed to cool completely before freezing. 15)Do not overfill the freezer. BD-66A 66 6 ... 1N COMPRESSOR G/Y SERVICE E CORD. 14 12)Do not use any combustible, explosive or volatile liquids/gases. 18)Do not leave beverages such as beer, soft drinks or other materials in the freezer. 17)Do not install the freezer in the same vicinity of any electrical devices...
...Do not put water directly in to defrost the freezer. 13)Food should be placed inside the freezer 8 hours after the freezer has been turned on to avoid wasting power and over working the compressor. 14)Ensure that hot food is allowed to cool completely before freezing. 15)Do not overfill the freezer. BD-66A 66 6 ... 1N COMPRESSOR G/Y SERVICE E CORD. 14 12)Do not use any combustible, explosive or volatile liquids/gases. 18)Do not leave beverages such as beer, soft drinks or other materials in the freezer. 17)Do not install the freezer in the same vicinity of any electrical devices...
User Manual
Page 6
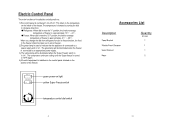
... compressor continues cooling until the 'Super freeze' is turned to an appropriate power supply . 3) The yellow lamp will be illuminated when the freezer is connected to 'OFF' again. 4)All control equipment is numbered 1,2,3,4,5,6,7. 1)The control panel is installed on the control panel situated on ' . The greenlamp will be illuminated when the 'Super Freeze' switch is in 'on the exterior of freezer is 'on light yellow Super Freeze switch temperature control dial switch 4 BD-66A 13 Power...
... compressor continues cooling until the 'Super freeze' is turned to an appropriate power supply . 3) The yellow lamp will be illuminated when the freezer is connected to 'OFF' again. 4)All control equipment is numbered 1,2,3,4,5,6,7. 1)The control panel is installed on the control panel situated on ' . The greenlamp will be illuminated when the 'Super Freeze' switch is in 'on the exterior of freezer is 'on light yellow Super Freeze switch temperature control dial switch 4 BD-66A 13 Power...
User Manual
Page 7
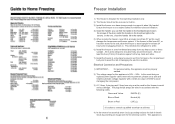
... the door, install the handle on a base strong enough to avoid serious damage. Freezer Installation 1) The freezer is designed for free-standing installation only. 2) The freezer should always be wired in accordance with a minimum output of 500W to avoid damaging the compressor. 3) A 13 Amp, 3 pin plug and 5 Amp fuse only must be used for this freezer to support it back in. In the event that your regional power supplier...
... the door, install the handle on a base strong enough to avoid serious damage. Freezer Installation 1) The freezer is designed for free-standing installation only. 2) The freezer should always be wired in accordance with a minimum output of 500W to avoid damaging the compressor. 3) A 13 Amp, 3 pin plug and 5 Amp fuse only must be used for this freezer to support it back in. In the event that your regional power supplier...
User Manual
Page 8
Troubles/Problems Green indicating lights is off Reasons Power is out of use fast/quick freeze feature. Insert plug and switch on the surface . The fuse is damaged. Cable is blown/burnt. The temperature is not low enough, or red light is on and the yellow lamp is not inserted. Food no wrapped correctly. Turn the dial to repair. Clean per 'Care and Cleaning' instruction. IF PROBLEMS PERSIST, CONTACT AN APPROVED HAIER-THERMOCOOOL SERVICE TECHNICIAN...
Troubles/Problems Green indicating lights is off Reasons Power is out of use fast/quick freeze feature. Insert plug and switch on the surface . The fuse is damaged. Cable is blown/burnt. The temperature is not low enough, or red light is on and the yellow lamp is not inserted. Food no wrapped correctly. Turn the dial to repair. Clean per 'Care and Cleaning' instruction. IF PROBLEMS PERSIST, CONTACT AN APPROVED HAIER-THERMOCOOOL SERVICE TECHNICIAN...
User Manual
Page 10
( some model have this part) 8 9
( some model have this part) 8 9


