Haier BC111B Support and Manuals
Get Help and Manuals for this Haier item

View All Support Options Below
Free Haier BC111B manuals!
Problems with Haier BC111B?
Ask a Question
Free Haier BC111B manuals!
Problems with Haier BC111B?
Ask a Question
Popular Haier BC111B Manual Pages
User Manual - Page 2

... grasp the plug firmly and pull straight out from the outlet.
4) Repair or replace immediately, all of any food is poor or questionable, discard it is not being used .
If the odor or color of the instructions before making any repairs. See grounding instructions in defrosting your refrigerator.
7) If your refrigerator before cleaning or before...
User Manual - Page 3

.... Before you for freestanding installation only.
11) Do not operate your refrigerator. Remember to obtain warranty service.
22 They are on a label in the presence of child entrapment.
Leave the shelves
in getting the best use manual will need it to record the model and serial number. You will guide you in place so that...
User Manual - Page 4
... f??@@@@??f f ??@@@@??f f??@@@@??f f??@@@@??f f??@@@@??f f??@@@@??f f??@@@@??f f ??@@@@??f f??@@@@??f f
1
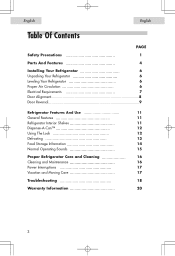
Parts And Features... f ??@@@@??f f??@@@@??f f??@@@@??f f??@@@@??f f??@@@@??f f??@@@@??f f ??@@@@??f f??@@@@??f f
4
Installing Your Refrigerator...f??@@@@??f f ??@@@@??f f??@@@@??f f??@@@@??f f??@@@@??f f??@@@@??f f??@@@@??f f ??@@@@??f f??@@@@??f f??@@@@??f f??@@@@??f f
Troubleshooting...
User Manual - Page 5

...) 5. Drip Tray (not in all models, not shown) 8. Fixed Door Shelves (varies by model) 4. Adjustable Temperature Control
6. Full Width Retainer Bar
(not in all models)
2. Slide-Out Shelves 7. Adjustable Front Leveling Legs
(not in all models) 3. EEnnglgislhish
Parts And Features
Non Dispense-A-Can™ Models
2 1
English
4 5
3 6
8
7
HSE04WNA
12345678
1. Ice Cube Tray...
User Manual - Page 6

... Control 5. Adjustable Front Leveling Leg (not shown)
8. Slide-Out Shelves
55
6. "Dispense-A-Can™" can storage (not in all models)
9. Retainer Bar (not in all models)
7. Fixed Door Shelf (varies per model)
10. Drip Tray (not in all models) 4. English
1 3 4 5 6
Dispense-A-Can™ Models
2
EnEgnlgislihsh
8
9 7
®
10
HSL04WNA HSP04WNA
1 2 3 4 5 6 7 8 9 10
1.
User Manual - Page 7
... following are extended. Inspect and remove any remains of your refrigerator. EEnnglgislihsh
English
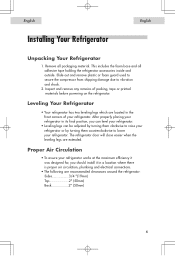
Installing Your Refrigerator
Unpacking Your Refrigerator
1. Slide out and remove plastic or foam guard ...on the refrigerator. After properly placing your refrigerator in its final position, you should install it was designed for, you can level your refrigerator.
• Leveling legs ...
User Manual - Page 8
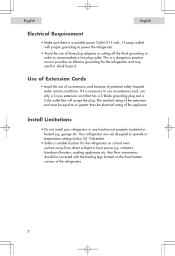
.... Use of the extension cord must be corrected with proper grounding to operate in temperature settings below 55˚ Fahrenheit.
• Select a suitable location for the refrigerator and may...a dangerous practice since it is necessary to accommodate a two plug outlet.
Install Limitations
• Do not install your refrigerator in order to use an extension cord, use of an extension ...
User Manual - Page 9

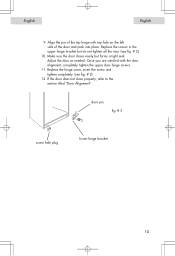
Remove the top hinge cover. 3. fig. # 1
88
Remove hinge cover screw. 2. Adjust the door or put a spacer in between and then tighten the screws. 5. EEnngglislihsh
English
Door Alignment (see fig. # 1)
1. Loosen the top hinge screws using a phillips head screwdriver. 4. Replace the top hinge cover.
User Manual - Page 11
...Once you are satisfied with top hole on the left side of the door and push into place. Replace the screws in the upper hinge bracket but forms a tight seal. Make sure the door closes easily... but do not tighten all the way. (see fig. # 2)
12.
Replace the hinge cover, insert the screw and tighten completely. (see fig. # 2)
10. If the door does not...
User Manual - Page 12
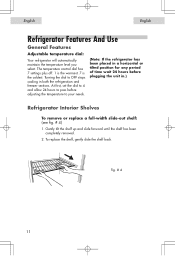
... the shelf up and slide forward until the shelf has been
completely removed. 2. fig. # 4
1111
The temperature control dial has 7 settings plus off. 1 is the warmest. 7 is the coldest. To replace the shelf, gently slide the shelf back. Turning the dial to your needs.
(Note: If the refrigerator has been placed in...
User Manual - Page 14
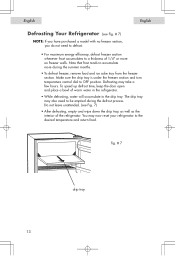
... more during the defrost process. You may take a few hours. fig. # 7
drip tray 1133 Do not leave unattended. (see Fig. # 7)
NOTE: If you have purchased a model with no freezer section, you do not need to be emptied during the summer months.
• To defrost freezer, remove food and ice cube tray...
User Manual - Page 17
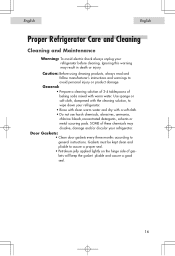
... wipe down your refrigerator. • Rinse with clean warm water and dry with warm water. Caution: Before using cleaning products, always read and follow manufacturer's instructions and warnings to general...
User Manual - Page 19
... been opened frequently or for an extended
period of time. • Clean condenser coils (for models with exposed condenser coils). • Check gasket for models with exposed condenser coils). • Adjust temperature control to colder setting. EEnngglislihsh
English
TroubleShooting
Refrigerator Does Not Operate • Check if thermostat control is not in the "OFF" position...
User Manual - Page 21
...-in lieu of 12 months.
Contact your nearest authorized service center. There will repair or replace, at our discretion any covered items during the warranty period so specified.
2. This warranty gives you specific legal rights, and you may not apply to the authorized service center before warranty repairs are covered in workmanship or materials for a period...
Haier BC111B Reviews
We have not received any reviews for Haier yet.