
User Manual
Page 2
... of many other foods. Do not use and care guide. 2) This refrigerator must be dangerous to save as much of its length, the plug or the connector end. 5) Unplug your refrigerator by pulling on the power cord. Skin may be properly installed in the installation section. 3) Never unplug your refrigerator before cleaning or before it . Use refrozen foods as soon as possible...
... of many other foods. Do not use and care guide. 2) This refrigerator must be dangerous to save as much of its length, the plug or the connector end. 5) Unplug your refrigerator by pulling on the power cord. Skin may be properly installed in the installation section. 3) Never unplug your refrigerator before cleaning or before it . Use refrozen foods as soon as possible...

User Manual
Page 3
.... You will guide you for freestanding installation only. 11) Do not operate your old refrigerator or freezer, take off the doors. As per UL 250 11.2.6 Thank you in back of child entrapment. They are on a label in getting the best use manual will need it to record the model and serial number. It is designed for using our Haier product. Remember to obtain warranty service. 22...
.... You will guide you for freestanding installation only. 11) Do not operate your old refrigerator or freezer, take off the doors. As per UL 250 11.2.6 Thank you in back of child entrapment. They are on a label in getting the best use manual will need it to record the model and serial number. It is designed for using our Haier product. Remember to obtain warranty service. 22...
User Manual
Page 4
... f??@@@@??f f??@@@@??f f 6 Electrical Requirements ??@@@@??f f??@@@@??f f??@@@@??f f??@@@@??f f ??@@@@??f f??@@@@??f f??@@@@??f f??@@@@??f f??@@@@??f f??@@@@??f f ??@@@@??f f??@@@@??f f??@@@@??f f??@@@@??f f??@@@@??f f??@@@@??f f ??@@@@??f f??@@@@??f f??@@@@??f f??@@@@??f f??@@@@??f f??@@@@??f f ??@@@@??f f??@@@@??f f??@@@@??f f??@@@@??f f??@@@@??f f??@@@@??f f ??@@@@??f f??@@@@??f f??@@@@??f f??@@@@??f f??@@@@??f f??@@@@??f f ??@@@@??f f??@@@@??f f??@@@@??f f??@@@@??f f??@@@@??f f??@@@@??f f ??@@@@??f f??@@@@??f f 7 Door Alignment 8 Door Reversal 9 Refrigerator Features And Use...
... f??@@@@??f f??@@@@??f f 6 Electrical Requirements ??@@@@??f f??@@@@??f f??@@@@??f f??@@@@??f f ??@@@@??f f??@@@@??f f??@@@@??f f??@@@@??f f??@@@@??f f??@@@@??f f ??@@@@??f f??@@@@??f f??@@@@??f f??@@@@??f f??@@@@??f f??@@@@??f f ??@@@@??f f??@@@@??f f??@@@@??f f??@@@@??f f??@@@@??f f??@@@@??f f ??@@@@??f f??@@@@??f f??@@@@??f f??@@@@??f f??@@@@??f f??@@@@??f f ??@@@@??f f??@@@@??f f??@@@@??f f??@@@@??f f??@@@@??f f??@@@@??f f ??@@@@??f f??@@@@??f f??@@@@??f f??@@@@??f f??@@@@??f f??@@@@??f f ??@@@@??f f??@@@@??f f 7 Door Alignment 8 Door Reversal 9 Refrigerator Features And Use...

User Manual
Page 5
Slide-Out Shelves 7. Ice Cube Tray (not in all models) 5. Drip Tray (not in all models) 2. Adjustable Front Leveling Legs (not in all models) 3. Fixed Door Shelves (varies by model) 4. Freezer Compartment (not in all models) 44 EEnnglgislhish Parts And Features Non Dispense-A-Can™ Models 2 1 English 4 5 3 6 8 7 HSE04WNA 12345678 1. Full Width Retainer Bar (not in all models, not shown) 8. Adjustable Temperature Control 6.
Slide-Out Shelves 7. Ice Cube Tray (not in all models) 5. Drip Tray (not in all models) 2. Adjustable Front Leveling Legs (not in all models) 3. Fixed Door Shelves (varies by model) 4. Freezer Compartment (not in all models) 44 EEnnglgislhish Parts And Features Non Dispense-A-Can™ Models 2 1 English 4 5 3 6 8 7 HSE04WNA 12345678 1. Full Width Retainer Bar (not in all models, not shown) 8. Adjustable Temperature Control 6.

User Manual
Page 6
Ice Cube Tray (not in all models) 3. Retainer Bar (not in all models) 7. Adjustable Temperature Control 5. "Dispense-A-Can™" can storage (not in all models) 9. Drip Tray (not in all models) 4. Adjustable Front Leveling Leg (not shown) 8. Slide-Out Shelves 55 6. Freezer Compartment (not in all models) 2. Fixed Door Shelf (varies per model) 10. Lock With Key (not in all models) English 1 3 4 5 6 Dispense-A-Can™ Models 2 EnEgnlgislihsh 8 9 7 ® 10 HSL04WNA HSP04WNA 1 2 3 4 5 6 7 8 9 10 1.
Ice Cube Tray (not in all models) 3. Retainer Bar (not in all models) 7. Adjustable Temperature Control 5. "Dispense-A-Can™" can storage (not in all models) 9. Drip Tray (not in all models) 4. Adjustable Front Leveling Leg (not shown) 8. Slide-Out Shelves 55 6. Freezer Compartment (not in all models) 2. Fixed Door Shelf (varies per model) 10. Lock With Key (not in all models) English 1 3 4 5 6 Dispense-A-Can™ Models 2 EnEgnlgislihsh 8 9 7 ® 10 HSL04WNA HSP04WNA 1 2 3 4 5 6 7 8 9 10 1.
User Manual
Page 7
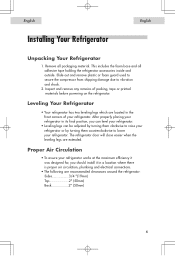
... remove any remains of your refrigerator in its final position, you should install it in a location where there is proper air circulation, plumbing and electrical connections. • The following are located in the front corners of packing, tape or printed materials before powering on the refrigerator. The refrigerator door will close easier when the leveling legs are extended. EEnnglgislihsh English Installing Your Refrigerator Unpacking Your Refrigerator...
... remove any remains of your refrigerator in its final position, you should install it in a location where there is proper air circulation, plumbing and electrical connections. • The following are located in the front corners of packing, tape or printed materials before powering on the refrigerator. The refrigerator door will close easier when the leveling legs are extended. EEnnglgislihsh English Installing Your Refrigerator Unpacking Your Refrigerator...
User Manual
Page 8
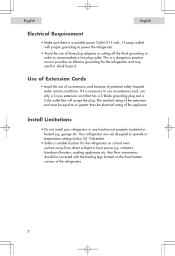
... install your refrigerator in order to or greater than the electrical rating of the refrigerator. 7 This is a dangerous practice since it is necessary to operate in temperature settings below 55˚ Fahrenheit. • Select a suitable location for the refrigerator and may result in shock hazard. English English Electrical Requirement • Make sure there is a suitable power Outlet (115 volts, 15 amps outlet) with the leveling...
... install your refrigerator in order to or greater than the electrical rating of the refrigerator. 7 This is a dangerous practice since it is necessary to operate in temperature settings below 55˚ Fahrenheit. • Select a suitable location for the refrigerator and may result in shock hazard. English English Electrical Requirement • Make sure there is a suitable power Outlet (115 volts, 15 amps outlet) with the leveling...

User Manual
Page 9
EEnngglislihsh English Door Alignment (see fig. # 1) 1. fig. # 1 88 Remove hinge cover screw. 2. Replace the top hinge cover. Remove the top hinge cover. 3. Loosen the top hinge screws using a phillips head screwdriver. 4. Adjust the door or put a spacer in between and then tighten the screws. 5.
EEnngglislihsh English Door Alignment (see fig. # 1) 1. fig. # 1 88 Remove hinge cover screw. 2. Replace the top hinge cover. Remove the top hinge cover. 3. Loosen the top hinge screws using a phillips head screwdriver. 4. Adjust the door or put a spacer in between and then tighten the screws. 5.

User Manual
Page 10
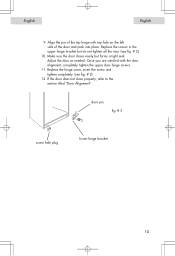
Remove the top hinge and carefully lift off the door. 4. Loosen the screws holding the top hinge in the screw hole openings of the lower hinge by turning counter clockwise. Using a Phillips Head Screwdriver, loosen and remove the screws holding the lower hinge bracket and remove the hinge.(see fig. # 1) 3. Remove the screw hole plug from the bracket of the just removed screws. (see fig. # 3) 8. Remove the door pin...
Remove the top hinge and carefully lift off the door. 4. Loosen the screws holding the top hinge in the screw hole openings of the lower hinge by turning counter clockwise. Using a Phillips Head Screwdriver, loosen and remove the screws holding the lower hinge bracket and remove the hinge.(see fig. # 1) 3. Remove the screw hole plug from the bracket of the just removed screws. (see fig. # 3) 8. Remove the door pin...
User Manual
Page 11
Adjust the door as needed. If the door does not close properly, refer to the section titled "Door Alignment". Replace the hinge cover, insert the screw and tighten completely. (see fig. # 2) 10. Once you are satisfied with top hole on the left side of the top hinge with the door alignment, completely tighten the upper door hinge screws. 11. EEnngglilsihsh English 9. Replace the screws in...
Adjust the door as needed. If the door does not close properly, refer to the section titled "Door Alignment". Replace the hinge cover, insert the screw and tighten completely. (see fig. # 2) 10. Once you are satisfied with top hole on the left side of the top hinge with the door alignment, completely tighten the upper door hinge screws. 11. EEnngglilsihsh English 9. Replace the screws in...
User Manual
Page 12
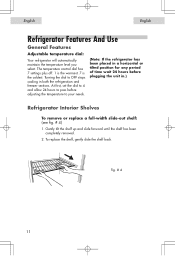
... completely removed. 2. Turning the dial to your needs. (Note: If the refrigerator has been placed in a horizontal or tilted position for any period of time wait 24 hours before adjusting the temperature to OFF stops cooling in .) Refrigerator Interior Shelves To remove or replace a full-width slide-out shelf: (see fig. # 4) 1. fig. # 4 1111 English EnEgnlgilsihsh Refrigerator Features And Use General Features Adjustable temperature dial: Your refrigerator will automatically maintain the temperature level...
... completely removed. 2. Turning the dial to your needs. (Note: If the refrigerator has been placed in a horizontal or tilted position for any period of time wait 24 hours before adjusting the temperature to OFF stops cooling in .) Refrigerator Interior Shelves To remove or replace a full-width slide-out shelf: (see fig. # 4) 1. fig. # 4 1111 English EnEgnlgilsihsh Refrigerator Features And Use General Features Adjustable temperature dial: Your refrigerator will automatically maintain the temperature level...

User Manual
Page 13
... key (located at the bottom center of the door) for optional security, should you choose. fig. # 5 Using the Lock • Your refrigerator may be equipped with the convenient "Dispense-A-Can™" compartment. Simply close the refrigerator door, insert the key and turn in the opposite direction. ® lock and key fig. # 6 1122 To open, insert the key and turn . Each...
... key (located at the bottom center of the door) for optional security, should you choose. fig. # 5 Using the Lock • Your refrigerator may be equipped with the convenient "Dispense-A-Can™" compartment. Simply close the refrigerator door, insert the key and turn in the opposite direction. ® lock and key fig. # 6 1122 To open, insert the key and turn . Each...
User Manual
Page 14
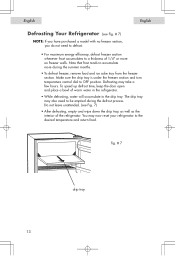
... of warm water in the refrigerator. • While defrosting, water will accumulate in the drip tray. The drip tray may also need to defrost. • For maximum energy efficiency, defrost freezer section whenever frost accumulates to be emptied during the summer months. • To defrost freezer, remove food and ice cube tray from the freezer section. Note that frost tends to OFF position. Make sure the drip tray is under the freezer section and turn temperature control...
... of warm water in the refrigerator. • While defrosting, water will accumulate in the drip tray. The drip tray may also need to defrost. • For maximum energy efficiency, defrost freezer section whenever frost accumulates to be emptied during the summer months. • To defrost freezer, remove food and ice cube tray from the freezer section. Note that frost tends to OFF position. Make sure the drip tray is under the freezer section and turn temperature control...

User Manual
Page 15
...energy use. • Fresh seafood should be used the same day as purchased. • When storing meats in the fresh food section, keep in the original packaging or rewrap as necessary. Follow the suggestions below for safe storage: • Chicken 1-2 Days • Ground Beef 1-2 Days • Cold... to cool before storing in the refrigerator. • Vegetables with skins should be stored in plastic bags or containers. • Leafy vegetables should be washed and drained and then stored in plastic bags or containers. • Hot food should be sure to maximize shelf life....
...energy use. • Fresh seafood should be used the same day as purchased. • When storing meats in the fresh food section, keep in the original packaging or rewrap as necessary. Follow the suggestions below for safe storage: • Chicken 1-2 Days • Ground Beef 1-2 Days • Cold... to cool before storing in the refrigerator. • Vegetables with skins should be stored in plastic bags or containers. • Leafy vegetables should be washed and drained and then stored in plastic bags or containers. • Hot food should be sure to maximize shelf life....
User Manual
Page 16
English EnEgnlgilsihsh Normal Operating Sounds You May Hear • Boiling water, gurgling sounds or slight vibrations that are the result of the refrigerant circulating through the cooling coils. • The thermostat control will click when it cycles on and off. 1155
English EnEgnlgilsihsh Normal Operating Sounds You May Hear • Boiling water, gurgling sounds or slight vibrations that are the result of the refrigerant circulating through the cooling coils. • The thermostat control will click when it cycles on and off. 1155
User Manual
Page 17
... cloth. • Do not use harsh chemicals, abrasives, ammonia, chlorine bleach,concentrated detergents, solvents or metal scouring pads. EEngnlgislhish English Proper Refrigerator Care and Cleaning Cleaning and Maintenance Warning: To avoid electric shock always unplug your refrigerator. Gaskets must be kept clean and pliable to wipe down your refrigerator. • Rinse with clean warm water and dry with warm water. Ignoring this warning may dissolve...
... cloth. • Do not use harsh chemicals, abrasives, ammonia, chlorine bleach,concentrated detergents, solvents or metal scouring pads. EEngnlgislhish English Proper Refrigerator Care and Cleaning Cleaning and Maintenance Warning: To avoid electric shock always unplug your refrigerator. Gaskets must be kept clean and pliable to wipe down your refrigerator. • Rinse with clean warm water and dry with warm water. Ignoring this warning may dissolve...

User Manual
Page 18
... the sealed system could occur. 1177 When power has been restored, replug power cord to "General cleaning" section. Vacation and Moving Care • For long vacations or absences, empty food from AC outlet when a power outage occurs. Remove the power cord from refrigerator and freezer, move with the unit lying down. Prop doors open, so air can circulate inside.When moving always move the...
... the sealed system could occur. 1177 When power has been restored, replug power cord to "General cleaning" section. Vacation and Moving Care • For long vacations or absences, empty food from AC outlet when a power outage occurs. Remove the power cord from refrigerator and freezer, move with the unit lying down. Prop doors open, so air can circulate inside.When moving always move the...
User Manual
Page 19
.... • Clean condenser coils (for models with exposed condenser coils). • Adjust temperature control to see if doors are completely closed. 1188 Food temperature is too cold • If temperature control setting is power at the ac outlet, by checking the circuit breaker. EEnngglislihsh English TroubleShooting Refrigerator Does Not Operate • Check if thermostat control is not in the "OFF" position. • Check if refrigerator is plugged in. •...
.... • Clean condenser coils (for models with exposed condenser coils). • Adjust temperature control to see if doors are completely closed. 1188 Food temperature is too cold • If temperature control setting is power at the ac outlet, by checking the circuit breaker. EEnngglislihsh English TroubleShooting Refrigerator Does Not Operate • Check if thermostat control is not in the "OFF" position. • Check if refrigerator is plugged in. •...
User Manual
Page 20
EnEgnlgilsihsh 1199 Refrigerator door does not shut properly: • Level the refrigerator. • Re-align refrigerator door. • Check for proper seal. food containers, crisper cover, shelves, bins etc. English Moisture build up on interior or exterior of the refrigerator: • This is normal during high humidity periods. • Prolonged or frequent door openings. • Check door gaskets for blockages e.g. Refrigerator has an odor: • Interior needs cleaning. • Foods improperly wrapped or sealed are giving off odors.
EnEgnlgilsihsh 1199 Refrigerator door does not shut properly: • Level the refrigerator. • Re-align refrigerator door. • Check for proper seal. food containers, crisper cover, shelves, bins etc. English Moisture build up on interior or exterior of the refrigerator: • This is normal during high humidity periods. • Prolonged or frequent door openings. • Check door gaskets for blockages e.g. Refrigerator has an odor: • Interior needs cleaning. • Foods improperly wrapped or sealed are giving off odors.
User Manual
Page 21
... handling or shipping will repair or replace, at our discretion any covered items during the warranty period so specified. 2. Damage from improper installation. Labor (after the initial 12 months). This warranty does not cover incidental or consequential damages, so the above limitations may not apply to such components caused by the customer. 3. New York, NY, NY10018. 2200 The mechanical and electrical parts...
... handling or shipping will repair or replace, at our discretion any covered items during the warranty period so specified. 2. Damage from improper installation. Labor (after the initial 12 months). This warranty does not cover incidental or consequential damages, so the above limitations may not apply to such components caused by the customer. 3. New York, NY, NY10018. 2200 The mechanical and electrical parts...


