
User Manual
Page 2
... all electric service cords that have been thawed completely. Always grasp the plug firmly and pull straight out from the outlet. 4) Repair or replace immediately, all of its length, the plug or the connector end. 5) Unplug your refrigerator by pulling on the power cord. Use refrozen foods as soon as you remove the doors. Skin may be properly installed in the freezer compartment...
... all electric service cords that have been thawed completely. Always grasp the plug firmly and pull straight out from the outlet. 4) Repair or replace immediately, all of its length, the plug or the connector end. 5) Unplug your refrigerator by pulling on the power cord. Use refrozen foods as soon as you remove the doors. Skin may be properly installed in the freezer compartment...

User Manual
Page 3
... easy-to your refrigerator. You will guide you throw away your refrigerator in back of child entrapment. As per UL 250 11.2.6 Thank you for freestanding installation only. 11) Do not operate your old refrigerator or freezer, take off the doors. Before you in getting the best use manual will need it to record the model and serial number. Leave the shelves in an enclosed cabinet...
... easy-to your refrigerator. You will guide you throw away your refrigerator in back of child entrapment. As per UL 250 11.2.6 Thank you for freestanding installation only. 11) Do not operate your old refrigerator or freezer, take off the doors. Before you in getting the best use manual will need it to record the model and serial number. Leave the shelves in an enclosed cabinet...
User Manual
Page 4
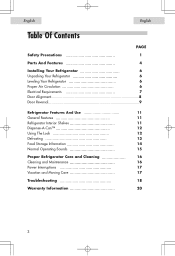
... f??@@@@??f f??@@@@??f f??@@@@??f f ??@@@@??f f??@@@@??f f??@@@@??f f??@@@@??f f??@@@@??f f??@@@@??f f ??@@@@??f f??@@@@??f f 7 Door Alignment 8 Door Reversal 9 Refrigerator Features And Use ??@@@@??f f ??@@@@??f f ??@@@@??f f ??@@@@??f f ??@@@@??f f ??@@@@??f f ??@@@@??f f ??@@@@??f f ??@@@@??f f ??@@@@??f f ??@@@@??f f ??@@@@??f f ??@@@@??f f ??@@@@??f f ??@@@@??f f ??@@@@??f f ??@@@@??f f ??@@@@??f f ??@@@@??f f ??@@@@??f f ??@@@@??f f ??@@@@??f f ??@@@@??f f ??@@@@??f f ??@@@@??f f ??@@@@??f f ??@@@@??f f ??@@@@??f f ??@@@@??f f ??@@@@??f f ??@@@@??f f ??@@@@??f f General Features...
... f??@@@@??f f??@@@@??f f??@@@@??f f ??@@@@??f f??@@@@??f f??@@@@??f f??@@@@??f f??@@@@??f f??@@@@??f f ??@@@@??f f??@@@@??f f 7 Door Alignment 8 Door Reversal 9 Refrigerator Features And Use ??@@@@??f f ??@@@@??f f ??@@@@??f f ??@@@@??f f ??@@@@??f f ??@@@@??f f ??@@@@??f f ??@@@@??f f ??@@@@??f f ??@@@@??f f ??@@@@??f f ??@@@@??f f ??@@@@??f f ??@@@@??f f ??@@@@??f f ??@@@@??f f ??@@@@??f f ??@@@@??f f ??@@@@??f f ??@@@@??f f ??@@@@??f f ??@@@@??f f ??@@@@??f f ??@@@@??f f ??@@@@??f f ??@@@@??f f ??@@@@??f f ??@@@@??f f ??@@@@??f f ??@@@@??f f ??@@@@??f f ??@@@@??f f General Features...

User Manual
Page 5
Fixed Door Shelves (varies by model) 4. Drip Tray (not in all models) 44 Full Width Retainer Bar (not in all models) 3. EEnnglgislhish Parts And Features Non Dispense-A-Can™ Models 2 1 English 4 5 3 6 8 7 HSE04WNA 12345678 1. Freezer Compartment (not in all models) 5. Slide-Out Shelves 7. Adjustable Temperature Control 6. Ice Cube Tray (not in all models, not shown) 8. Adjustable Front Leveling Legs (not in all models) 2.
Fixed Door Shelves (varies by model) 4. Drip Tray (not in all models) 44 Full Width Retainer Bar (not in all models) 3. EEnnglgislhish Parts And Features Non Dispense-A-Can™ Models 2 1 English 4 5 3 6 8 7 HSE04WNA 12345678 1. Freezer Compartment (not in all models) 5. Slide-Out Shelves 7. Adjustable Temperature Control 6. Ice Cube Tray (not in all models, not shown) 8. Adjustable Front Leveling Legs (not in all models) 2.

User Manual
Page 6
Slide-Out Shelves 55 6. Adjustable Front Leveling Leg (not shown) 8. Lock With Key (not in all models) English 1 3 4 5 6 Dispense-A-Can™ Models 2 EnEgnlgislihsh 8 9 7 ® 10 HSL04WNA HSP04WNA 1 2 3 4 5 6 7 8 9 10 1. Freezer Compartment (not in all models) 2. Drip Tray (not in all models) 4. Adjustable Temperature Control 5. Fixed Door Shelf (varies per model) 10. "Dispense-A-Can™" can storage (not in all models) 9. Ice Cube Tray (not in all models) 3. Retainer Bar (not in all models) 7.
Slide-Out Shelves 55 6. Adjustable Front Leveling Leg (not shown) 8. Lock With Key (not in all models) English 1 3 4 5 6 Dispense-A-Can™ Models 2 EnEgnlgislihsh 8 9 7 ® 10 HSL04WNA HSP04WNA 1 2 3 4 5 6 7 8 9 10 1. Freezer Compartment (not in all models) 2. Drip Tray (not in all models) 4. Adjustable Temperature Control 5. Fixed Door Shelf (varies per model) 10. "Dispense-A-Can™" can storage (not in all models) 9. Ice Cube Tray (not in all models) 3. Retainer Bar (not in all models) 7.
User Manual
Page 7
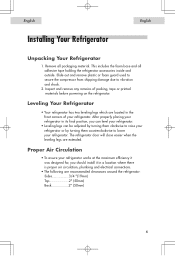
... air circulation, plumbing and electrical connections. • The following are located in its final position, you can level your refrigerator. • Leveling legs can be adjusted by turning them clockwise to raise your refrigerator or by turning them counterclockwise to vibration and shock. 2. Inspect and remove any remains of your refrigerator. The refrigerator door will close easier when the leveling legs are extended. EEnnglgislihsh English Installing Your Refrigerator...
... air circulation, plumbing and electrical connections. • The following are located in its final position, you can level your refrigerator. • Leveling legs can be adjusted by turning them clockwise to raise your refrigerator or by turning them counterclockwise to vibration and shock. 2. Inspect and remove any remains of your refrigerator. The refrigerator door will close easier when the leveling legs are extended. EEnnglgislihsh English Installing Your Refrigerator...
User Manual
Page 8
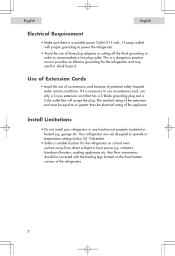
... cord must be corrected with proper grounding to power the refrigerator. • Avoid the use only a 3-wire extension cord that has a 3-blade grounding plug and a 3-slot outlet that will accept the plug. English English Electrical Requirement • Make sure there is a suitable power Outlet (115 volts, 15 amps outlet) with the leveling legs located on a hard even surface away from direct sunlight...
... cord must be corrected with proper grounding to power the refrigerator. • Avoid the use only a 3-wire extension cord that has a 3-blade grounding plug and a 3-slot outlet that will accept the plug. English English Electrical Requirement • Make sure there is a suitable power Outlet (115 volts, 15 amps outlet) with the leveling legs located on a hard even surface away from direct sunlight...

User Manual
Page 9
Adjust the door or put a spacer in between and then tighten the screws. 5. fig. # 1 88 Loosen the top hinge screws using a phillips head screwdriver. 4. Remove hinge cover screw. 2. Remove the top hinge cover. 3. EEnngglislihsh English Door Alignment (see fig. # 1) 1. Replace the top hinge cover.
Adjust the door or put a spacer in between and then tighten the screws. 5. fig. # 1 88 Loosen the top hinge screws using a phillips head screwdriver. 4. Remove hinge cover screw. 2. Remove the top hinge cover. 3. EEnngglislihsh English Door Alignment (see fig. # 1) 1. Replace the top hinge cover.

User Manual
Page 10
Remove the top hinge and carefully lift off the door. 4. Move the pin to the corresponding holes in the screw hole openings of the lower hinge by turning counter clockwise. Loosen the screws holding the top hinge in the lower hinge bracket to the opposite hole and tighten. (see fig. # 3) 8. Remove the top hinge cover screw and then remove the top hinge cover. (see fig. # 3) 7. Remove the...
Remove the top hinge and carefully lift off the door. 4. Move the pin to the corresponding holes in the screw hole openings of the lower hinge by turning counter clockwise. Loosen the screws holding the top hinge in the lower hinge bracket to the opposite hole and tighten. (see fig. # 3) 8. Remove the top hinge cover screw and then remove the top hinge cover. (see fig. # 3) 7. Remove the...
User Manual
Page 11
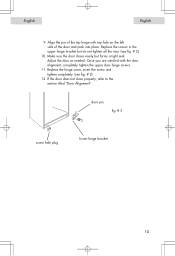
... top hole on the left side of the top hinge with the door alignment, completely tighten the upper door hinge screws. 11. Replace the screws in the upper hinge bracket but forms a tight seal. door pin fig. # 3 screw hole plug lower hinge bracket 1100 Make sure the door closes easily but do not tighten all the way. (see fig. # 2) 12. Adjust the door as needed.
... top hole on the left side of the top hinge with the door alignment, completely tighten the upper door hinge screws. 11. Replace the screws in the upper hinge bracket but forms a tight seal. door pin fig. # 3 screw hole plug lower hinge bracket 1100 Make sure the door closes easily but do not tighten all the way. (see fig. # 2) 12. Adjust the door as needed.
User Manual
Page 12
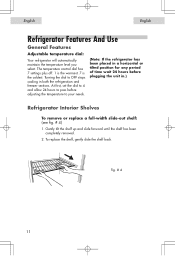
English EnEgnlgilsihsh Refrigerator Features And Use General Features Adjustable temperature dial: Your refrigerator will automatically maintain the temperature level you select. At first, set the dial to 4 and allow 24 hours to pass before adjusting the temperature to OFF stops cooling in .) Refrigerator Interior Shelves To remove or replace a full-width slide-out shelf: (see fig. # 4) 1. To replace the shelf, gently slide the shelf back. The temperature control dial has 7 settings plus off. 1 is the warmest...
English EnEgnlgilsihsh Refrigerator Features And Use General Features Adjustable temperature dial: Your refrigerator will automatically maintain the temperature level you select. At first, set the dial to 4 and allow 24 hours to pass before adjusting the temperature to OFF stops cooling in .) Refrigerator Interior Shelves To remove or replace a full-width slide-out shelf: (see fig. # 4) 1. To replace the shelf, gently slide the shelf back. The temperature control dial has 7 settings plus off. 1 is the warmest...

User Manual
Page 13
... a lock and key (located at the bottom center of the door) for optional security, should you choose. To dispense a can, simply draw one out from the top. Simply close the refrigerator door, insert the key and turn in the opposite direction. ® lock and key fig. # 6 1122 To open, insert the key and turn . fig. # 5 Using the Lock •...
... a lock and key (located at the bottom center of the door) for optional security, should you choose. To dispense a can, simply draw one out from the top. Simply close the refrigerator door, insert the key and turn in the opposite direction. ® lock and key fig. # 6 1122 To open, insert the key and turn . fig. # 5 Using the Lock •...
User Manual
Page 14
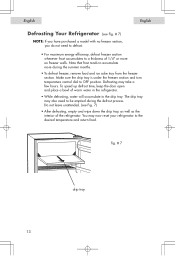
Make sure the drip tray is under the freezer section and turn temperature control dial to a thickness of 1/4" or more during the defrost process. You may take a few hours. Defrosting may now reset your refrigerator to the desired temperature and return food. To speed up defrost time, keep the door open and place a bowl of warm water in the refrigerator. • While defrosting, water will accumulate in the drip tray. Note that frost...
Make sure the drip tray is under the freezer section and turn temperature control dial to a thickness of 1/4" or more during the defrost process. You may take a few hours. Defrosting may now reset your refrigerator to the desired temperature and return food. To speed up defrost time, keep the door open and place a bowl of warm water in the refrigerator. • While defrosting, water will accumulate in the drip tray. Note that frost...

User Manual
Page 15
This will prevent unnecessary energy use. • Fresh seafood should be used the same day as purchased. • When storing meats in the fresh food section, keep in the original packaging or rewrap as necessary. This will ensure proper shelf life and prevent the transfer of odors and tastes... and drained and then stored in plastic bags or containers. • Hot food should be allowed to wrap or store food in the refrigeration. EEnnglgislihsh English Food Storage Information Fresh Food • When storing fresh food, which is not prepackaged, be sure to cool before ...
This will prevent unnecessary energy use. • Fresh seafood should be used the same day as purchased. • When storing meats in the fresh food section, keep in the original packaging or rewrap as necessary. This will ensure proper shelf life and prevent the transfer of odors and tastes... and drained and then stored in plastic bags or containers. • Hot food should be allowed to wrap or store food in the refrigeration. EEnnglgislihsh English Food Storage Information Fresh Food • When storing fresh food, which is not prepackaged, be sure to cool before ...
User Manual
Page 16
English EnEgnlgilsihsh Normal Operating Sounds You May Hear • Boiling water, gurgling sounds or slight vibrations that are the result of the refrigerant circulating through the cooling coils. • The thermostat control will click when it cycles on and off. 1155
English EnEgnlgilsihsh Normal Operating Sounds You May Hear • Boiling water, gurgling sounds or slight vibrations that are the result of the refrigerant circulating through the cooling coils. • The thermostat control will click when it cycles on and off. 1155
User Manual
Page 17
... jelly applied lightly on the hinge side of gaskets will keep the gasket pliable and assure a good seal. 1166 SOME of baking soda mixed with the cleaning solution, to general instructions. Ignoring this warning may dissolve, damage and/or discolor your refrigerator. Door Gaskets: • Clean door gaskets every three months according to wipe down your refrigerator before cleaning. Use sponge or soft cloth, dampened with warm water.
... jelly applied lightly on the hinge side of gaskets will keep the gasket pliable and assure a good seal. 1166 SOME of baking soda mixed with the cleaning solution, to general instructions. Ignoring this warning may dissolve, damage and/or discolor your refrigerator. Door Gaskets: • Clean door gaskets every three months according to wipe down your refrigerator before cleaning. Use sponge or soft cloth, dampened with warm water.

User Manual
Page 18
... in freezer and refrigerator. When power has been restored, replug power cord to thunderstorms or other causes. Prop doors open, so air can circulate inside.When moving always move with the unit lying down. Do not move the refrigerator vertically. Possible damage to "General cleaning" section. Remove the power cord from refrigerator and freezer, move the temperature DIAL to the OFF position and clean the refrigerator and door gaskets according...
... in freezer and refrigerator. When power has been restored, replug power cord to thunderstorms or other causes. Prop doors open, so air can circulate inside.When moving always move with the unit lying down. Do not move the refrigerator vertically. Possible damage to "General cleaning" section. Remove the power cord from refrigerator and freezer, move the temperature DIAL to the OFF position and clean the refrigerator and door gaskets according...
User Manual
Page 19
Food temperature appears too warm • Frequent door openings. • Allow time for recently added warm food to reach fresh food or freezer temperature. • Check gaskets for proper seal. • Clean condenser coils (for temperature to adjust. Food temperature is too cold • If temperature control setting is power at the ac outlet, by checking the circuit breaker. Refrigerator runs too frequently • This may be normal to maintain...
Food temperature appears too warm • Frequent door openings. • Allow time for recently added warm food to reach fresh food or freezer temperature. • Check gaskets for proper seal. • Clean condenser coils (for temperature to adjust. Food temperature is too cold • If temperature control setting is power at the ac outlet, by checking the circuit breaker. Refrigerator runs too frequently • This may be normal to maintain...
User Manual
Page 20
EnEgnlgilsihsh 1199 food containers, crisper cover, shelves, bins etc. Refrigerator has an odor: • Interior needs cleaning. • Foods improperly wrapped or sealed are giving off odors. Refrigerator door does not shut properly: • Level the refrigerator. • Re-align refrigerator door. • Check for proper seal. English Moisture build up on interior or exterior of the refrigerator: • This is normal during high humidity periods. • Prolonged or frequent door openings. • Check door gaskets for blockages e.g.
EnEgnlgilsihsh 1199 food containers, crisper cover, shelves, bins etc. Refrigerator has an odor: • Interior needs cleaning. • Foods improperly wrapped or sealed are giving off odors. Refrigerator door does not shut properly: • Level the refrigerator. • Re-align refrigerator door. • Check for proper seal. English Moisture build up on interior or exterior of the refrigerator: • This is normal during high humidity periods. • Prolonged or frequent door openings. • Check door gaskets for blockages e.g.
User Manual
Page 21
... English Limited Warranty What is covered. 1. EXCEPTIONS: Commercial or Rental Use warranty 90 days labor (carry-in workmanship or materials for a period of purchase. Damage from the date of 12 months. Decorative trims or replaceable light bulbs. This warranty covers all parts except finish, and trim. 2. What will be paid by mechanical abuse or improper handling or shipping will repair or replace, at...
... English Limited Warranty What is covered. 1. EXCEPTIONS: Commercial or Rental Use warranty 90 days labor (carry-in workmanship or materials for a period of purchase. Damage from the date of 12 months. Decorative trims or replaceable light bulbs. This warranty covers all parts except finish, and trim. 2. What will be paid by mechanical abuse or improper handling or shipping will repair or replace, at...


