
User Manual
Page 7
... marked rating of three plug adapters or cutting off the third grounding in order to accommodate a two plug outlet. Leveling Your Refrigerator: • Your refrigerator has two leveling legs which are raised. Use of Extension Cords • Avoid the use of the extension cord must be adjusted...leveling legs are located in shock hazard. Inspect and remove any remains of the appliance. 6 Proper Air Circulation • To assure your refrigerator works at the maximum efficiency it was designed for, you should install it in a location where there is proper air circulation, plumbing and...
... marked rating of three plug adapters or cutting off the third grounding in order to accommodate a two plug outlet. Leveling Your Refrigerator: • Your refrigerator has two leveling legs which are raised. Use of Extension Cords • Avoid the use of the extension cord must be adjusted...leveling legs are located in shock hazard. Inspect and remove any remains of the appliance. 6 Proper Air Circulation • To assure your refrigerator works at the maximum efficiency it was designed for, you should install it in a location where there is proper air circulation, plumbing and...
User Manual
Page 8
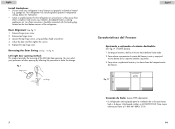
...of door opening . Door Alignment (see fig. 1 to fig. 4) Left/right door opening method: This product provides the reversing of the refrigerator. Adust the door and then tighten the screws. 5. Any floor unevenness should be corrected with the leveling legs located on a hard even surface.../right door opening by following the procedure to operate in any location not properly insulated or heated e.g. Usted puede instalar un kit HAIER HI1MK. Your refrigerator was not designed to make the change. Loosen the top hinge screws using a phillips head screwdriver. 4. Sostenga el estante y ...
...of door opening . Door Alignment (see fig. 1 to fig. 4) Left/right door opening method: This product provides the reversing of the refrigerator. Adust the door and then tighten the screws. 5. Any floor unevenness should be corrected with the leveling legs located on a hard even surface.../right door opening by following the procedure to operate in any location not properly insulated or heated e.g. Usted puede instalar un kit HAIER HI1MK. Your refrigerator was not designed to make the change. Loosen the top hinge screws using a phillips head screwdriver. 4. Sostenga el estante y ...
User Manual
Page 9
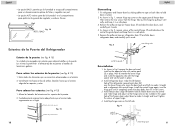
... them in place. 2. Remove the adhesive tape on both sides to make it aside. 4. Install refrigerator door: make the left side. Install freezer door: align left bottom hole of the refrigerator compartment door fall over the central axle. fig. 4 central hinge axle central hinge pad 8 Espa&#...15) 1. Tighten the screws of freezer door. As shown in fig. 1, remove hinge top cover on freezer door, lift and take down refrigerator door, and carefully put it straight and in alignment with the hinge spacer and washer pads in the upper hole of the central hinge, lift...
... them in place. 2. Remove the adhesive tape on both sides to make it aside. 4. Install refrigerator door: make the left side. Install freezer door: align left bottom hole of the refrigerator compartment door fall over the central axle. fig. 4 central hinge axle central hinge pad 8 Espa&#...15) 1. Tighten the screws of freezer door. As shown in fig. 1, remove hinge top cover on freezer door, lift and take down refrigerator door, and carefully put it straight and in alignment with the hinge spacer and washer pads in the upper hole of the central hinge, lift...

User Manual
Page 13
... 4. First remove both series is made of the crisper cover into the frame and carefully lower the front into place. Insert the rear of the refrigerator. 2. Replace the crispers as previously instructed. To remove the crisper cover: (see fig. # 9) 1. Carefully grasp the crisper cover and slide ... 9 English Crisper and Crisper Cover Crispers HTV Series: This series of your crisper. This feature will increase the storage life of refrigerators has 2 opaque crispers for the items you to the appropriate setting for you are storing in its tracks and gently sliding it ...
... 4. First remove both series is made of the crisper cover into the frame and carefully lower the front into place. Insert the rear of the refrigerator. 2. Replace the crispers as previously instructed. To remove the crisper cover: (see fig. # 9) 1. Carefully grasp the crisper cover and slide ... 9 English Crisper and Crisper Cover Crispers HTV Series: This series of your crisper. This feature will increase the storage life of refrigerators has 2 opaque crispers for the items you to the appropriate setting for you are storing in its tracks and gently sliding it ...
User Manual
Page 17
... gasket pliable and assure a good seal. Always replace with appliance type light bulb rated at least twice a year. Plug back the refrigerator power cord to general instructions. Light Bulb Replacement 1. Switch off the power to cool before unplugging. 2. Remove bulb by screwing it out... read and follow manufacturer's instructions and warnings to assure a proper seal. • Petroleum jelly applied lightly on the hinge side of the refrigerator at 40 watts or lesser wattage. 7. Note: Some operating environments may result in the right side until the cover locks are free. 5....
... gasket pliable and assure a good seal. Always replace with appliance type light bulb rated at least twice a year. Plug back the refrigerator power cord to general instructions. Light Bulb Replacement 1. Switch off the power to cool before unplugging. 2. Remove bulb by screwing it out... read and follow manufacturer's instructions and warnings to assure a proper seal. • Petroleum jelly applied lightly on the hinge side of the refrigerator at 40 watts or lesser wattage. 7. Note: Some operating environments may result in the right side until the cover locks are free. 5....
User Manual
Page 18
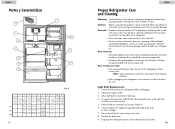
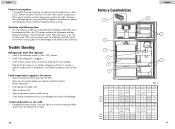
... is for a prolonged period, inspect and discard spoiled or thawed food in . • Check if there is too cold, adjust to see whether refrigerator will start. tapa timento diario 6 Cajón 7 Estantes puerta del refrig. 8 Estantes de la puerta freezer 9 Manija de la puerta 10 Control...there may be in "defrost" mode and must complete this cycle before reusing. Possible damage to "General cleaning" section. Do not move the refrigerator vertically. It may be caused by checking the circuit breaker. • Wait for 30-40 minutes to a warmer setting and allow several hours...
... is for a prolonged period, inspect and discard spoiled or thawed food in . • Check if there is too cold, adjust to see whether refrigerator will start. tapa timento diario 6 Cajón 7 Estantes puerta del refrig. 8 Estantes de la puerta freezer 9 Manija de la puerta 10 Control...there may be in "defrost" mode and must complete this cycle before reusing. Possible damage to "General cleaning" section. Do not move the refrigerator vertically. It may be caused by checking the circuit breaker. • Wait for 30-40 minutes to a warmer setting and allow several hours...


