
User Manual
Page 7
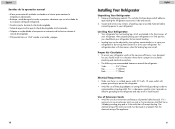
... power outlet (115 volts, 15 amps outlet) with proper grounding to or greater than the electrical rating of Extension Cords • Avoid the use only a 3-wire extension cord that has a 3-blade grounding plug and a 3-slot outlet that will close easier when the leveling legs are located in shock hazard. The refrigerator door will accept the plug. Leveling Your Refrigerator: • Your refrigerator has two leveling legs...
... power outlet (115 volts, 15 amps outlet) with proper grounding to or greater than the electrical rating of Extension Cords • Avoid the use only a 3-wire extension cord that has a 3-blade grounding plug and a 3-slot outlet that will close easier when the leveling legs are located in shock hazard. The refrigerator door will accept the plug. Leveling Your Refrigerator: • Your refrigerator has two leveling legs...
User Manual
Page 8
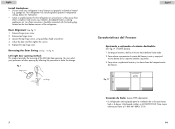
... temperature settings below 55˚ Fahrenheit. • Select a suitable location for the refrigerator on the front bottom corners of the left/right door opening by following the procedure to make the change. Para retirar simplemente levante y tire hacia fuera del compartimento del freezer. Para mayor información llame al 1-800-461-8890/ 3100 14 Remove top hinge cover. 3. Adust the door and then tighten the screws. 5. Replace the top hinge cover...
... temperature settings below 55˚ Fahrenheit. • Select a suitable location for the refrigerator on the front bottom corners of the left/right door opening by following the procedure to make the change. Para retirar simplemente levante y tire hacia fuera del compartimento del freezer. Para mayor información llame al 1-800-461-8890/ 3100 14 Remove top hinge cover. 3. Adust the door and then tighten the screws. 5. Replace the top hinge cover...
User Manual
Page 9
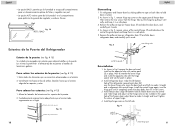
... puerta. Then remove the two screws from the hinge. Remove the adhesive tape on the left side. Install refrigerator door: make the left bottom hole of the refrigerator compartment door fall over the central axle. Install freezer door: align left bottom hole of freezer door over the lower hinge axle, move the door back and forth to make it straight and level. Install top hinge cover on refrigerator door, lift and take down refrigerator door, and carefully put it...
... puerta. Then remove the two screws from the hinge. Remove the adhesive tape on the left side. Install refrigerator door: make the left bottom hole of the refrigerator compartment door fall over the central axle. Install freezer door: align left bottom hole of freezer door over the lower hinge axle, move the door back and forth to make it straight and level. Install top hinge cover on refrigerator door, lift and take down refrigerator door, and carefully put it...

User Manual
Page 13
... of the crisper cover to raise or lower the humidity levels of glass. Grip the crisper firmly and slide out completely. 4. Replace the crisper by placing the crisper properly in the crispers. 12 To replace the crisper cover: (see fig. # 11) (HTE Series Only) Your refrigerator model may be equipped with slide control to remove it back into the support bracket the side walls of the crisper. 3. Crisper Humidity Control: (see...
... of the crisper cover to raise or lower the humidity levels of glass. Grip the crisper firmly and slide out completely. 4. Replace the crisper by placing the crisper properly in the crispers. 12 To replace the crisper cover: (see fig. # 11) (HTE Series Only) Your refrigerator model may be equipped with slide control to remove it back into the support bracket the side walls of the crisper. 3. Crisper Humidity Control: (see...
User Manual
Page 17
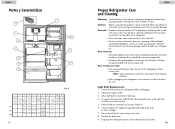
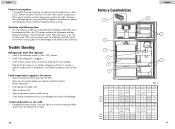
Door Gaskets: • Clean door gaskets every three months according to cool before removing. 4. Remove the highest shelf. 3. Allow light bulb to general instructions. Always replace with a soft cloth. • Do not use a vacuum or a brush to avoid personal injury or product damage. Plug back the refrigerator power cord to wipe down your refrigerator before unplugging. 2. Español Partes y Caracteristicas 10 7 6 1 3 4 5 11 8 9 2 fig. 2 1 2 3 4 5 6 7 8 9 10 11 Refrige rador interior Arrinc La Puerta del refrig. Use sponge...
Door Gaskets: • Clean door gaskets every three months according to cool before removing. 4. Remove the highest shelf. 3. Allow light bulb to general instructions. Always replace with a soft cloth. • Do not use a vacuum or a brush to avoid personal injury or product damage. Plug back the refrigerator power cord to wipe down your refrigerator before unplugging. 2. Español Partes y Caracteristicas 10 7 6 1 3 4 5 11 8 9 2 fig. 2 1 2 3 4 5 6 7 8 9 10 11 Refrige rador interior Arrinc La Puerta del refrig. Use sponge...
User Manual
Page 18
...; If temperature control setting is too cold, adjust to a warmer setting and allow several hours for temperature to "General cleaning" section. tapa timento diario 6 Cajón 7 Estantes puerta del refrig. 8 Estantes de la puerta freezer 9 Manija de la puerta 10 Control temp. tapa timento diario 6 Cajón 7 Estantes puerta del refrig. 8 Estantes de la puerta freezer 9 Manija de la puerta 10 Control temp. Prop doors open, so air may be in freezer and refrigerator...
...; If temperature control setting is too cold, adjust to a warmer setting and allow several hours for temperature to "General cleaning" section. tapa timento diario 6 Cajón 7 Estantes puerta del refrig. 8 Estantes de la puerta freezer 9 Manija de la puerta 10 Control temp. tapa timento diario 6 Cajón 7 Estantes puerta del refrig. 8 Estantes de la puerta freezer 9 Manija de la puerta 10 Control temp. Prop doors open, so air may be in freezer and refrigerator...

User Manual
Page 20
...? 1. This warranty covers all parts except finish, and trim. 2. Damages in the remaining warranty. Gracias por utilizar nuestro producto Haier Este manual de fácil uso lo guiará para obtener el mejor uso de su refrigerador. EXCEPTIONS: Commercial or Rental Use warranty 90 days labor (carry-in normal usage during the initial 12 month period. This warranty gives you specific legal...
...? 1. This warranty covers all parts except finish, and trim. 2. Damages in the remaining warranty. Gracias por utilizar nuestro producto Haier Este manual de fácil uso lo guiará para obtener el mejor uso de su refrigerador. EXCEPTIONS: Commercial or Rental Use warranty 90 days labor (carry-in normal usage during the initial 12 month period. This warranty gives you specific legal...


