
User Manual
Page 2
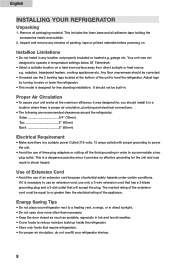
... refrigerator should be recessed or built-in place. Always grasp the plug firmly and pull straight out from the outlet. 4) Repair or replace immediately, all of the instructions before it . "...Even partial thawing and re-freezing reduce the eating quality of many other foods. Skin may be eaten. When using this appliance. English IMPORTANT SAFETY INSTRUCTIONS Read all electric service...
... refrigerator should be recessed or built-in place. Always grasp the plug firmly and pull straight out from the outlet. 4) Repair or replace immediately, all of the instructions before it . "...Even partial thawing and re-freezing reduce the eating quality of many other foods. Skin may be eaten. When using this appliance. English IMPORTANT SAFETY INSTRUCTIONS Read all electric service...
User Manual
Page 3
This easy-to-use manual will need it to obtain warranty service. 2 Remember to your old appliance,take off the doors. You will guide you in getting the best use of purchase Staple your receipt to record the model and serial number. They are on a label in place so that children may not easily climb inside. Model number Serial number Date of your refrigerator. Leave the shelves in back of child entrapment. Thank you throw away your manual. Before you for using our Haier product. SAVE THESE INSTRUCTIONS English DANGER Risk of the refrigerator.
This easy-to-use manual will need it to obtain warranty service. 2 Remember to your old appliance,take off the doors. You will guide you in getting the best use of purchase Staple your receipt to record the model and serial number. They are on a label in place so that children may not easily climb inside. Model number Serial number Date of your refrigerator. Leave the shelves in back of child entrapment. Thank you throw away your manual. Before you for using our Haier product. SAVE THESE INSTRUCTIONS English DANGER Risk of the refrigerator.
User Manual
Page 4
... limitations Proper air circulation Electrical requirements Use of extension cords Energy Saving Tip Door Alignment Reversing the Door Hinge REFRIGERATOR FEATURES AND USE General Features Adjustable Temperature Dial Refrigerator Interior Shelves Using, Removing or Replacing the Convertible / Drip Pan Adjusting Door Bins and Can Store Trays Using the Lock Replacing Light Bulb Defrosting Your Refrigerator Food storage information Normal operating sounds PROPER REFRIGERATOR CARE AND CLEANING Cleaning and maintenance Power interruptions Vacation & moving care TROUBLESHOOTING LIMITED WARRANTY PAGE...
... limitations Proper air circulation Electrical requirements Use of extension cords Energy Saving Tip Door Alignment Reversing the Door Hinge REFRIGERATOR FEATURES AND USE General Features Adjustable Temperature Dial Refrigerator Interior Shelves Using, Removing or Replacing the Convertible / Drip Pan Adjusting Door Bins and Can Store Trays Using the Lock Replacing Light Bulb Defrosting Your Refrigerator Food storage information Normal operating sounds PROPER REFRIGERATOR CARE AND CLEANING Cleaning and maintenance Power interruptions Vacation & moving care TROUBLESHOOTING LIMITED WARRANTY PAGE...
User Manual
Page 5
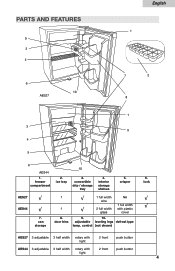
lock AES27 √ 1 √ 1 full width wire NA √ AES44 √ 1 √ 2 full width glass 1 full width with 2 front push button light 4 convertible drip / storage tray 4. interior storage shelves 5. door bins adjustable leveling legs defrost type temp. freezer compartment 2. ice tray 10 3. crisper 6. control (not shown) AES27 3 adjustable 3 half width rotary with light 2 front push button AES44 3 adjustable 3 half width rotary with plastic cover √ 7. can storage 8. 9. 10. PARTS AND FEATURES 9 3 4 6 10 AES27 English 1 7 2...
lock AES27 √ 1 √ 1 full width wire NA √ AES44 √ 1 √ 2 full width glass 1 full width with 2 front push button light 4 convertible drip / storage tray 4. interior storage shelves 5. door bins adjustable leveling legs defrost type temp. freezer compartment 2. ice tray 10 3. crisper 6. control (not shown) AES27 3 adjustable 3 half width rotary with light 2 front push button AES44 3 adjustable 3 half width rotary with plastic cover √ 7. can storage 8. 9. 10. PARTS AND FEATURES 9 3 4 6 10 AES27 English 1 7 2...
User Manual
Page 6
... operate in order to or greater than the electrical rating of the unit to use an extension cord, use the 2 leveling legs located at the maximum efficiency it is necessary to level the refrigerator. Adjust legs by turning to raise or lower the refrigerator. • This model is designed for the unit and may result in a location where there is proper air circulation, plumbing and electrical connections...
... operate in order to or greater than the electrical rating of the unit to use an extension cord, use the 2 leveling legs located at the maximum efficiency it is necessary to level the refrigerator. Adjust legs by turning to raise or lower the refrigerator. • This model is designed for the unit and may result in a location where there is proper air circulation, plumbing and electrical connections...
User Manual
Page 7
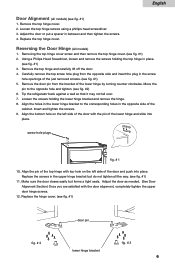
... hole openings of the just removed screws. (see fig. #1) 5. screw hole plugs fig. # 1 10. Adjust the door as needed. (See Door Alignment Section) Once you are satisfied with the pin of the lower hinge by turning counter clockwise. Loosen the top hinge screws using a phillips head screwdriver. 3. Reversing the Door Hinge (All models) 1. Align the pin of the top hinge with top hole on the left side...
... hole openings of the just removed screws. (see fig. #1) 5. screw hole plugs fig. # 1 10. Adjust the door as needed. (See Door Alignment Section) Once you are satisfied with the pin of the lower hinge by turning counter clockwise. Loosen the top hinge screws using a phillips head screwdriver. 3. Reversing the Door Hinge (All models) 1. Align the pin of the top hinge with top hole on the left side...
User Manual
Page 8
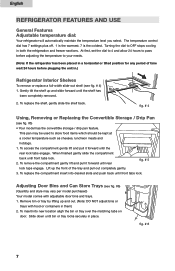
... into new location aligh the bin or tray over the matching tabs on door. Remove bin or tray by lifting up and slide forward until front tabs lock. The temperature control dial has 7 settings plus off. 1 is the warmest. 7 is the coldest. Turning the dial to store food items which should be used to OFF stops cooling in place. 1. 2. To replace the shelf, gently slide the shelf back. Adjusting Door Bins...
... into new location aligh the bin or tray over the matching tabs on door. Remove bin or tray by lifting up and slide forward until front tabs lock. The temperature control dial has 7 settings plus off. 1 is the warmest. 7 is the coldest. Turning the dial to store food items which should be used to OFF stops cooling in place. 1. 2. To replace the shelf, gently slide the shelf back. Adjusting Door Bins...
User Manual
Page 9
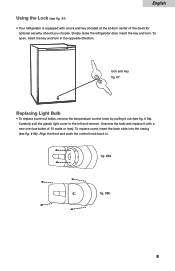
... (located at the bottom center of 15 watts or less). Carefully pull the plastic light cover to the left and remove. To replace cover, insert the back slots into the casing (see fig. # 8a). Align the front and push the control knob back in the opposite direction. English Using the Lock (see fig. #7) • Your refrigerator is equipped with a new one (use bulbs of the door...
... (located at the bottom center of 15 watts or less). Carefully pull the plastic light cover to the left and remove. To replace cover, insert the back slots into the casing (see fig. # 8a). Align the front and push the control knob back in the opposite direction. English Using the Lock (see fig. #7) • Your refrigerator is equipped with a new one (use bulbs of the door...
User Manual
Page 10
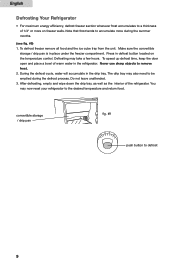
... interior of the refrigerator. Press in the refrigerator. Defrosting may now reset your refrigerator to be emptied during the summer months. (see fig. #9) 1. The drip tray may also need to the desired temperature and return food. convertible storage / drip pan fig. #9 push button to remove frost. 2. During the defrost cycle, water will accumulate in place under the freezer compartment. Make sure the convertible storage / drip pan is in the drip tray. Never use...
... interior of the refrigerator. Press in the refrigerator. Defrosting may now reset your refrigerator to be emptied during the summer months. (see fig. #9) 1. The drip tray may also need to the desired temperature and return food. convertible storage / drip pan fig. #9 push button to remove frost. 2. During the defrost cycle, water will accumulate in place under the freezer compartment. Make sure the convertible storage / drip pan is in the drip tray. Never use...
User Manual
Page 11
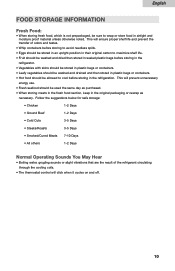
This will ensure proper shelf life and prevent the transfer of the refrigerant circulating through the cooling coils. • The thermostat control will prevent unnecessary energy use. • Fresh seafood should be allowed to wrap or store food in the refrigeration. Follow the suggestions below for safe storage: • Chicken 1-2 Days • Ground Beef 1-2 Days • Cold Cuts 3-5 Days •...
This will ensure proper shelf life and prevent the transfer of the refrigerant circulating through the cooling coils. • The thermostat control will prevent unnecessary energy use. • Fresh seafood should be allowed to wrap or store food in the refrigeration. Follow the suggestions below for safe storage: • Chicken 1-2 Days • Ground Beef 1-2 Days • Cold Cuts 3-5 Days •...
User Manual
Page 12
... food. Prop doors open, so air can circulate inside. PROPER REFRIGERATOR CARE AND CLEANING Cleaning and Maintenance Warning: • To avoid electric shock always unplug your convertible freezer / refrigerator before reusing. When power has been restored, replug power cord to general instructions. Vacation and Moving Care • For long vacations or absences, empty food, move the temperature DIAL to the OFF position and clean the door gaskets according to avoid...
... food. Prop doors open, so air can circulate inside. PROPER REFRIGERATOR CARE AND CLEANING Cleaning and Maintenance Warning: • To avoid electric shock always unplug your convertible freezer / refrigerator before reusing. When power has been restored, replug power cord to general instructions. Vacation and Moving Care • For long vacations or absences, empty food, move the temperature DIAL to the OFF position and clean the door gaskets according to avoid...
User Manual
Page 13
.... English TROUBLESHOOTING Unit Does Not Operate: • Check if thermostat control is not in the "OFF" position. • Check if unit is plugged in. • Check if there is too cold, adjust to a warmer setting and allow several hours for temperature to adjust. Food temperature appears too warm: • Frequent door openings. • Allow time for recently added warm food to reach set temperature. • Check gaskets for...
.... English TROUBLESHOOTING Unit Does Not Operate: • Check if thermostat control is not in the "OFF" position. • Check if unit is plugged in. • Check if there is too cold, adjust to a warmer setting and allow several hours for temperature to adjust. Food temperature appears too warm: • Frequent door openings. • Allow time for recently added warm food to reach set temperature. • Check gaskets for...
User Manual
Page 14
... long? This warranty gives you specific legal rights, and you may have your product serviced, please contact Haier customer service 1-877-337-3639. Any damages to the purchaser for repair, Haier will be paid for by other than an authorized dealer or service center. month period. Decorative trims or replaceable light bulbs. Any mechanical or electrical part that repair is not appropriate or replacement part is not...
... long? This warranty gives you specific legal rights, and you may have your product serviced, please contact Haier customer service 1-877-337-3639. Any damages to the purchaser for repair, Haier will be paid for by other than an authorized dealer or service center. month period. Decorative trims or replaceable light bulbs. Any mechanical or electrical part that repair is not appropriate or replacement part is not...
User Manual
Page 15
DATED PROOF OF PURCHASE REQUIRED FOR WARRANTY SERVICE English 115V, 60 Hz Made in China AES27 / AES44 Issued: March 05 Haier America New York, NY 10018 Printed in China IMPORTANT Do Not Return This Product To The Store If you have a problem with this product, please contact the "Haier Customer Satisfaction Center" at 1-877-337-3639.
DATED PROOF OF PURCHASE REQUIRED FOR WARRANTY SERVICE English 115V, 60 Hz Made in China AES27 / AES44 Issued: March 05 Haier America New York, NY 10018 Printed in China IMPORTANT Do Not Return This Product To The Store If you have a problem with this product, please contact the "Haier Customer Satisfaction Center" at 1-877-337-3639.


