User Manual
Page 5
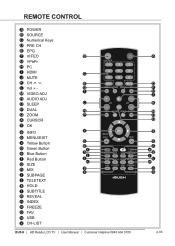
... A POWER B SOURCE C Numerical Keys D PRE CH E EPG F VI'EO G YPbPr H PC I L N P Y b d hf j l n p x EPG YPbPr Vol DUAL MENU /EXIT INFO FAV CH-LIST USB FREEZE D F H J K M O Q X a c eg i k m o q BUSH | HD Ready LCD TV | User Manual | Customer Helpline 0845 604 0105 p.03
... A POWER B SOURCE C Numerical Keys D PRE CH E EPG F VI'EO G YPbPr H PC I L N P Y b d hf j l n p x EPG YPbPr Vol DUAL MENU /EXIT INFO FAV CH-LIST USB FREEZE D F H J K M O Q X a c eg i k m o q BUSH | HD Ready LCD TV | User Manual | Customer Helpline 0845 604 0105 p.03

User Manual
Page 6
... the Battery Cover from remote control handset when it may result in the device. HANDLING THE REMOTE CONTROL Battery Compartment Cover Do not use . p.04 BUSH | HD Ready LCD TV | User Manual | Customer Helpline 0845 604 0105 BU fig. 1 REMOTE CONTROL 1. marks correctly aligned. Remove the battery from the Remote Control...
... the Battery Cover from remote control handset when it may result in the device. HANDLING THE REMOTE CONTROL Battery Compartment Cover Do not use . p.04 BUSH | HD Ready LCD TV | User Manual | Customer Helpline 0845 604 0105 BU fig. 1 REMOTE CONTROL 1. marks correctly aligned. Remove the battery from the Remote Control...

User Manual
Page 7
Carefully close the Battery Cover. fig. 3 BUSH | HD Ready LCD TV | User Manual | Customer Helpline 0845 604 0105 p.05 REMOTE CONTROL 3. See fig. 3. PRECAUTIONS: To obtain the best performance from your remote control, please consider the following: • Ensure there is no obstruction between remote control and TV set. • Bright sunlight may affect the remote control performance. • Always ensure that both batteries are replaced at the same time.
Carefully close the Battery Cover. fig. 3 BUSH | HD Ready LCD TV | User Manual | Customer Helpline 0845 604 0105 p.05 REMOTE CONTROL 3. See fig. 3. PRECAUTIONS: To obtain the best performance from your remote control, please consider the following: • Ensure there is no obstruction between remote control and TV set. • Bright sunlight may affect the remote control performance. • Always ensure that both batteries are replaced at the same time.

User Manual
Page 8
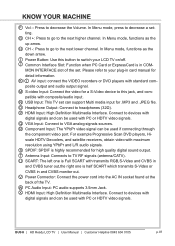
In Menu mode, functions as the right ar- D MENU: Press to toggle between video input sources. B Wall Mount Hole: For wall mount use only. p.06 BUSH | HD Ready LCD TV | User Manual | Customer Helpline 0845 604 0105 BU E Vol +: Press to the next menu or increase a setting. If the LED color ...
In Menu mode, functions as the right ar- D MENU: Press to toggle between video input sources. B Wall Mount Hole: For wall mount use only. p.06 BUSH | HD Ready LCD TV | User Manual | Customer Helpline 0845 604 0105 BU E Vol +: Press to the next menu or increase a setting. If the LED color ...
User Manual
Page 9
... the power cord into the AC IN socket found at the back of the set can be used if connecting through the component video port. BUSH | HD Ready LCD TV | User Manual | Customer Helpline 0845 604 0105 p.07 In Menu mode, functions as the down arrow. I Power Button: Use this jack...
... the power cord into the AC IN socket found at the back of the set can be used if connecting through the component video port. BUSH | HD Ready LCD TV | User Manual | Customer Helpline 0845 604 0105 p.07 In Menu mode, functions as the down arrow. I Power Button: Use this jack...
User Manual
Page 10
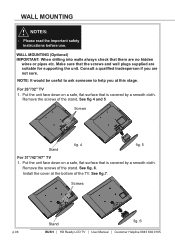
... a smooth cloth. Put the unit face down on a safe, flat surface that the screws and wall plugs supplied are not sure. Screws Stand fig. 6 p.08 BUSH | HD Ready LCD TV | User Manual | Customer Helpline 0845 604 0105 BU Please read the important safety instructions before use.
... a smooth cloth. Put the unit face down on a safe, flat surface that the screws and wall plugs supplied are not sure. Screws Stand fig. 6 p.08 BUSH | HD Ready LCD TV | User Manual | Customer Helpline 0845 604 0105 BU Please read the important safety instructions before use.
User Manual
Page 11
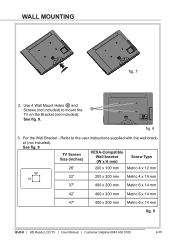
... Metric 4 x 14 mm 37" 400 x 200 mm Metric 6 x 14 mm 42" 400 x 200 mm Metric 6 x 14 mm 47" 400 x 200 mm Metric 6 x 14 mm fig. 9 BUSH | HD Ready LCD TV | User Manual | Customer Helpline 0845 604 0105 p.09 WALL MOUNTING fig. 7 2. Use 4 Wall Mount Holes B and Screws (not included) to the...
... Metric 4 x 14 mm 37" 400 x 200 mm Metric 6 x 14 mm 42" 400 x 200 mm Metric 6 x 14 mm 47" 400 x 200 mm Metric 6 x 14 mm fig. 9 BUSH | HD Ready LCD TV | User Manual | Customer Helpline 0845 604 0105 p.09 WALL MOUNTING fig. 7 2. Use 4 Wall Mount Holes B and Screws (not included) to the...
User Manual
Page 12
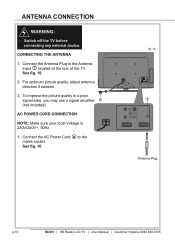
... AC Power Cord a to the Antenna Input T located at the rear of the TV. CONNECTING THE ANTENNA 1. See fig. 10 fig. 10 T Antenna Plug p.10 BUSH | HD Ready LCD TV | User Manual | Customer Helpline 0845 604 0105 BU To improve the picture quality in a poor signal area, you may use a signal...
... AC Power Cord a to the Antenna Input T located at the rear of the TV. CONNECTING THE ANTENNA 1. See fig. 10 fig. 10 T Antenna Plug p.10 BUSH | HD Ready LCD TV | User Manual | Customer Helpline 0845 604 0105 BU To improve the picture quality in a poor signal area, you may use a signal...
User Manual
Page 13
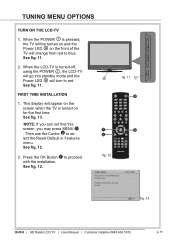
... LED A will change from red to blue See fig. 11. 2. See fig. 12. 2. Please press [OK] to proceed with the installation. OK Next fig. 13 BUSH | HD Ready LCD TV | User Manual | Customer Helpline 0845 604 0105 p.11 TUNING MENU OPTIONS TURN ON THE LCD-TV 1. FIRST TIME INSTALLATION 1. A fig. 11...
... LED A will change from red to blue See fig. 11. 2. See fig. 12. 2. Please press [OK] to proceed with the installation. OK Next fig. 13 BUSH | HD Ready LCD TV | User Manual | Customer Helpline 0845 604 0105 p.11 TUNING MENU OPTIONS TURN ON THE LCD-TV 1. FIRST TIME INSTALLATION 1. A fig. 11...
User Manual
Page 14
... scan or select Skip Scan to skip this page.It will display the first channel found. EXIT Cancel Completed fig. 19 Back OK Exit p.12 BUSH | HD Ready LCD TV | User Manual | Customer Helpline 0845 604 0105 BU Analog Channels: 0 Digital Channels: 10 10% fig. 18 Initial Setup Congratulations...
... scan or select Skip Scan to skip this page.It will display the first channel found. EXIT Cancel Completed fig. 19 Back OK Exit p.12 BUSH | HD Ready LCD TV | User Manual | Customer Helpline 0845 604 0105 BU Analog Channels: 0 Digital Channels: 10 10% fig. 18 Initial Setup Congratulations...

User Manual
Page 15
... and CVBS monitor out. 4. Full SCART, which transmits S-Video or CVBS in and CVBS tuner out. EPG YPbPr Vol DUAL SCART 2 fig. 20 F fig. 21 BUSH | HD Ready LCD TV | User Manual | Customer Helpline 0845 604 0105 p.13 SCART INPUT - To connect external devices such SCART1 U as DVD players, set top...
... and CVBS monitor out. 4. Full SCART, which transmits S-Video or CVBS in and CVBS tuner out. EPG YPbPr Vol DUAL SCART 2 fig. 20 F fig. 21 BUSH | HD Ready LCD TV | User Manual | Customer Helpline 0845 604 0105 p.13 SCART INPUT - To connect external devices such SCART1 U as DVD players, set top...
User Manual
Page 16
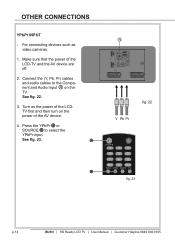
See fig. 23. Connect the (Y, Pb, Pr) cables and audio cables to select the YPbPr input. Turn on the power of the LCDTV first and then turn on the TV. B R fig. 22 Y Pb Pr EPG YPbPr G fig. 23 p.14 BUSH | HD Ready LCD TV | User Manual | Customer Helpline 0845 604 0105 BU Press the YPbPr G or SOURCE B to the Component and Audio Input R on the power of the LCD-TV and the AV device are off. 2. Make sure that the power of the AV device. 4. For connecting devices such as video cameras. 1. OTHER CONNECTIONS YPbPr INPUT - See fig. 22. 3.
See fig. 23. Connect the (Y, Pb, Pr) cables and audio cables to select the YPbPr input. Turn on the power of the LCDTV first and then turn on the TV. B R fig. 22 Y Pb Pr EPG YPbPr G fig. 23 p.14 BUSH | HD Ready LCD TV | User Manual | Customer Helpline 0845 604 0105 BU Press the YPbPr G or SOURCE B to the Component and Audio Input R on the power of the LCD-TV and the AV device are off. 2. Make sure that the power of the AV device. 4. For connecting devices such as video cameras. 1. OTHER CONNECTIONS YPbPr INPUT - See fig. 22. 3.
User Manual
Page 17
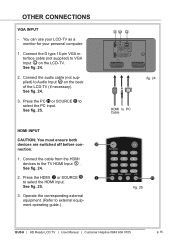
...) to VGA Input Q on the back of the LCD-TV (if necessary). XW Q fig. 24 HDMI to external equipment operating guide.) EPG YPbPr H fig. 25 BUSH | HD Ready LCD TV | User Manual | Customer Helpline 0845 604 0105 p.15 Connect the audio cable (not supplied) to select the PC input. See fig...
...) to VGA Input Q on the back of the LCD-TV (if necessary). XW Q fig. 24 HDMI to external equipment operating guide.) EPG YPbPr H fig. 25 BUSH | HD Ready LCD TV | User Manual | Customer Helpline 0845 604 0105 p.15 Connect the audio cable (not supplied) to select the PC input. See fig...
User Manual
Page 18
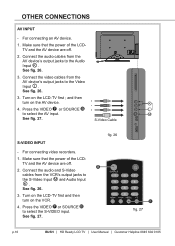
... the S-Video Input M and Audio Input K. Turn on the AV device. For connecting video recorders. 1. See fig. 26. 3. fig. 26 B EPG YPbPr F fig. 27 p.16 BUSH | HD Ready LCD TV | User Manual | Customer Helpline 0845 604 0105 BU OTHER CONNECTIONS AV INPUT - See fig. 26. 3. K 4. Connect the audio and S-Video cables...
... the S-Video Input M and Audio Input K. Turn on the AV device. For connecting video recorders. 1. See fig. 26. 3. fig. 26 B EPG YPbPr F fig. 27 p.16 BUSH | HD Ready LCD TV | User Manual | Customer Helpline 0845 604 0105 BU OTHER CONNECTIONS AV INPUT - See fig. 26. 3. K 4. Connect the audio and S-Video cables...
User Manual
Page 19
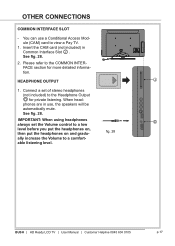
... using headphones always set of stereo headphones (not included) to a low O level before you put the headphones on, then put the headphones on and gradu- BUSH | HD Ready LCD TV | User Manual | Customer Helpline 0845 604 0105 p.17 You can use , the speakers will be automatically mute. Insert the CAM card...
... using headphones always set of stereo headphones (not included) to a low O level before you put the headphones on, then put the headphones on and gradu- BUSH | HD Ready LCD TV | User Manual | Customer Helpline 0845 604 0105 p.17 You can use , the speakers will be automatically mute. Insert the CAM card...

User Manual
Page 20
.... A number will disappear. Vol See fig. 29. L to restore the sound. See fig. 29. The mute icon will appear on the screen. fig. 29 p.18 BUSH | HD Ready LCD TV | User Manual | Customer Helpline 0845 604 0105 BU A mute icon will appear on L screen indicating the Volume level. Then press HDMI...
.... A number will disappear. Vol See fig. 29. L to restore the sound. See fig. 29. The mute icon will appear on the screen. fig. 29 p.18 BUSH | HD Ready LCD TV | User Manual | Customer Helpline 0845 604 0105 BU A mute icon will appear on L screen indicating the Volume level. Then press HDMI...
User Manual
Page 21
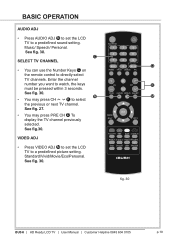
.... 30. BASIC OPERATION AUDIO ADJ • Press AUDIO ADJ N to set the LCD TV to a predefined picture setting. FAV CH-LIST USB FREEZE fig. 30 BUSH | HD Ready LCD TV | User Manual | Customer Helpline 0845 604 0105 p.19 Standard/Vivid/Movie/Eco/Personal.
.... 30. BASIC OPERATION AUDIO ADJ • Press AUDIO ADJ N to set the LCD TV to a predefined picture setting. FAV CH-LIST USB FREEZE fig. 30 BUSH | HD Ready LCD TV | User Manual | Customer Helpline 0845 604 0105 p.19 Standard/Vivid/Movie/Eco/Personal.

User Manual
Page 22
.../ Y MENU channel audio mode. DUAL O INFO Q • Press INFO a to display electronic program guide in TV mode. x FAV CH-LIST USB FREEZE fig. 31 p.20 BUSH | HD Ready LCD TV | User Manual | Customer Helpline 0845 604 0105 BU CHANNEL LIST • Press CH-LIST x to select the picture format menu. See...
.../ Y MENU channel audio mode. DUAL O INFO Q • Press INFO a to display electronic program guide in TV mode. x FAV CH-LIST USB FREEZE fig. 31 p.20 BUSH | HD Ready LCD TV | User Manual | Customer Helpline 0845 604 0105 BU CHANNEL LIST • Press CH-LIST x to select the picture format menu. See...

User Manual
Page 23
... p to display the mul- See fig. 32. See fig. 32. Press again to return to freeze the picture. l p FAV CH-LIST USB FREEZE o q fig. 32 BUSH | HD Ready LCD TV | User Manual | Customer Helpline 0845 604 0105 p.21 FREEZE(Only for TV mode) • Press FREEZE o to a moving picture. See fig...
... p to display the mul- See fig. 32. See fig. 32. Press again to return to freeze the picture. l p FAV CH-LIST USB FREEZE o q fig. 32 BUSH | HD Ready LCD TV | User Manual | Customer Helpline 0845 604 0105 p.21 FREEZE(Only for TV mode) • Press FREEZE o to a moving picture. See fig...
User Manual
Page 24
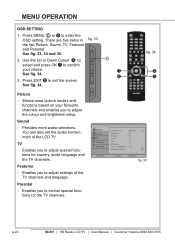
... Parental OK Enter Smart Picture Brightness Contrast Colour Tint Sharpness Colour Temperature Advanced Control Standard 45 50 60 0 5 Cool Select EXIT Exit fig. 35 p.22 BUSH | HD Ready LCD TV | User Manual | Customer Helpline 0845 604 0105 BU EPG YPbPr fig. 34 2. Features - Enables you to control special functions for country...
... Parental OK Enter Smart Picture Brightness Contrast Colour Tint Sharpness Colour Temperature Advanced Control Standard 45 50 60 0 5 Cool Select EXIT Exit fig. 35 p.22 BUSH | HD Ready LCD TV | User Manual | Customer Helpline 0845 604 0105 BU EPG YPbPr fig. 34 2. Features - Enables you to control special functions for country...

