User Manual
Page 2
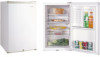
... intended purpose as described in this product requires service, we strongly recommend that a certified technician performs the service. 6) If your refrigerator before cleaning or before it is not being used . Note: If for your refrigerator. 8) Do not operate your refrigerator by pulling on the power cord. SAFETY PRECAUTIONS Read all electric service cords that you remove the doors and leave the shelves in place.
... intended purpose as described in this product requires service, we strongly recommend that a certified technician performs the service. 6) If your refrigerator before cleaning or before it is not being used . Note: If for your refrigerator. 8) Do not operate your refrigerator by pulling on the power cord. SAFETY PRECAUTIONS Read all electric service cords that you remove the doors and leave the shelves in place.
User Manual
Page 3
DANGER Risk of your refrigerator. Before you throw away your receipt to -use manual will need it to record the model and serial number. Thank you in getting the best use of child entrapment. You will guide you for using our Haier product. Remember to obtain warranty service. 2 This easy-to your manual. Model number Serial number Date of the refrigerator. Leave the shelves in back of purchase Staple your old refrigerator or freezer, take off the doors. They are on a label in place so that children may not easily climb inside.
DANGER Risk of your refrigerator. Before you throw away your receipt to -use manual will need it to record the model and serial number. Thank you in getting the best use of child entrapment. You will guide you for using our Haier product. Remember to obtain warranty service. 2 This easy-to your manual. Model number Serial number Date of the refrigerator. Leave the shelves in back of purchase Staple your old refrigerator or freezer, take off the doors. They are on a label in place so that children may not easily climb inside.

User Manual
Page 4
...4 Installing Your Refrigerator 5 Unpacking Your Refrigerator 5 Leveling Your Refrigerator 5 Proper Air Circulation 5 Electrical Requirements 5 Install Limitations 6 Use of Extension Cords 6 Door Alignment 7 Door Reversal 8 Refrigerator Features And Use 10 General Features 10 Refrigerator Interior Shelves 10 Dispense-A-Can 11 Light 11 Crisper 11 Lock and Key 11 Food Storage Information 12 Normal Operating Sounds 12 Proper Refrigerator Care and Cleaning 13 Cleaning and Maintenance 13 Power Interruptions 14 Vacation and Moving Care 14 Troubleshooting 15 Warranty Information...
...4 Installing Your Refrigerator 5 Unpacking Your Refrigerator 5 Leveling Your Refrigerator 5 Proper Air Circulation 5 Electrical Requirements 5 Install Limitations 6 Use of Extension Cords 6 Door Alignment 7 Door Reversal 8 Refrigerator Features And Use 10 General Features 10 Refrigerator Interior Shelves 10 Dispense-A-Can 11 Light 11 Crisper 11 Lock and Key 11 Food Storage Information 12 Normal Operating Sounds 12 Proper Refrigerator Care and Cleaning 13 Cleaning and Maintenance 13 Power Interruptions 14 Vacation and Moving Care 14 Troubleshooting 15 Warranty Information...
User Manual
Page 5
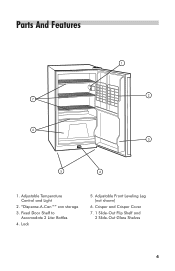
Lock 5. Adjustable Front Leveling Leg (not shown) 6. Fixed Door Shelf to Accomodate 2 Liter Bottles 4. "Dispense-A-Can™" can storage 3. Crisper and Crisper Cover 7. 1 Slide-Out Flip Shelf and 2 Slide-Out Glass Shelves 4 Parts And Features 1 2 7 6 3 5 4 1. Adjustable Temperature Control and Light 2.
Lock 5. Adjustable Front Leveling Leg (not shown) 6. Fixed Door Shelf to Accomodate 2 Liter Bottles 4. "Dispense-A-Can™" can storage 3. Crisper and Crisper Cover 7. 1 Slide-Out Flip Shelf and 2 Slide-Out Glass Shelves 4 Parts And Features 1 2 7 6 3 5 4 1. Adjustable Temperature Control and Light 2.
User Manual
Page 6
... around the refrigerator: Sides 3/4 "(19mm) Top 2" (50mm) Back 2" (50mm) Electrical Requirement • Make sure there is proper air circulation, plumbing and electrical connections. • The following are extended. After properly placing your refrigerator in a location where there is a suitable power Outlet (115 volts, 15 amps outlet) with proper grounding to lower your refrigerator. Remove all adhesive tape holding the refrigerator accessories inside and outside...
... around the refrigerator: Sides 3/4 "(19mm) Top 2" (50mm) Back 2" (50mm) Electrical Requirement • Make sure there is proper air circulation, plumbing and electrical connections. • The following are extended. After properly placing your refrigerator in a location where there is a suitable power Outlet (115 volts, 15 amps outlet) with proper grounding to lower your refrigerator. Remove all adhesive tape holding the refrigerator accessories inside and outside...
User Manual
Page 7
... the use only a 3-wire extension cord that has a 3-blade grounding plug and a 3-slot outlet that will accept the plug. Install Limitations • Do not install your refrigerator in temperature settings below 55˚ Fahrenheit. • Select a suitable location for the refrigerator on the front bottom corners of the refrigerator. Any floor unevenness should be equal to or greater than the electrical rating of potential...
... the use only a 3-wire extension cord that has a 3-blade grounding plug and a 3-slot outlet that will accept the plug. Install Limitations • Do not install your refrigerator in temperature settings below 55˚ Fahrenheit. • Select a suitable location for the refrigerator on the front bottom corners of the refrigerator. Any floor unevenness should be equal to or greater than the electrical rating of potential...
User Manual
Page 8
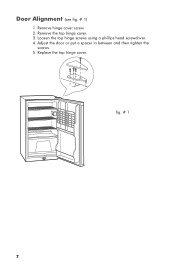
Door Alignment (see fig. # 1) 1. Replace the top hinge cover. Adjust the door or put a spacer in between and then tighten the screws. 5. fig. # 1 7 Loosen the top hinge screws using a phillips head screwdriver. 4. Remove the top hinge cover. 3. Remove hinge cover screw. 2.
Door Alignment (see fig. # 1) 1. Replace the top hinge cover. Adjust the door or put a spacer in between and then tighten the screws. 5. fig. # 1 7 Loosen the top hinge screws using a phillips head screwdriver. 4. Remove the top hinge cover. 3. Remove hinge cover screw. 2.

User Manual
Page 9
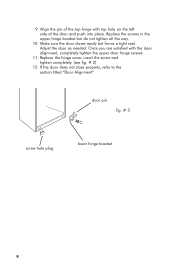
... openings of the lower hinge by turning counter clockwise. Align the bottom hole on the left side of the door with the pin of the cabinet. Reversing the Door Hinge 1. Remove the screw hole plug from the bracket of the just removed screws. (see fig. # 1) 3. Move the pin to the corresponding holes in place. (see fig. # 2) 5. Remove the top hinge cover screw and then remove...
... openings of the lower hinge by turning counter clockwise. Align the bottom hole on the left side of the door with the pin of the cabinet. Reversing the Door Hinge 1. Remove the screw hole plug from the bracket of the just removed screws. (see fig. # 1) 3. Move the pin to the corresponding holes in place. (see fig. # 2) 5. Remove the top hinge cover screw and then remove...
User Manual
Page 10
... are satisfied with top hole on the left side of the door and push into place. Replace the hinge cover, insert the screw and tighten completely. (see fig. # 2) 12. door pin fig. # 3 screw hole plug lower hinge bracket 9 Replace the screws in the upper hinge bracket but forms a tight seal. 9. Adjust the door as needed. If the door does not close properly, refer to...
... are satisfied with top hole on the left side of the door and push into place. Replace the hinge cover, insert the screw and tighten completely. (see fig. # 2) 12. door pin fig. # 3 screw hole plug lower hinge bracket 9 Replace the screws in the upper hinge bracket but forms a tight seal. 9. Adjust the door as needed. If the door does not close properly, refer to...
User Manual
Page 11
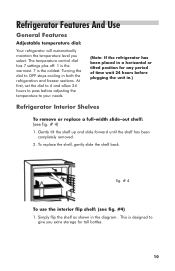
... select. At first, set the dial to 4 and allow 24 hours to OFF stops cooling in the diagram. fig. # 4 To use the interior flip shelf: (see fig. # 4) 1. This is the coldest. Turning the dial to pass before plugging the unit in.) Refrigerator Interior Shelves To remove or replace a full-width slide-out shelf: (see fig. #4) 1. Simply flip the shelf as shown in both the refrigeration and freezer sections.
... select. At first, set the dial to 4 and allow 24 hours to OFF stops cooling in the diagram. fig. # 4 To use the interior flip shelf: (see fig. # 4) 1. This is the coldest. Turning the dial to pass before plugging the unit in.) Refrigerator Interior Shelves To remove or replace a full-width slide-out shelf: (see fig. #4) 1. Simply flip the shelf as shown in both the refrigeration and freezer sections.
User Manual
Page 12
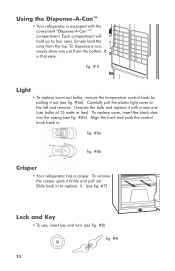
fig. #6a fig. #6b Crisper • Your refrigerator has a crisper. Using the Dispense-A-Can™ • Your refrigerator is that easy. Each compartment will hold up to the left and remove. fig. # 5 Light • To replace burnt-out bulbs, remove the temperature control knob by pulling it . (see fig. #7) Lock and Key • To use bulbs of 15 watts or less). Carefully pull the plastic light cover to four cans. To...
fig. #6a fig. #6b Crisper • Your refrigerator has a crisper. Using the Dispense-A-Can™ • Your refrigerator is that easy. Each compartment will hold up to the left and remove. fig. # 5 Light • To replace burnt-out bulbs, remove the temperature control knob by pulling it . (see fig. #7) Lock and Key • To use bulbs of 15 watts or less). Carefully pull the plastic light cover to four cans. To...
User Manual
Page 13
...ensure proper shelf life and prevent the transfer of the refrigerant circulating through the cooling coils. • The thermostat control will prevent unnecessary energy use. • Fresh seafood should be washed and dried then stored in sealed plastic bags before storing in the refrigeration. Food Storage... Days • Ground Beef 1-2 Days • Cold Cuts 3-5 Days • Steaks/Roasts 3-5 Days • Smoked/Cured Meats 7-10 Days • All others 1-2 Days Normal Operating Sounds You May Hear • Boiling water, gurgling sounds or slight vibrations that are the result...
...ensure proper shelf life and prevent the transfer of the refrigerant circulating through the cooling coils. • The thermostat control will prevent unnecessary energy use. • Fresh seafood should be washed and dried then stored in sealed plastic bags before storing in the refrigeration. Food Storage... Days • Ground Beef 1-2 Days • Cold Cuts 3-5 Days • Steaks/Roasts 3-5 Days • Smoked/Cured Meats 7-10 Days • All others 1-2 Days Normal Operating Sounds You May Hear • Boiling water, gurgling sounds or slight vibrations that are the result...
User Manual
Page 14
... injury. General: • Prepare a cleaning solution of 3-4 tablespoons of gaskets will keep the gasket pliable and assure a good seal. 13 Gaskets must be kept clean and pliable to wipe down your refrigerator. • Rinse with clean warm water and dry with warm water. Use sponge or soft cloth, dampened with the cleaning solution, to assure a proper seal. • Petroleum jelly applied lightly on the hinge side...
... injury. General: • Prepare a cleaning solution of 3-4 tablespoons of gaskets will keep the gasket pliable and assure a good seal. 13 Gaskets must be kept clean and pliable to wipe down your refrigerator. • Rinse with clean warm water and dry with warm water. Use sponge or soft cloth, dampened with the cleaning solution, to assure a proper seal. • Petroleum jelly applied lightly on the hinge side...
User Manual
Page 15
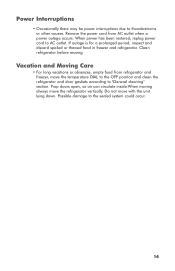
... doors open, so air can circulate inside.When moving always move with the unit lying down. Remove the power cord from refrigerator and freezer, move the temperature DIAL to the OFF position and clean the refrigerator and door gaskets according to thunderstorms or other causes. Do not move the refrigerator vertically. Power Interruptions • Occasionally there may be power interruptions due to "General cleaning" section. Vacation and Moving Care...
... doors open, so air can circulate inside.When moving always move with the unit lying down. Remove the power cord from refrigerator and freezer, move the temperature DIAL to the OFF position and clean the refrigerator and door gaskets according to thunderstorms or other causes. Do not move the refrigerator vertically. Power Interruptions • Occasionally there may be power interruptions due to "General cleaning" section. Vacation and Moving Care...
User Manual
Page 16
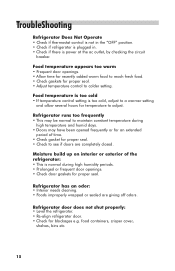
... time. • Check gasket for proper seal. Refrigerator runs too frequently • This may be normal to maintain constant temperature during high humidity periods. • Prolonged or frequent door openings. • Check door gaskets for proper seal. • Check to colder setting. food containers, crisper cover, shelves, bins etc. 15 Food temperature is too cold • If temperature control setting is too cold, adjust to a warmer setting and allow several hours...
... time. • Check gasket for proper seal. Refrigerator runs too frequently • This may be normal to maintain constant temperature during high humidity periods. • Prolonged or frequent door openings. • Check door gaskets for proper seal. • Check to colder setting. food containers, crisper cover, shelves, bins etc. 15 Food temperature is too cold • If temperature control setting is too cold, adjust to a warmer setting and allow several hours...
User Manual
Page 17
... compressor, condenser and evaporator from state to the purchaser for parts on the date the item was purchased and the original purchase receipt must be done? 1. What will be paid by mechanical abuse or improper handling or shipping will repair or replace, at our discretion any covered items during the warranty period so specified. 2. This warranty gives you specific legal...
... compressor, condenser and evaporator from state to the purchaser for parts on the date the item was purchased and the original purchase receipt must be done? 1. What will be paid by mechanical abuse or improper handling or shipping will repair or replace, at our discretion any covered items during the warranty period so specified. 2. This warranty gives you specific legal...


