User Manual
Page 1
HTF21S32 20/21 USER MANUAL Please read this manual carefully before using this TV set and keep it for future reference.
HTF21S32 20/21 USER MANUAL Please read this manual carefully before using this TV set and keep it for future reference.
User Manual
Page 2
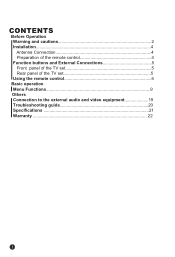
CONTENTS Before Operation Warning and cautions 2 Installation 4 Antenna Connection 4 Preparation of the remote control 4 Function buttons and External Connections 5 Front panel of the TV set 5 Rear panel of the TV set 5 Using the remote control 6 Basic operation Menu Functions 9 Others Connection to the external audio and video equipment 19 Troubleshooting guide 20 Specifications 21 Warranty 22
CONTENTS Before Operation Warning and cautions 2 Installation 4 Antenna Connection 4 Preparation of the remote control 4 Function buttons and External Connections 5 Front panel of the TV set 5 Rear panel of the TV set 5 Using the remote control 6 Basic operation Menu Functions 9 Others Connection to the external audio and video equipment 19 Troubleshooting guide 20 Specifications 21 Warranty 22
User Manual
Page 3
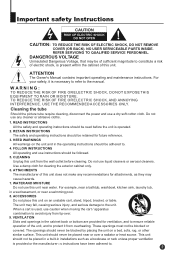
Do not use caution when moving the cart / apparatus combination to the manual. FOLLOW INSTRUCTIONS All operating and use liquid cleaners or aerosol cleaners. When a cart is necessary to refer to avoid injury from tip-over a radiator or heat source. WARNING: TO REDUCE THE RISK OF FIRE OR ELECTRIC SHOCK, DO NOT EXPOSE THIS EQUIPMENT TO RAIN OR MOISTURE. Use a damp cloth for ventilation, and to ensure reliable operation of this unit does not make any cleaner or abrasive cloths. 1. The unit may be of sufficient magnitude to the unit. This unit should be ...
Do not use caution when moving the cart / apparatus combination to the manual. FOLLOW INSTRUCTIONS All operating and use liquid cleaners or aerosol cleaners. When a cart is necessary to refer to avoid injury from tip-over a radiator or heat source. WARNING: TO REDUCE THE RISK OF FIRE OR ELECTRIC SHOCK, DO NOT EXPOSE THIS EQUIPMENT TO RAIN OR MOISTURE. Use a damp cloth for ventilation, and to ensure reliable operation of this unit does not make any cleaner or abrasive cloths. 1. The unit may be of sufficient magnitude to the unit. This unit should be ...
User Manual
Page 4
If you to dangerous voltage or other hazards. Adjust only those that the unit is damaged. If the unit has been dropped or the cabinet has been damaged. Failure to rain or water. SOUND VOLUME Reduce the volume to the minimum level before you connect the product to other equipment, turn on or pinched by a qualified technician to restore the unit to operate from heat sources such as radiators, heat registers, stoves, or other controls may cause an electric shock and serious personal injury. For units intended to its normal operation. POWER LINES An outside antenna...
If you to dangerous voltage or other hazards. Adjust only those that the unit is damaged. If the unit has been dropped or the cabinet has been damaged. Failure to rain or water. SOUND VOLUME Reduce the volume to the minimum level before you connect the product to other equipment, turn on or pinched by a qualified technician to restore the unit to operate from heat sources such as radiators, heat registers, stoves, or other controls may cause an electric shock and serious personal injury. For units intended to its normal operation. POWER LINES An outside antenna...

User Manual
Page 5
Remove the battery cover. ! Do not throw the batteries into fire. Mixer (not incl.) Antenna/ CATV input 75 standard coaxial type AC power socket Note: * It is used to avoid interference. *To avoid interference from electrical signals, do not bind the antenna cable together with any mains lead. When the remote control will not be used batteries in the specified manner. ! Installation Antenna connection Generally speaking, to enjoy a clearer picture, we recommend that a 75 ohm coaxial antenna is recommended that you use a CATV system or an outdoor antenna .In different places, ...
Remove the battery cover. ! Do not throw the batteries into fire. Mixer (not incl.) Antenna/ CATV input 75 standard coaxial type AC power socket Note: * It is used to avoid interference. *To avoid interference from electrical signals, do not bind the antenna cable together with any mains lead. When the remote control will not be used batteries in the specified manner. ! Installation Antenna connection Generally speaking, to enjoy a clearer picture, we recommend that a 75 ohm coaxial antenna is recommended that you use a CATV system or an outdoor antenna .In different places, ...

User Manual
Page 6
Function Buttons and External Connections Front panel the TV set Menu Volume up/ down TV/AV Switching Channel Position up/down Video Iutput terminal Audio Input terminal Signal Receiver Power Switch Rear panel of the TV set Power Indicator Video CB Input terminal Video Y Input terminal Video Output terminal S-VIDEO input terminal Video Input terminal Antenna Input socket Video CR Input terminal Audio Output terminal Audio Input terminal
Function Buttons and External Connections Front panel the TV set Menu Volume up/ down TV/AV Switching Channel Position up/down Video Iutput terminal Audio Input terminal Signal Receiver Power Switch Rear panel of the TV set Power Indicator Video CB Input terminal Video Y Input terminal Video Output terminal S-VIDEO input terminal Video Input terminal Antenna Input socket Video CR Input terminal Audio Output terminal Audio Input terminal

User Manual
Page 7
Using the Remote Control MUTE SCAN SLEEP ZOOM CALL TV/AV P.STD SWAP S.STD CH+ VOL- SOUND TIME FUNCTION TUNE EXIT Buttons on the remote control Program scan Mute Zoom function MTS selection Program number Digital selector Picture mode Volume selection Picture menu Time menu Function menu Exit screen display Tune menu Sound menu Menu selection / adjustment Channel selection (No available) Last Channel Recall Button Call screen display TV/AV exchange Stand by Sleep Time MENU VOL+ PICTURE CH-
Using the Remote Control MUTE SCAN SLEEP ZOOM CALL TV/AV P.STD SWAP S.STD CH+ VOL- SOUND TIME FUNCTION TUNE EXIT Buttons on the remote control Program scan Mute Zoom function MTS selection Program number Digital selector Picture mode Volume selection Picture menu Time menu Function menu Exit screen display Tune menu Sound menu Menu selection / adjustment Channel selection (No available) Last Channel Recall Button Call screen display TV/AV exchange Stand by Sleep Time MENU VOL+ PICTURE CH-

User Manual
Page 8
System and Channel Display Button: CALL This will cycle you through each option. Press the digit select button twice , then enter the two digits . Three Digit Channel Select: When you the current channel number. To cancel, keep SLEEP pressing button until you to turn power ON or OFF , press power button on remote control. TV/AV Pressing this button will show you want to select one digit channel ,press 0 and other digit. One Digit Channel Select: When you want to select a three digit channel .Press the digit select twice , then enter the three digits . System will also...
System and Channel Display Button: CALL This will cycle you through each option. Press the digit select button twice , then enter the two digits . Three Digit Channel Select: When you the current channel number. To cancel, keep SLEEP pressing button until you to turn power ON or OFF , press power button on remote control. TV/AV Pressing this button will show you want to select one digit channel ,press 0 and other digit. One Digit Channel Select: When you want to select a three digit channel .Press the digit select twice , then enter the three digits . System will also...

User Manual
Page 9
Volume (+/-) Select Button: CH- SCAN Pressing it displays Time Menu Screen. System and Channel Display Cancel Button: This button allows you to turn off the channel display and exit EXIT system menus. Last Channel Recall Button: This feature allows you to recall the previously viewed channel. This button can also be used in adjusting the function selections in the Menu Mode. MENU VOL+ by pressing VOL (+) button and decrease VOL(-) button.This button can also be used in adjusting the functions in the Menu Mode. You can increase the volume by pressing the ...
Volume (+/-) Select Button: CH- SCAN Pressing it displays Time Menu Screen. System and Channel Display Cancel Button: This button allows you to turn off the channel display and exit EXIT system menus. Last Channel Recall Button: This feature allows you to recall the previously viewed channel. This button can also be used in adjusting the function selections in the Menu Mode. MENU VOL+ by pressing VOL (+) button and decrease VOL(-) button.This button can also be used in adjusting the functions in the Menu Mode. You can increase the volume by pressing the ...
User Manual
Page 10
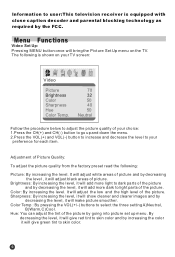
The following : Picture: By increasing the level. Brightness: By increasing the level, it will add more light to dark parts of the picture and by decreasing the level, it will add more dark to light parts of your preference for each item. Sharpness: By increasing the level, it will show cleaner and clearer images and by increasing the color it will bring the Picture Set Up menu on your TV screen: Video Picture Brightness Color Sharpness Hue Color Temp. 70 32 50 40 50 Neutral Follow the procedure below to adjust the picture quality of the picture. It will adjust white areas of...
The following : Picture: By increasing the level. Brightness: By increasing the level, it will add more light to dark parts of the picture and by decreasing the level, it will add more dark to light parts of your preference for each item. Sharpness: By increasing the level, it will show cleaner and clearer images and by increasing the color it will bring the Picture Set Up menu on your TV screen: Video Picture Brightness Color Sharpness Hue Color Temp. 70 32 50 40 50 Neutral Follow the procedure below to adjust the picture quality of the picture. It will adjust white areas of...

User Manual
Page 11
Switch 17:18 18:00 1 --:-0 --:-1 Follow the procedure below to adjust the sound quality: Press VOL (+) button to increase and VOL (-)button to decrease the level to your favorite channel. Ch. Time-Off : Press CH( +/-) buttons to scroll to Clock, then press VOL (-/+) buttons to set channel. Press VOL(+) or VOL(-) button to select the channel. Timer Set Up: By pressing MENU button ,and then pressing VOL(-/+) button it will switch over to the set the hour after setting the hour press CH( +/-) buttons to go to minute mode and et by using VOL(+/-) buttons. Remind time: Press ...
Switch 17:18 18:00 1 --:-0 --:-1 Follow the procedure below to adjust the sound quality: Press VOL (+) button to increase and VOL (-)button to decrease the level to your favorite channel. Ch. Time-Off : Press CH( +/-) buttons to scroll to Clock, then press VOL (-/+) buttons to set channel. Press VOL(+) or VOL(-) button to select the channel. Timer Set Up: By pressing MENU button ,and then pressing VOL(-/+) button it will switch over to the set the hour after setting the hour press CH( +/-) buttons to go to minute mode and et by using VOL(+/-) buttons. Remind time: Press ...
User Manual
Page 12
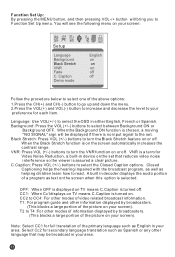
Note: Select CC1 for Video Noise Reduction, a built-in device on the set . You will see the following menu on TV means C.Caption is no input signal to Function Set Up menu. When the Background ON function is chosen, a moving "NO SIGNAL" sign will bring you to the set that may be displayed if there is turned off . OFF: When OFF is displayed on your screen). CC2 to T4 :For other modes of the picture on . VNR is turned on your screen: Setup Language Background Black Stretch VNR Fade C. Closed Captioning helps the hearing impaired with the broadcast program, ...
Note: Select CC1 for Video Noise Reduction, a built-in device on the set . You will see the following menu on TV means C.Caption is no input signal to Function Set Up menu. When the Background ON function is chosen, a moving "NO SIGNAL" sign will bring you to the set that may be displayed if there is turned off . OFF: When OFF is displayed on your screen). CC2 to T4 :For other modes of the picture on . VNR is turned on your screen: Setup Language Background Black Stretch VNR Fade C. Closed Captioning helps the hearing impaired with the broadcast program, ...
User Manual
Page 13
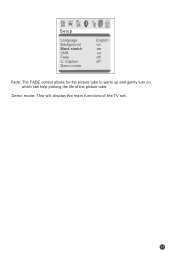
Demo mode: This will display the main functions of the picture tube. Setup Language Background Black stretch VNR Fade C. Caption Demo mode English on on on off off Fade: The FADE control allows for the picture tube to warm up and gently turn on, which can help prolong the life of the TV set.
Demo mode: This will display the main functions of the picture tube. Setup Language Background Black stretch VNR Fade C. Caption Demo mode English on on on off off Fade: The FADE control allows for the picture tube to warm up and gently turn on, which can help prolong the life of the TV set.
User Manual
Page 14
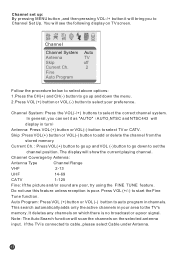
The display will see the following display on the selected antenna input. Note: The Auto Search function will display in turn Antenna: Press VOL (+) button or VOL(-) button to cable, please select Cable under Antenna. If the TV is connected to select TV or CATV. In general, you to auto program in your preference. Current Ch. : Press VOL(+) button to go up and VOL (-) button to go up : By pressing MENU button ,and then pressing VOL-/+ button it will bring you can set it as "AUTO" AUTO,NTSC and NTSC443 will scan the channels on TV screen. You will show the ...
The display will see the following display on the selected antenna input. Note: The Auto Search function will display in turn Antenna: Press VOL (+) button or VOL(-) button to cable, please select Cable under Antenna. If the TV is connected to select TV or CATV. In general, you to auto program in your preference. Current Ch. : Press VOL(+) button to go up and VOL (-) button to go up : By pressing MENU button ,and then pressing VOL-/+ button it will bring you can set it as "AUTO" AUTO,NTSC and NTSC443 will scan the channels on TV screen. You will show the ...
User Manual
Page 15
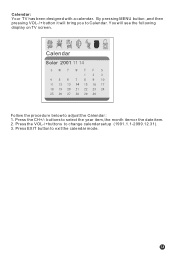
OCT OCT OCT Calendar Solar 2001 11 14 Follow the procedure below to select the year item, the month item or the date item. 2. buttons to adjust the Calendar : 1. By pressing MENU button ,and then pressing VOL-/+ button it will see the following display on TV screen. You will bring you to change calendar setup (1901.1.1-2099.12.31). 3. Press the VOL-/+buttons to Calendar. Press the CH+/- Calendar: Your TV has been designed with a calendar. Press EXIT button to exit the calendar mode.
OCT OCT OCT Calendar Solar 2001 11 14 Follow the procedure below to select the year item, the month item or the date item. 2. buttons to adjust the Calendar : 1. By pressing MENU button ,and then pressing VOL-/+ button it will see the following display on TV screen. You will bring you to change calendar setup (1901.1.1-2099.12.31). 3. Press the VOL-/+buttons to Calendar. Press the CH+/- Calendar: Your TV has been designed with a calendar. Press EXIT button to exit the calendar mode.
User Manual
Page 16
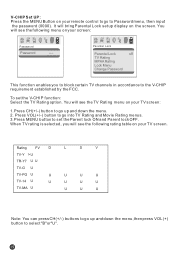
To set up and down the menu. 2. Rating FV D L S V TV-Y >U TR-Y7 U U TV-G U TV-PG U TV-14 U TV-MA U U U U U U U U U U U U Note: You can press CH(+/-) buttons to go up and down the menu,then press VOL(+) button to the V-CHIP requirement established by the FCC. When TV rating is selected, you to block certain TV channels in accordance to select "B"or"U". Parental Lock Parental Lock off TV Rating MPAA Rating Lock Menu Change Password This function enables you will see the following menu on your screen: Passsword Password ---- You will see ...
To set up and down the menu. 2. Rating FV D L S V TV-Y >U TR-Y7 U U TV-G U TV-PG U TV-14 U TV-MA U U U U U U U U U U U U Note: You can press CH(+/-) buttons to go up and down the menu,then press VOL(+) button to the V-CHIP requirement established by the FCC. When TV rating is selected, you to block certain TV channels in accordance to select "B"or"U". Parental Lock Parental Lock off TV Rating MPAA Rating Lock Menu Change Password This function enables you will see the following menu on your screen: Passsword Password ---- You will see ...

User Manual
Page 17
If the PARENT LOCK is in the "ON" mode then V-CHIP function is activated to accept the V-CHIP signal. PROGRAM LOCK:When it is set ON,you can not see the following rating table on . PARENT LOCK ON means the lock function is turned on your TV screen. Password The "Default Password" preset by the manufacturer is turned off . This channel can press CH(+/-) buttons to go up and down the menu,then press VOL(+) button to your own password, just choose any four digits that channel will see the program of this channel. Once you set password for a particular channel, that can ...
If the PARENT LOCK is in the "ON" mode then V-CHIP function is activated to accept the V-CHIP signal. PROGRAM LOCK:When it is set ON,you can not see the following rating table on . PARENT LOCK ON means the lock function is turned on your TV screen. Password The "Default Password" preset by the manufacturer is turned off . This channel can press CH(+/-) buttons to go up and down the menu,then press VOL(+) button to your own password, just choose any four digits that channel will see the program of this channel. Once you set password for a particular channel, that can ...

User Manual
Page 18
TV-14:Parents strongly cautioned-this type of rated programs contain Fantasy and cartoon violence. FV: This type of rated programs may contain sexual content, strong language and more intense violence. Violence: This type of rated programs contain sex. To understand clearly about TV programs rating codes, read the following list: U.S. S: This type of rated programs contain violence. this type of 7. TV-MA:Mature audience only-this type of rated programs may include comedic violence of mild physical, or may frighten children under the age of rated programs may contain sexual ...
TV-14:Parents strongly cautioned-this type of rated programs contain Fantasy and cartoon violence. FV: This type of rated programs may contain sexual content, strong language and more intense violence. Violence: This type of rated programs contain sex. To understand clearly about TV programs rating codes, read the following list: U.S. S: This type of rated programs contain violence. this type of 7. TV-MA:Mature audience only-this type of rated programs may include comedic violence of mild physical, or may frighten children under the age of rated programs may contain sexual ...

User Manual
Page 19
Movies Rating Chart NR: This means movie is pending government rating approval. PG-13:Parents Strongly Cautioned - To understand clearly about movies rating codes, read the following list: U.S. G: This type of rated programs generally suitable for all ages admitted to see the movie. To understand clearly about Canadian programs rating codes, read the following list: Canadian English Rating Chart E:Exempt - G:General Audience-this type of rated programs contain news, sports, documentaries, talk shows, music videos, and variety of other programs. C:This type of movie rating means ...
Movies Rating Chart NR: This means movie is pending government rating approval. PG-13:Parents Strongly Cautioned - To understand clearly about movies rating codes, read the following list: U.S. G: This type of rated programs generally suitable for all ages admitted to see the movie. To understand clearly about Canadian programs rating codes, read the following list: Canadian English Rating Chart E:Exempt - G:General Audience-this type of rated programs contain news, sports, documentaries, talk shows, music videos, and variety of other programs. C:This type of movie rating means ...
User Manual
Page 20
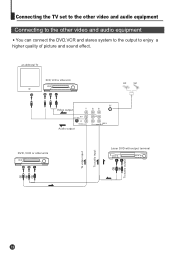
an additional TV DVD, VCD or otherunits Video output Audio output DVD, VCD or otherunits Laser DVD with output terminal To video input To audio input To audio output Connecting the TV set to the other video and audio equipment Connecting to the other video and audio equipment You can connect the DVD,VCR and stereo system to the output to enjoy a higher quality of picture and sound effect.
an additional TV DVD, VCD or otherunits Video output Audio output DVD, VCD or otherunits Laser DVD with output terminal To video input To audio input To audio output Connecting the TV set to the other video and audio equipment Connecting to the other video and audio equipment You can connect the DVD,VCR and stereo system to the output to enjoy a higher quality of picture and sound effect.