
User Manual
Page 1
21F6B-T COLOR TV RECEIVER OWNER'S MANUAL MAIN FUNCTIONS Slide Curtain Power On/Off Display 218 Channels Preset Multiple Picture & Sound Modes On/Off Timer Child Lock Soft Change Channel Function Count Time Channels Appointment DVD Video Component Input Terminals Please read this manual carefully before operating the unit, and keep it for future reference.
21F6B-T COLOR TV RECEIVER OWNER'S MANUAL MAIN FUNCTIONS Slide Curtain Power On/Off Display 218 Channels Preset Multiple Picture & Sound Modes On/Off Timer Child Lock Soft Change Channel Function Count Time Channels Appointment DVD Video Component Input Terminals Please read this manual carefully before operating the unit, and keep it for future reference.

User Manual
Page 3
...panel Using the remote control Basic Operation Power on and power off . . . Manual search MFT Skip Adjusting the picture and the sound Multiple picture modes Multiple sound modes S.C.C,count and mute Setting the Timer Timr off Viewing TV programs Viewing TV programs Program scan and screen display Tuning Automatic search. . . CONTENTS Before Operation Warning and Cautions Installation Antenna connection Preparation for the remote control Position of playing the game Technical operation Connecting Additional Equipments Connecting additional equipment Others Troubleshooting Specifications...
...panel Using the remote control Basic Operation Power on and power off . . . Manual search MFT Skip Adjusting the picture and the sound Multiple picture modes Multiple sound modes S.C.C,count and mute Setting the Timer Timr off Viewing TV programs Viewing TV programs Program scan and screen display Tuning Automatic search. . . CONTENTS Before Operation Warning and Cautions Installation Antenna connection Preparation for the remote control Position of playing the game Technical operation Connecting Additional Equipments Connecting additional equipment Others Troubleshooting Specifications...

User Manual
Page 5
... drop, dampen or disassemble the remote control. Insert two size AA batteries matching the +/-polarities of time or when the batteries are different. 300 twin-lead cable Antenna adapter Mixer additional purchase 75 coaxial cable Plug (additional purchase) Antenna input 75 standard coaxial type AC power socket Note * It is recommended that you 'd better use 75 coaxial cable to remove the disturbance caused by airwave...
... drop, dampen or disassemble the remote control. Insert two size AA batteries matching the +/-polarities of time or when the batteries are different. 300 twin-lead cable Antenna adapter Mixer additional purchase 75 coaxial cable Plug (additional purchase) Antenna input 75 standard coaxial type AC power socket Note * It is recommended that you 'd better use 75 coaxial cable to remove the disturbance caused by airwave...

User Manual
Page 6
Position of Keys and Plug-ins Front panel Headphones Video socket R/L Audio Power switch Power indicator Signal receiver Back panel Menu TV/AV switching Volume up/ down Channel position up/down Video CB input terminal Video Y input terminal Video input terminal (Not available) Antenna input socket Video CR input terminal Audio input terminal (Not available)
Position of Keys and Plug-ins Front panel Headphones Video socket R/L Audio Power switch Power indicator Signal receiver Back panel Menu TV/AV switching Volume up/ down Channel position up/down Video CB input terminal Video Y input terminal Video input terminal (Not available) Antenna input socket Video CR input terminal Audio input terminal (Not available)
User Manual
Page 7
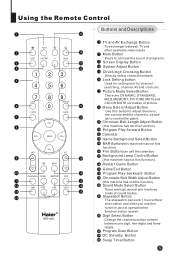
...) Restart Game Button Game Exit Button Program Play-backward Button Chromatic Belt Width Adjust Button (this machine has not this function) Sound Mode Select Button There are DYNAMIC, STANDARD, MILD,MEMORY, PICTURE MUTEand COLOR MUTE six modes of picture. SCAN LOCK P.STD WATCH S.STD CH+ VOL- Menu Select/ Adjust Button Use this function,do not operate other available video inputs Mute Button Press to control the game. Digit Select Button Change the channel position number between TV and other function button as to conceal the sound of sound modes. WID...
...) Restart Game Button Game Exit Button Program Play-backward Button Chromatic Belt Width Adjust Button (this machine has not this function) Sound Mode Select Button There are DYNAMIC, STANDARD, MILD,MEMORY, PICTURE MUTEand COLOR MUTE six modes of picture. SCAN LOCK P.STD WATCH S.STD CH+ VOL- Menu Select/ Adjust Button Use this function,do not operate other available video inputs Mute Button Press to control the game. Digit Select Button Change the channel position number between TV and other function button as to conceal the sound of sound modes. WID...
User Manual
Page 8
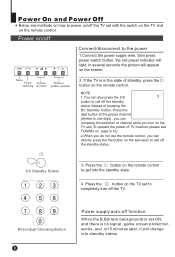
... the screen. Press the button on the TV set to completely turn on the TV set( To operate the preset of TV channel, please see TUNING on page 9-12). 2.When you do not use the remote control, you turn off the TV set ON, and there is no signal , game screen protection works, and ,in15 minutes later, it will change into the standby state. 4. Direct-digit Choosing Button Power supply auto-off Connect/disconnect...
... the screen. Press the button on the TV set to completely turn on the TV set( To operate the preset of TV channel, please see TUNING on page 9-12). 2.When you do not use the remote control, you turn off the TV set ON, and there is no signal , game screen protection works, and ,in15 minutes later, it will change into the standby state. 4. Direct-digit Choosing Button Power supply auto-off Connect/disconnect...

User Manual
Page 9
... channels you can see COLOR AUTO the form. MENU VOL+ 1.Use the direct-digit choosing button Press the button from 0-9 to channel 7. For example, if you have viewed channel 1,2,3,4,5,6 after the TV is powered on, and the channel you are watching now is set ON, the volume of the channel. button, and move the indicator to SOUND, and press VOL+/- Press CH- select adjust to decrease the channel position number. 3.Use PRE button and BACK button...
... channels you can see COLOR AUTO the form. MENU VOL+ 1.Use the direct-digit choosing button Press the button from 0-9 to channel 7. For example, if you have viewed channel 1,2,3,4,5,6 after the TV is powered on, and the channel you are watching now is set ON, the volume of the channel. button, and move the indicator to SOUND, and press VOL+/- Press CH- select adjust to decrease the channel position number. 3.Use PRE button and BACK button...
User Manual
Page 10
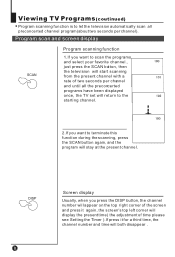
... during the scanning, press the SCAN button again, and the program will both disappear . Program scan and screen display SCAN Program scanning function 1.If you want to scan the programs and select your favorite channel , just press the SCAN button, then the television will start scanning from the present channel with a rate of time please see Setting the Timer ).If press it again, the screen's top left corner will display the present time( the adjustment of two...
... during the scanning, press the SCAN button again, and the program will both disappear . Program scan and screen display SCAN Program scanning function 1.If you want to scan the programs and select your favorite channel , just press the SCAN button, then the television will start scanning from the present channel with a rate of time please see Setting the Timer ).If press it again, the screen's top left corner will display the present time( the adjustment of two...
User Manual
Page 11
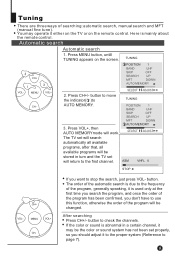
... you should adjust it to the proper system (Reference to the frequency of searching: automatic search, manual search and MFT (manual fine tune). Automatic search Automatic search 1. Press CH+/- If the color or sound is mainly about the remote control. button to move the indicator( )to check the channels. Press MENU button, untill TUNING appears on the remote control. The TV set will work. TUNING...
... you should adjust it to the proper system (Reference to the frequency of searching: automatic search, manual search and MFT (manual fine tune). Automatic search Automatic search 1. Press CH+/- If the color or sound is mainly about the remote control. button to move the indicator( )to check the channels. Press MENU button, untill TUNING appears on the remote control. The TV set will work. TUNING...

User Manual
Page 14
... the remote control to set it ON. Press CH+/- TUNING POSITION 1 BAND UHF SKIP OFF SEARCH UP MFT DOWN AUTO MEMORY CH+ VOL- Press VOL+/- button to select this channel will be recovered. 2. However, you can skip some programs so that to be skipped. Use Direct-digit Choosing button to select the number of the channel to select your favorite channels only. 1. button or Direct-digit Choosing button to close the menu. Direct-digit Choosing Button...
... the remote control to set it ON. Press CH+/- TUNING POSITION 1 BAND UHF SKIP OFF SEARCH UP MFT DOWN AUTO MEMORY CH+ VOL- Press VOL+/- button to select this channel will be recovered. 2. However, you can skip some programs so that to be skipped. Use Direct-digit Choosing button to select the number of the channel to select your favorite channels only. 1. button or Direct-digit Choosing button to close the menu. Direct-digit Choosing Button...

User Manual
Page 16
...set ON, the sudden change the channel( only the pre-50 channels volume). MENU VOL+ CH- 1.Press MENU button, until FUNCTION 1 appears on the FUNCTION 1 screen. 2.Press CH+/- ENGLISH CURTAIN III LOW VOL 00 NORMAL VOL 00 HIGH VOL 00 VOL STORE OFF VOL, then press VOL+/- button, move the indicator( ) to the preconcerted parameter quickly...ure¼anÏd thñe SºouÍndÉ ù Ò (coutinued) Multiple Sound Modes How to select the different sound setting modes. With the same FUNCTION 1 method, you change of the volume can adjust the parameter of...
...set ON, the sudden change the channel( only the pre-50 channels volume). MENU VOL+ CH- 1.Press MENU button, until FUNCTION 1 appears on the FUNCTION 1 screen. 2.Press CH+/- ENGLISH CURTAIN III LOW VOL 00 NORMAL VOL 00 HIGH VOL 00 VOL STORE OFF VOL, then press VOL+/- button, move the indicator( ) to the preconcerted parameter quickly...ure¼anÏd thñe SºouÍndÉ ù Ò (coutinued) Multiple Sound Modes How to select the different sound setting modes. With the same FUNCTION 1 method, you change of the volume can adjust the parameter of...

User Manual
Page 17
... fade out when the channel is changed. The time displayed is the total time when you watch the TV(time of standby status will not be included), the number cannot be altered through operating by the remote control or on the TV set "ON", the picture will appear at the button left corner of the screen, and the sound of the TV set it is cut...
... fade out when the channel is changed. The time displayed is the total time when you watch the TV(time of standby status will not be included), the number cannot be altered through operating by the remote control or on the TV set "ON", the picture will appear at the button left corner of the screen, and the sound of the TV set it is cut...

User Manual
Page 18
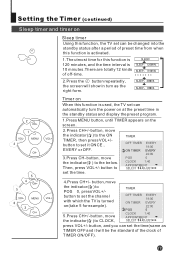
... 1:40 APPOINTMENT CH+ VOL- This TV set provides you can turn the TV set the time(It will be the standard of the clock of TIMER ON/OFF). MENU VOL+ 1.Press MENU button, until TIMER appears on , timer off and sleep off Using this function can set automatically into standby status at the preconcerted time. button, and you with three timer functions such as timer on the screen.
... 1:40 APPOINTMENT CH+ VOL- This TV set provides you can turn the TV set the time(It will be the standard of the clock of TIMER ON/OFF). MENU VOL+ 1.Press MENU button, until TIMER appears on , timer off and sleep off Using this function can set automatically into standby status at the preconcerted time. button, and you with three timer functions such as timer on the screen.
User Manual
Page 19
... 0 CLOCK 1:40 APPOINTMENT CH+ VOL- button, move the indicator( ) to set the time(same as the right form. Then, press VOL+/- MENU VOL+ CH- 4.Press CH+/- button, move the indicator( ) to set the channel with which the TV is turned on the screen. 2.Press CH+/- Setting the Timer (coutinued) Sleep timer and timer on Sleep timer Using this function, the TV set can be the standard of the...
... 0 CLOCK 1:40 APPOINTMENT CH+ VOL- button, move the indicator( ) to set the time(same as the right form. Then, press VOL+/- MENU VOL+ CH- 4.Press CH+/- button, move the indicator( ) to set the channel with which the TV is turned on the screen. 2.Press CH+/- Setting the Timer (coutinued) Sleep timer and timer on Sleep timer Using this function, the TV set can be the standard of the...
User Manual
Page 20
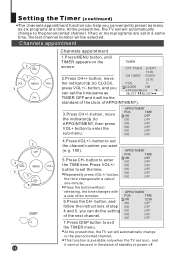
...+/- 000 OFF button to the preconcerted channel. At the preset time, the TV set will automatically change to set is available only when the TV set the channel number you conveniently preset as many as OFF TIMER EVERY 19:00 ON TIMER EVERY 22:00 POS 0 CLOCK 1:40 APPOINTMENT TIMER OFF and it cannot be used in a same time, the last channel number will be selected. This...
...+/- 000 OFF button to the preconcerted channel. At the preset time, the TV set will automatically change to set is available only when the TV set the channel number you conveniently preset as many as OFF TIMER EVERY 19:00 ON TIMER EVERY 22:00 POS 0 CLOCK 1:40 APPOINTMENT TIMER OFF and it cannot be used in a same time, the last channel number will be selected. This...

User Manual
Page 23
... programs and you can conveniently adjust the order of the programs due to 9. button, move POS.EX. Direct-digit Choosing Button EX.POS1 then press VOL+ button to set EX.POS2 1 9 the channel number to your own need. MENU VOL+ CH- 4.Press CH+/- EXCHANGE ? Setting the other Function(continued) The function of channel exchange will be exchanged. MENU VOL+ CH- 1.Press MENU button, until FUNCTION 2 appears on the screen...
... programs and you can conveniently adjust the order of the programs due to 9. button, move POS.EX. Direct-digit Choosing Button EX.POS1 then press VOL+ button to set EX.POS2 1 9 the channel number to your own need. MENU VOL+ CH- 4.Press CH+/- EXCHANGE ? Setting the other Function(continued) The function of channel exchange will be exchanged. MENU VOL+ CH- 1.Press MENU button, until FUNCTION 2 appears on the screen...

User Manual
Page 24
...- 2.Press the 0 button four times, and enter the menu of change password. Press the Direct-digit Choosing button and input a four-digits password. CHANGE PASS. Direct-digit Choosing Button 4. Setting the Lock This TV set provides you with the LOCK function, you can choose it , please follow the instructions below. 1.Press LOCK button, the LOCK OR UNLOCK PASSWORD ---- LOCK OR UNLOCK PASSWORD ---- Changing your password LOCK Changing your TV set a four digit password, the original one is 0000, if you can set . LOCK OR UNLOCK CHANGE PASS. screen will show...
...- 2.Press the 0 button four times, and enter the menu of change password. Press the Direct-digit Choosing button and input a four-digits password. CHANGE PASS. Direct-digit Choosing Button 4. Setting the Lock This TV set provides you with the LOCK function, you can choose it , please follow the instructions below. 1.Press LOCK button, the LOCK OR UNLOCK PASSWORD ---- LOCK OR UNLOCK PASSWORD ---- Changing your password LOCK Changing your TV set a four digit password, the original one is 0000, if you can set . LOCK OR UNLOCK CHANGE PASS. screen will show...

User Manual
Page 25
... right. 2.Press the Direct-digit Choosing button 0 for four times( or input the password you can set it due to your need. Setting the Lock(continued) Setting the Lock LOCK Setting the Lock There are pressed, it will indicate that it has been locked. SEARCH LOCK OFF POS LOCK ON AV LOCK OFF TIMER LOCK ON CHILD LOCK OFF ALL CLEAR OFF Direct-digit Choosing Button 3.Press CH+/- LOCK OR UNLOCK 1.Press the LOCK button, the PASSWORD ---screen will show as...
... right. 2.Press the Direct-digit Choosing button 0 for four times( or input the password you can set it due to your need. Setting the Lock(continued) Setting the Lock LOCK Setting the Lock There are pressed, it will indicate that it has been locked. SEARCH LOCK OFF POS LOCK ON AV LOCK OFF TIMER LOCK ON CHILD LOCK OFF ALL CLEAR OFF Direct-digit Choosing Button 3.Press CH+/- LOCK OR UNLOCK 1.Press the LOCK button, the PASSWORD ---screen will show as...

User Manual
Page 27
Connecting Additional Equipments Connecting additional equipments You can connect the DVD,VCR and stereo system to the AV output to enjoy a higher quality of picture and sound effect. Signal flow White (Audio) Red (CR ) Blue (CB) Green (Y) Yellow (Video) DVD, VCD or other units Laser DVD with output terminal To video input To audio input To audio output To DVD compnent output
Connecting Additional Equipments Connecting additional equipments You can connect the DVD,VCR and stereo system to the AV output to enjoy a higher quality of picture and sound effect. Signal flow White (Audio) Red (CR ) Blue (CB) Green (Y) Yellow (Video) DVD, VCD or other units Laser DVD with output terminal To video input To audio input To audio output To DVD compnent output

User Manual
Page 28
... turn on Good picture , no sound Poor color / tint, good sound Be sure the power cord is changed . The batteries in the remote control may be exhausted. CAUTION In case of problems, have your TV serviced by other electrical sources such as interference from color shading. The contrast, color and tint may expose you to service the set . If you are experiencing. Check if the direction of...
... turn on Good picture , no sound Poor color / tint, good sound Be sure the power cord is changed . The batteries in the remote control may be exhausted. CAUTION In case of problems, have your TV serviced by other electrical sources such as interference from color shading. The contrast, color and tint may expose you to service the set . If you are experiencing. Check if the direction of...


