
User Manual
Page 1
The Owner`s Manual for future reference. COLOR TV RECEIVER OWNER'S MANUAL Please READ this manual carefully before operating the unit, and keep it for the Follow Models: 21F3A, 21F3A-P, 21T3A, 21T3A-P
The Owner`s Manual for future reference. COLOR TV RECEIVER OWNER'S MANUAL Please READ this manual carefully before operating the unit, and keep it for the Follow Models: 21F3A, 21F3A-P, 21T3A, 21T3A-P
User Manual
Page 2
*Please read this manual carefully before using your television and keep this manual in a good place for future reference. *To achieve the best performance of your television, read this User's Manual carefully and properly store it for future reference. *Information of the TV set 4 Buttons on the remote control 5 Basic operation Switching on/off the TV set 6 Watching TV program 7 Watching TV program 7 Program swap and auto scan functions 8 Searching channel 9 Full automatic search mode 9 Semi-automatic search 10 Manual fine tune 11 Program skip 12 Convenient picture and sound ...
*Please read this manual carefully before using your television and keep this manual in a good place for future reference. *To achieve the best performance of your television, read this User's Manual carefully and properly store it for future reference. *Information of the TV set 4 Buttons on the remote control 5 Basic operation Switching on/off the TV set 6 Watching TV program 7 Watching TV program 7 Program swap and auto scan functions 8 Searching channel 9 Full automatic search mode 9 Semi-automatic search 10 Manual fine tune 11 Program skip 12 Convenient picture and sound ...
User Manual
Page 3
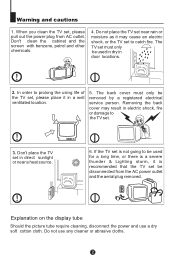
The TV set must only be disconnected from AC outlet. Do not use a dry soft cotton cloth. In order to the TV set be removed by a registered electrical service person. Explanation on the display tube Should the picture tube require cleaning, disconnect the power and use any cleaner or abrasive cloths. Warning and cautions 1. When you clean the TV set , please place it in door locations. 2. Removing the back cover may cause an electric shock, or the TV set near a heat source. 6. Do not place the TV set to be used for a long time, or there is a severe thunder & ...
The TV set must only be disconnected from AC outlet. Do not use a dry soft cotton cloth. In order to the TV set be removed by a registered electrical service person. Explanation on the display tube Should the picture tube require cleaning, disconnect the power and use any cleaner or abrasive cloths. Warning and cautions 1. When you clean the TV set , please place it in door locations. 2. Removing the back cover may cause an electric shock, or the TV set near a heat source. 6. Do not place the TV set to be used for a long time, or there is a severe thunder & ...
User Manual
Page 4
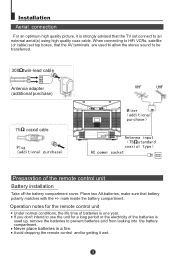
Never place batteries in a fire. If you don't intend to use the unit for the remote control unit Under normal conditions, the life time of the remote control unit Battery installation Take off the battery compartment cover. mark inside the battery compartment. Installation Aerial connection For an optimum high quality picture, it wet. Avoid dropping the remote control and/or getting it is used to allow the stereo sound to be transferred. 300 twin-lead cable Antenna adapter (additional purchase) 75 coaxial cable Preparation of batteries is one year. When connecting to HiFi VCRs...
Never place batteries in a fire. If you don't intend to use the unit for the remote control unit Under normal conditions, the life time of the remote control unit Battery installation Take off the battery compartment cover. mark inside the battery compartment. Installation Aerial connection For an optimum high quality picture, it wet. Avoid dropping the remote control and/or getting it is used to allow the stereo sound to be transferred. 300 twin-lead cable Antenna adapter (additional purchase) 75 coaxial cable Preparation of batteries is one year. When connecting to HiFi VCRs...

User Manual
Page 5
Function buttons and external sockets Front panel of the TV set Menu TV/AV Volume switch up/ down Channel position up/down Signal receiver Power switch Power indicator Rear panel of the TV set Antenna input EXT TV SCRAT Terminal If you want to connect the TV set to the other audio/video equipment, please refer to P24.
Function buttons and external sockets Front panel of the TV set Menu TV/AV Volume switch up/ down Channel position up/down Signal receiver Power switch Power indicator Rear panel of the TV set Antenna input EXT TV SCRAT Terminal If you want to connect the TV set to the other audio/video equipment, please refer to P24.

User Manual
Page 6
MENU VOL+ CH- PICTURE SOUND TIME FUNCTION TUNE EXIT Buttons and Descriptions Program scan Button Mute Button Press to conceal the sound of programs. No including) Screen Display Button Program number Button Digital selector Picture mode selection Menu Select/ Adjust Button Use this button to adjust the menu, the volume and the channels Teletext Button Picture menu (Red) Time menu (Yellow) Tune menu (White) Exit screen display/Teletext Function menu (cyan) Green Button No including) No including) No including) TV and AV Exchange Button To exchanger between TV and other available video ...
MENU VOL+ CH- PICTURE SOUND TIME FUNCTION TUNE EXIT Buttons and Descriptions Program scan Button Mute Button Press to conceal the sound of programs. No including) Screen Display Button Program number Button Digital selector Picture mode selection Menu Select/ Adjust Button Use this button to adjust the menu, the volume and the channels Teletext Button Picture menu (Red) Time menu (Yellow) Tune menu (White) Exit screen display/Teletext Function menu (cyan) Green Button No including) No including) No including) TV and AV Exchange Button To exchanger between TV and other available video ...

User Manual
Page 7
Auto switch-off function When the "Back" function is lighting in red, press the button on the remote control again. If the "OFF TIME" is on, it will be switched off according to switch on AC power supply and the power indicator will be explained. The auto power off function does not work under video input or when the background is off. (Note: If the "off timer" is selected or the TV programs are ended for the day, the power will light. 2 If the indicator is on it directly through pressing the P+/- buttons on the TV set (Child Lock must be turned off). 4 AUTO BG 2 If you want to...
Auto switch-off function When the "Back" function is lighting in red, press the button on the remote control again. If the "OFF TIME" is on, it will be switched off according to switch on AC power supply and the power indicator will be explained. The auto power off function does not work under video input or when the background is off. (Note: If the "off timer" is selected or the TV programs are ended for the day, the power will light. 2 If the indicator is on it directly through pressing the P+/- buttons on the TV set (Child Lock must be turned off). 4 AUTO BG 2 If you want to...
User Manual
Page 8
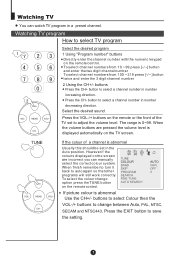
If the colour of the TV set in number decreasing direction. To select the colour change between Auto, PAL, NTSC, SECAM and NTSC443. Press the EXIT button to select a channel number in the Auto position. Press the CH- The range is abnormal Use the CH+/- TUNE CH+ VOL- Select the desired sound Press the VOL-/+ buttons on the remote or the front of a channel is displayed automatically on the screen are incorrect you can watch TV program in number increasing direction. However if the colours displayed on the TV screen. TUNE COLOUR BAND SKIP PROGRAM SEARCH FINE ...
If the colour of the TV set in number decreasing direction. To select the colour change between Auto, PAL, NTSC, SECAM and NTSC443. Press the EXIT button to select a channel number in the Auto position. Press the CH- The range is abnormal Use the CH+/- TUNE CH+ VOL- Select the desired sound Press the VOL-/+ buttons on the remote or the front of a channel is displayed automatically on the screen are incorrect you can watch TV program in number increasing direction. However if the colours displayed on the TV screen. TUNE COLOUR BAND SKIP PROGRAM SEARCH FINE ...

User Manual
Page 9
Program swap and auto scan functions SWAP Program swap 1 Suppose the channel number you used last time. 18 AUTO BG 8 AUTO BG 18 AUTO BG SCAN Auto program scan 1 If you want to select a desirable program, you may scan all the programs in memory with "OFF" skip status (each channel number will last about 2 seconds). The program numbers will last about 2 seconds). 2 If you want to stop the function during auto scanning, simply press the SCAN button again. Through this . Auto scan function enables automatic successive scanning of all the TV programs in the figure). 2 If you ...
Program swap and auto scan functions SWAP Program swap 1 Suppose the channel number you used last time. 18 AUTO BG 8 AUTO BG 18 AUTO BG SCAN Auto program scan 1 If you want to select a desirable program, you may scan all the programs in memory with "OFF" skip status (each channel number will last about 2 seconds). The program numbers will last about 2 seconds). 2 If you want to stop the function during auto scanning, simply press the SCAN button again. Through this . Auto scan function enables automatic successive scanning of all the TV programs in the figure). 2 If you ...

User Manual
Page 10
Full automatic mode TUNE CH+ VOL- TUNE COLOUR BAND SKIP PROGRAM SEARCH FINE TUNE AUTO SEARCH AUTO VHFL OFF 0 CALL 3 Press the VOL+ button to select "AUTO SEARCH". buttons to ensure automatic search function operates. Searching channel This TV set has three methods to set channel. You can also use the remote control to set the channel is explained. Display function Press the CALL button, then the channel number and the systems will be automatically preset in order . MENU VOL+ CH- 1 Press the TUNE menu button , till the TUNING menu shown on the right display on the screen...
Full automatic mode TUNE CH+ VOL- TUNE COLOUR BAND SKIP PROGRAM SEARCH FINE TUNE AUTO SEARCH AUTO VHFL OFF 0 CALL 3 Press the VOL+ button to select "AUTO SEARCH". buttons to ensure automatic search function operates. Searching channel This TV set has three methods to set channel. You can also use the remote control to set the channel is explained. Display function Press the CALL button, then the channel number and the systems will be automatically preset in order . MENU VOL+ CH- 1 Press the TUNE menu button , till the TUNING menu shown on the right display on the screen...

User Manual
Page 11
channel 1 1 AUTO BG TUNE 2 Press the TUNE menu button , till the TUNING menu shown on the right display on -screen menu In general, after you want to select " SEARCH". TUNE COLOUR BAND SKIP PROGRAM SEARCH FINE TUNE AUTO SEARCH AUTO VHFL OFF 0 EXIT 4 Press the VOL-/+ buttons to choose desired channels I.E. The VOL- To turn off the on the screen. MENU VOL+ CH- 3 Press the CH+/- If you press the MENU button, the menu item display (PICTURE, TIME, FUNCTION, TUNE, EXCHANGE, ETC.) will automatically disappear within 15 seconds. CH+ VOL- down button is used for higher side ...
channel 1 1 AUTO BG TUNE 2 Press the TUNE menu button , till the TUNING menu shown on the right display on -screen menu In general, after you want to select " SEARCH". TUNE COLOUR BAND SKIP PROGRAM SEARCH FINE TUNE AUTO SEARCH AUTO VHFL OFF 0 EXIT 4 Press the VOL-/+ buttons to choose desired channels I.E. The VOL- To turn off the on the screen. MENU VOL+ CH- 3 Press the CH+/- If you press the MENU button, the menu item display (PICTURE, TIME, FUNCTION, TUNE, EXCHANGE, ETC.) will automatically disappear within 15 seconds. CH+ VOL- down button is used for higher side ...

User Manual
Page 12
Do not use this feature unless reception is poor. MENU VOL+ CH- 1 Press the CH+/- FINE TUNE 152.25MHz CH+ VOL- buttons or PROGRAM NUMBER 0-9 button to carry out fine tune, till the best picture and sound are poor, try using the FINE TUNE feature. channel 1 1 AUTO BG TUNE 2 Press the TUNE menu button , till the TUNING menu shown on the right display on the screen. TUNE COLOUR BAND SKIP PROGRAM SEARCH FINE TUNE AUTO SEARCH AUTO VHFL OFF 0 CH- 4 Press the VOL-/+ buttons all 1 through to choose desired channels I.E. CH+ VOL- MENU VOL+ 3 Press the CH+/- ...
Do not use this feature unless reception is poor. MENU VOL+ CH- 1 Press the CH+/- FINE TUNE 152.25MHz CH+ VOL- buttons or PROGRAM NUMBER 0-9 button to carry out fine tune, till the best picture and sound are poor, try using the FINE TUNE feature. channel 1 1 AUTO BG TUNE 2 Press the TUNE menu button , till the TUNING menu shown on the right display on the screen. TUNE COLOUR BAND SKIP PROGRAM SEARCH FINE TUNE AUTO SEARCH AUTO VHFL OFF 0 CH- 4 Press the VOL-/+ buttons all 1 through to choose desired channels I.E. CH+ VOL- MENU VOL+ 3 Press the CH+/- ...

User Manual
Page 13
buttons to close the menu. When you want to recover the skipped channel 1 Use the PROGRAM NUMBER buttons to select the channel number to be displayed by directly using the CH+/- MENU VOL+ CH- 4 Press the VOL-/+ buttons to turn the SKIP function "OFF". TUNE COLOUR BAND SKIP PROGRAM SEARCH FINE TUNE AUTO SEARCH AUTO VHFL ON 0 If you use the PROGRAM NUMBER buttons to be skipped. buttons. These channels will be displayed when using the channel number buttons on the screen. 3 Press the CH+/- MENU VOL+ CH- However, you do not wish to select the skipped channel ...
buttons to close the menu. When you want to recover the skipped channel 1 Use the PROGRAM NUMBER buttons to select the channel number to be displayed by directly using the CH+/- MENU VOL+ CH- 4 Press the VOL-/+ buttons to turn the SKIP function "OFF". TUNE COLOUR BAND SKIP PROGRAM SEARCH FINE TUNE AUTO SEARCH AUTO VHFL ON 0 If you use the PROGRAM NUMBER buttons to be skipped. buttons. These channels will be displayed when using the channel number buttons on the screen. 3 Press the CH+/- MENU VOL+ CH- However, you do not wish to select the skipped channel ...

User Manual
Page 14
How to obtain the desired effect. Press VOL+ CONTRAST Weak BRIGHTNESS Dark Strong Bright COLUOR Shallow Deep SHARPNESS Soft Sharp *Hue lean to purple lean to green Note: The "Hue" item only appears when the colour system is a new feature that blacks out the TV screen when listening to music only channels; PICTURE CONTRAST BRIGHTNESS COLOUR SHARPNESS *HUE BLACK STRETCH 48 32 48 40 60 OFF ITEM Press VOL- MENU VOL+ CH- 2 Press the CH+/- LISTEN The 5 modes are SOFT Listen-This is NTSC. buttons to select the item to adjusted, then press the VOL-/+ ...
How to obtain the desired effect. Press VOL+ CONTRAST Weak BRIGHTNESS Dark Strong Bright COLUOR Shallow Deep SHARPNESS Soft Sharp *Hue lean to purple lean to green Note: The "Hue" item only appears when the colour system is a new feature that blacks out the TV screen when listening to music only channels; PICTURE CONTRAST BRIGHTNESS COLOUR SHARPNESS *HUE BLACK STRETCH 48 32 48 40 60 OFF ITEM Press VOL- MENU VOL+ CH- 2 Press the CH+/- LISTEN The 5 modes are SOFT Listen-This is NTSC. buttons to select the item to adjusted, then press the VOL-/+ ...

User Manual
Page 15
FUNCTION BACKGROUND ON NOISE REDUCE OFF FADE ON 3 Press the VOL-/+ buttons to CHILD LOCK OFF turn the BLACK STRETCH function "ON" or "OFF". PICTURE CONTRAST BRIGHTNESS COLOUR SHARPNESS *HUE BLACK STRETCH 48 32 48 40 60 ON FUNCTION CH+ VOL- buttons to select NOISE REDUCE 1 Press the FUNCTION menu button, till the FUNCTION menu shown on the right display on the FUNCTION BACKGROUND ON screen. MENU VOL+ CH- How to turn the NOISE REDUCE AVL CALENDAR ON function "ON" or "OFF". Convenient picture and sound control functions Continued Black Stretch-(...
FUNCTION BACKGROUND ON NOISE REDUCE OFF FADE ON 3 Press the VOL-/+ buttons to CHILD LOCK OFF turn the BLACK STRETCH function "ON" or "OFF". PICTURE CONTRAST BRIGHTNESS COLOUR SHARPNESS *HUE BLACK STRETCH 48 32 48 40 60 ON FUNCTION CH+ VOL- buttons to select NOISE REDUCE 1 Press the FUNCTION menu button, till the FUNCTION menu shown on the right display on the FUNCTION BACKGROUND ON screen. MENU VOL+ CH- How to turn the NOISE REDUCE AVL CALENDAR ON function "ON" or "OFF". Convenient picture and sound control functions Continued Black Stretch-(...
User Manual
Page 16
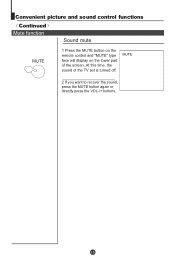
Convenient picture and sound control functions Continued Mute function Sound mute MUTE 1 Press the MUTE button on the remote control and "MUTE" type face will display on the lower part of the TV set is turned off. At this time, the sound of the screen. MUTE 2 If you want to recover the sound, press the MUTE button again or directly press the VOL-/+ buttons.
Convenient picture and sound control functions Continued Mute function Sound mute MUTE 1 Press the MUTE button on the remote control and "MUTE" type face will display on the lower part of the TV set is turned off. At this time, the sound of the screen. MUTE 2 If you want to recover the sound, press the MUTE button again or directly press the VOL-/+ buttons.

User Manual
Page 17
CH+ VOL- MENU VOL+ CH- 1 Press the TIME menu button, and the TIME menu display on or in standby. press again the CH+/- buttons to select "ON PROG", then press the VOL-/+ or program direct number buttons to select your desired channel (take 23:00 as an example) 17:18 18:00 1 --:-0 --:-1 17:18 18:00 8 23:00 0 --:-1 Time functions Clock setting and timer on/off functions Clock setting TIME The clock will need to be reset when the power is turned off timer function, the TV set can automatically turn on to a preset program or shut down in a preset time. 1 Press the TIME menu ...
CH+ VOL- MENU VOL+ CH- 1 Press the TIME menu button, and the TIME menu display on or in standby. press again the CH+/- buttons to select "ON PROG", then press the VOL-/+ or program direct number buttons to select your desired channel (take 23:00 as an example) 17:18 18:00 1 --:-0 --:-1 17:18 18:00 8 23:00 0 --:-1 Time functions Clock setting and timer on/off functions Clock setting TIME The clock will need to be reset when the power is turned off timer function, the TV set can automatically turn on to a preset program or shut down in a preset time. 1 Press the TIME menu ...

User Manual
Page 18
TIME CH+ VOL- press again the CH+/- buttons to select "REMIND PROG", then press the VOL -/+ buttons or the program direct number buttons to set the value in hour position; MENU VOL+ CH- buttons to select "REMIND TIME", then press the VOL -/+ buttons to select the minute position, and then set have 18 sections 0 option for sleep timer function (each section has a time 10 interval of the minute.(take 18 as an example) 3.Press the CH+/- buttons to select "SLEEP TIMER". 3 Press the VOL -/+ buttons to call up the TIME menu on the screen. 2 Press the CH +/- MENU VOL+ CH-...
TIME CH+ VOL- press again the CH+/- buttons to select "REMIND PROG", then press the VOL -/+ buttons or the program direct number buttons to set the value in hour position; MENU VOL+ CH- buttons to select "REMIND TIME", then press the VOL -/+ buttons to select the minute position, and then set have 18 sections 0 option for sleep timer function (each section has a time 10 interval of the minute.(take 18 as an example) 3.Press the CH+/- buttons to select "SLEEP TIMER". 3 Press the VOL -/+ buttons to call up the TIME menu on the screen. 2 Press the CH +/- MENU VOL+ CH-...

User Manual
Page 19
FUNCTION CH+ VOL- MENU VOL+ CH- FADE ON CHILD LOCK OFF AVL ON CALENDAR NOTE: All the control panel buttons on the top of the TV are disabled when CHILD LOCK is ON, the screen will still turn automatically as shown "NO SIGNAL" of moving ( black background). FUNCTION 2 Press the CH+/- Child lock function Enables the TV front control buttons to be locked. 1 Press the FUNCTION menu button, till the FUNCTION menu shown on the right display on . buttons to select "CHILD LOCK" and press FUNCTION the VOL-/+ buttons to turn the AVL ON CALENDAR BACKGROUND ...
FUNCTION CH+ VOL- MENU VOL+ CH- FADE ON CHILD LOCK OFF AVL ON CALENDAR NOTE: All the control panel buttons on the top of the TV are disabled when CHILD LOCK is ON, the screen will still turn automatically as shown "NO SIGNAL" of moving ( black background). FUNCTION 2 Press the CH+/- Child lock function Enables the TV front control buttons to be locked. 1 Press the FUNCTION menu button, till the FUNCTION menu shown on the right display on . buttons to select "CHILD LOCK" and press FUNCTION the VOL-/+ buttons to turn the AVL ON CALENDAR BACKGROUND ...

User Manual
Page 20
buttons to turn the BACKGROUND ON AVL function "ON" or "OFF." FUNCTION 3 Press VOL-/+ button to turn the YEAR/MONTH/DAY, press VOL-/+ buttons to the CALENDAR display on the BACKGROUND ON screen. Set up function Continued AVL and calendar functions AVL function Automatic Volume Limit control reduces effect of large volume changes such as when the ads come on the screen. FUNCTION CH+ 1 Press the FUNCTION menu button, till the FUNCTION menu shown on the right display on . MENU VOL+ 2 Press the CH+/- NOISE REDUCE ON FADE ON CHILD LOCK OFF AVL ON ...
buttons to turn the BACKGROUND ON AVL function "ON" or "OFF." FUNCTION 3 Press VOL-/+ button to turn the YEAR/MONTH/DAY, press VOL-/+ buttons to the CALENDAR display on the BACKGROUND ON screen. Set up function Continued AVL and calendar functions AVL function Automatic Volume Limit control reduces effect of large volume changes such as when the ads come on the screen. FUNCTION CH+ 1 Press the FUNCTION menu button, till the FUNCTION menu shown on the right display on . MENU VOL+ 2 Press the CH+/- NOISE REDUCE ON FADE ON CHILD LOCK OFF AVL ON ...