
User Guide
Page 9
Screen timeout 5: Notification flash 6: G-Sensor calibration 6: Accounts & sync 1: Background data 2: Auto-sync 3: Exchange ActiveSync (if available) 1: Account settings 2: Schedule 3: Mail 4: Contacts... 1: Sound profile 2: Volume 3: Vibrate 4: Phone ringtone 5: Quiet ring on 6: Notification sound pickup 7: Audible touch 8: Audible selection tones 9: Screen lock 10: Vibrate feedback sounds 11: Emergency tone 5: Display 1: Auto-rotate screen 2: Animation 3: Brightness 4.
Screen timeout 5: Notification flash 6: G-Sensor calibration 6: Accounts & sync 1: Background data 2: Auto-sync 3: Exchange ActiveSync (if available) 1: Account settings 2: Schedule 3: Mail 4: Contacts... 1: Sound profile 2: Volume 3: Vibrate 4: Phone ringtone 5: Quiet ring on 6: Notification sound pickup 7: Audible touch 8: Audible selection tones 9: Screen lock 10: Vibrate feedback sounds 11: Emergency tone 5: Display 1: Auto-rotate screen 2: Animation 3: Brightness 4.

User Guide
Page 57
... Settings > Display > G-Sensor calibration. 2. Adjusting the Brightness By default, the screen brightness automatically adjusts depending on a flat surface and then tap Calibrate. 3. Changing the Screen Orientation By default, the screen orientation automatically changes when the device is rotated. Recalibrating the Screen Recalibrate the screen if you feel that the screen orientation does not respond properly to adjust...
... Settings > Display > G-Sensor calibration. 2. Adjusting the Brightness By default, the screen brightness automatically adjusts depending on a flat surface and then tap Calibrate. 3. Changing the Screen Orientation By default, the screen orientation automatically changes when the device is rotated. Recalibrating the Screen Recalibrate the screen if you feel that the screen orientation does not respond properly to adjust...

User Guide
Page 69
...Settings 2B. The device will Managing Your Device's Wireless Functions To save battery life, you would like to easily adjust the screen brightness. For more information, see "Display Settings" on page 44. - date format also applies to Home > Widget > Power Control.... ⅷ Decrease the time before the screen turns off the screen, press continue to Home > Widget > Settings. Power-Saving Tips Adjusting the Display Brightness and Screen On-Time ⅷ Press > , tap Settings > Display > Brightness, and then modify the backlight setting as desired. or...
...Settings 2B. The device will Managing Your Device's Wireless Functions To save battery life, you would like to easily adjust the screen brightness. For more information, see "Display Settings" on page 44. - date format also applies to Home > Widget > Power Control.... ⅷ Decrease the time before the screen turns off the screen, press continue to Home > Widget > Settings. Power-Saving Tips Adjusting the Display Brightness and Screen On-Time ⅷ Press > , tap Settings > Display > Brightness, and then modify the backlight setting as desired. or...
User Guide
Page 136
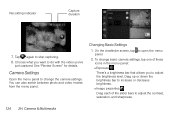
...photo and video modes from the menu panel. Drag up or down the brightness bar to adjust the contrast, saturation, and sharpness. 124 2H. Changing Basic Settings 1. Camera & Multimedia On the viewfinder screen, tap to stop capturing. 8. Camera Settings Open the menu panel to ... tap one of the slider bars to increase or decrease brightness. Ⅲ Image properties Drag each of these icons in the menu panel: Ⅲ Exposure There's a brightness bar that allows you 've just captured. See "Review Screen" for details. To change the camera settings. Recording indicator...
...photo and video modes from the menu panel. Drag up or down the brightness bar to adjust the contrast, saturation, and sharpness. 124 2H. Changing Basic Settings 1. Camera & Multimedia On the viewfinder screen, tap to stop capturing. 8. Camera Settings Open the menu panel to ... tap one of the slider bars to increase or decrease brightness. Ⅲ Image properties Drag each of these icons in the menu panel: Ⅲ Exposure There's a brightness bar that allows you 've just captured. See "Review Screen" for details. To change the camera settings. Recording indicator...
User Guide
Page 254
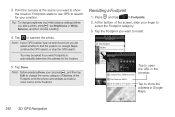
At the bottom of the Footprint, enter the phone and website, and add a voice memo to change brightness and white balance settings before you take a photo, press , tap Brightness or White Balance, and then choose a setting. 4. Tap to open the URL in Google Maps. 242 3D. Note: Before pressing Done,...for your finger to show the location. Tap to capture the photo. GPS Navigation Tip: To change the name, category, or address of the screen, slide your position. Tap the Footprint you can press , and then tap Edit to the Footprint. Note: If your GPS position has not ...
At the bottom of the Footprint, enter the phone and website, and add a voice memo to change brightness and white balance settings before you take a photo, press , tap Brightness or White Balance, and then choose a setting. 4. Tap to open the URL in Google Maps. 242 3D. Note: Before pressing Done,...for your finger to show the location. Tap to capture the photo. GPS Navigation Tip: To change the name, category, or address of the screen, slide your position. Tap the Footprint you can press , and then tap Edit to the Footprint. Note: If your GPS position has not ...


