Owners Manual
Page 3
... Systems 29 6.3 LATCH Locations 32 7.0 How to Install the Infant Restraint/Base 33-40 7.1 Installing the Infant Restraint Without Base Using Vehicle Belt 33 7.2 Installing the Infant Restraint and Base Using Vehicle Belt 34 7.3 Using LATCH to Install Base 37 7.4 Reclining Infant Restraint/Base 38 8.0 Additional Information 41-43 8.1 Airplane Use 41 8.2 Storing LATCH 41...
... Systems 29 6.3 LATCH Locations 32 7.0 How to Install the Infant Restraint/Base 33-40 7.1 Installing the Infant Restraint Without Base Using Vehicle Belt 33 7.2 Installing the Infant Restraint and Base Using Vehicle Belt 34 7.3 Using LATCH to Install Base 37 7.4 Reclining Infant Restraint/Base 38 8.0 Additional Information 41-43 8.1 Airplane Use 41 8.2 Storing LATCH 41...
Owners Manual
Page 4
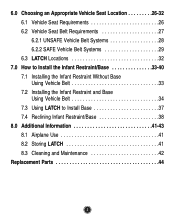
... installing and using this infant restraint. 2. Your child's safety depends on your vehicle owner's manual. Properly securing your child in your child. 3. Placing infant restraint/base in the proper slots for this infant restraint seems easy to READ, UNDERSTAND AND FOLLOW THE OWNER'S MANUAL. Some seating positions, such as those equipped...
... installing and using this infant restraint. 2. Your child's safety depends on your vehicle owner's manual. Properly securing your child in your child. 3. Placing infant restraint/base in the proper slots for this infant restraint seems easy to READ, UNDERSTAND AND FOLLOW THE OWNER'S MANUAL. Some seating positions, such as those equipped...
Owners Manual
Page 8
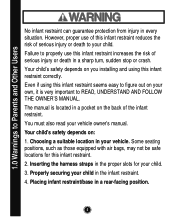
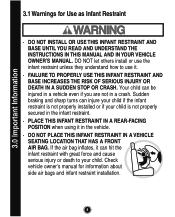
...air bags and infant restraint installation. 8 Check vehicle owner's manual for Use as Infant Restraint • DO NOT INSTALL OR USE THIS INFANT RESTRAINT AND BASE UNTIL YOU READ AND UNDERSTAND THE INSTRUCTIONS IN THIS MANUAL AND IN YOUR VEHICLE OWNER'S MANUAL. If the air bag inflates, it in a crash. ...hit the infant restraint with great force and cause serious injury or death to use it. • FAILURE TO PROPERLY USE THIS INFANT RESTRAINT AND BASE INCREASES THE RISK OF SERIOUS INJURY OR DEATH IN A SUDDEN STOP OR CRASH. DO NOT let others install or use the infant restraint unless ...
...air bags and infant restraint installation. 8 Check vehicle owner's manual for Use as Infant Restraint • DO NOT INSTALL OR USE THIS INFANT RESTRAINT AND BASE UNTIL YOU READ AND UNDERSTAND THE INSTRUCTIONS IN THIS MANUAL AND IN YOUR VEHICLE OWNER'S MANUAL. If the air bag inflates, it in a crash. ...hit the infant restraint with great force and cause serious injury or death to use it. • FAILURE TO PROPERLY USE THIS INFANT RESTRAINT AND BASE INCREASES THE RISK OF SERIOUS INJURY OR DEATH IN A SUDDEN STOP OR CRASH. DO NOT let others install or use the infant restraint unless ...
Owners Manual
Page 9
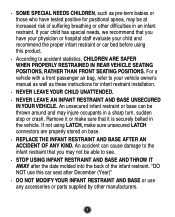
... restraint that you have tested positive for infant restraint installation. • NEVER LEAVE YOUR CHILD UNATTENDED. • NEVER LEAVE AN INFANT RESTRAINT AND BASE UNSECURED IN YOUR VEHICLE. "DO NOT use this product. • According to accident statistics, CHILDREN ARE SAFER WHEN PROPERLY RESTRAINED IN REAR VEHICLE ...or car bed before using LATCH, make sure that you may not be able to your vehicle owner's manual as well as pre-term babies or those who have your physician or hospital staff evaluate your child has special needs, we recommend that it is securely belted in the...
... restraint that you have tested positive for infant restraint installation. • NEVER LEAVE YOUR CHILD UNATTENDED. • NEVER LEAVE AN INFANT RESTRAINT AND BASE UNSECURED IN YOUR VEHICLE. "DO NOT use this product. • According to accident statistics, CHILDREN ARE SAFER WHEN PROPERLY RESTRAINED IN REAR VEHICLE ...or car bed before using LATCH, make sure that you may not be able to your vehicle owner's manual as well as pre-term babies or those who have your physician or hospital staff evaluate your child has special needs, we recommend that it is securely belted in the...
Owners Manual
Page 10
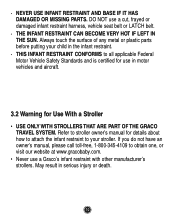
... harness, vehicle seat belt or LATCH belt. • THE INFANT RESTRAINT CAN BECOME VERY HOT IF LEFT IN THE SUN. DO NOT use a Graco's infant restraint with other manufacturer's strollers. Always touch the surface of any metal or plastic parts before putting your child in the infant restraint. &#...Vehicle Safety Standards and is certified for use in serious injury or death. 10 Refer to your stroller. • NEVER USE INFANT RESTRAINT AND BASE IF IT HAS DAMAGED OR MISSING PARTS. May result in motor vehicles and aircraft. 3.2 Warning for details about how to attach the infant restraint...
... harness, vehicle seat belt or LATCH belt. • THE INFANT RESTRAINT CAN BECOME VERY HOT IF LEFT IN THE SUN. DO NOT use a Graco's infant restraint with other manufacturer's strollers. Always touch the surface of any metal or plastic parts before putting your child in the infant restraint. &#...Vehicle Safety Standards and is certified for use in serious injury or death. 10 Refer to your stroller. • NEVER USE INFANT RESTRAINT AND BASE IF IT HAS DAMAGED OR MISSING PARTS. May result in motor vehicles and aircraft. 3.2 Warning for details about how to attach the infant restraint...
Owners Manual
Page 15
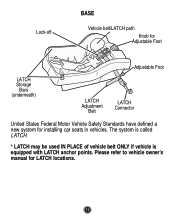
Lock-off BASE Vehicle belt/LATCH path Knob for Adjustable Foot Adjustable Foot LATCH Storage Bars (underneath) LATCH Adjustment Belt LATCH Connector United States Federal Motor Vehicle Safety Standards have defined a new system for LATCH locations. 15 The system is called LATCH. * LATCH may be used IN PLACE of vehicle belt ONLY if vehicle is equipped with LATCH anchor points. Please refer to vehicle owner's manual for installing car seats in vehicles.
Lock-off BASE Vehicle belt/LATCH path Knob for Adjustable Foot Adjustable Foot LATCH Storage Bars (underneath) LATCH Adjustment Belt LATCH Connector United States Federal Motor Vehicle Safety Standards have defined a new system for LATCH locations. 15 The system is called LATCH. * LATCH may be used IN PLACE of vehicle belt ONLY if vehicle is equipped with LATCH anchor points. Please refer to vehicle owner's manual for installing car seats in vehicles.
Owners Manual
Page 16
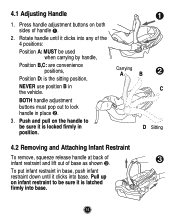
... to be used when carrying by handle, Position B,C: are convenience positions, Position D: is the sitting position, NEVER use position B in base, push infant restraint down until it is latched firmly into base. 16 Push and pull on the handle to lock handle in position. BOTH handle adjustment buttons must pop out to... Infant Restraint To remove, squeeze release handle at back of infant restraint and lift out of handle . 2. 4.1 Adjusting Handle 1. Pull up on both sides of base as shown . Rotate handle until it clicks into...
... to be used when carrying by handle, Position B,C: are convenience positions, Position D: is the sitting position, NEVER use position B in base, push infant restraint down until it is latched firmly into base. 16 Push and pull on the handle to lock handle in position. BOTH handle adjustment buttons must pop out to... Infant Restraint To remove, squeeze release handle at back of infant restraint and lift out of handle . 2. 4.1 Adjusting Handle 1. Pull up on both sides of base as shown . Rotate handle until it clicks into...
Owners Manual
Page 17
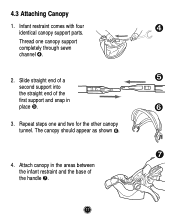
Infant restraint comes with four identical canopy support parts. Thread one and two for the other canopy tunnel. Attach canopy in place . 3. The canopy should appear as shown . 4. Slide straight end of a second support into the straight end of the first support and snap in the areas between the infant restraint and the base of the handle . 17 Repeat steps one canopy support completely through sewn channel . 2. 4.3 Attaching Canopy 1.
Infant restraint comes with four identical canopy support parts. Thread one and two for the other canopy tunnel. Attach canopy in place . 3. The canopy should appear as shown . 4. Slide straight end of a second support into the straight end of the first support and snap in the areas between the infant restraint and the base of the handle . 17 Repeat steps one canopy support completely through sewn channel . 2. 4.3 Attaching Canopy 1.
Owners Manual
Page 20
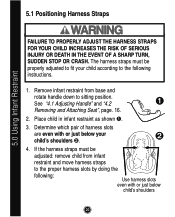
... Seat", page. 16. 2. The harness straps must be properly adjusted to fit your child's shoulders . 4. If the harness straps must be adjusted: remove child from base and rotate handle down to the proper harness slots by doing the following instructions. 1. Remove infant restraint from infant restraint and move harness straps to...
... Seat", page. 16. 2. The harness straps must be properly adjusted to fit your child's shoulders . 4. If the harness straps must be adjusted: remove child from base and rotate handle down to the proper harness slots by doing the following instructions. 1. Remove infant restraint from infant restraint and move harness straps to...
Owners Manual
Page 29
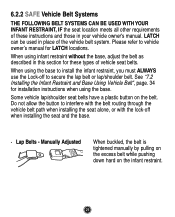
... vehicle owner's manual. Please refer to install the infant restraint, you must ALWAYS use the Lock-off when installing the seat and the base. • Lap Belts - Manually Adjusted When buckled, the belt is tightened manually by pulling on the excess belt while pushing down hard... on the belt. When using the base. See "7.2 Installing the Infant Restraint and Base Using Vehicle Belt", page. 34 for installation instructions when using the base to vehicle owner's manual for these instructions and those in place of vehicle seat ...
... vehicle owner's manual. Please refer to install the infant restraint, you must ALWAYS use the Lock-off when installing the seat and the base. • Lap Belts - Manually Adjusted When buckled, the belt is tightened manually by pulling on the excess belt while pushing down hard... on the belt. When using the base. See "7.2 Installing the Infant Restraint and Base Using Vehicle Belt", page. 34 for installation instructions when using the base to vehicle owner's manual for these instructions and those in place of vehicle seat ...
Owners Manual
Page 31
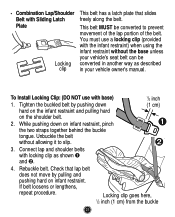
... shoulder belts with locking clip as described in another way as shown and . 4. Unbuckle the belt without the base unless your vehicle's seat belt can be converted to slip. 3. You must use with base) 1. While pushing down hard on the infant restraint and pulling hard on the shoulder belt. 1/2 inch (1 cm) 2. •...
... shoulder belts with locking clip as described in another way as shown and . 4. Unbuckle the belt without the base unless your vehicle's seat belt can be converted to slip. 3. You must use with base) 1. While pushing down hard on the infant restraint and pulling hard on the shoulder belt. 1/2 inch (1 cm) 2. •...
Owners Manual
Page 33
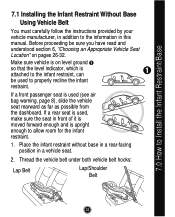
... of it is moved forward enough and is used to allow room for the infant restraint. 1. 7.0 How to Install the Infant Restraint/Base 7.1 Installing the Infant Restraint Without Base Using Vehicle Belt You must carefully follow the instructions provided by your vehicle manufacturer, in addition to the infant restraint, can be sure...
... of it is moved forward enough and is used to allow room for the infant restraint. 1. 7.0 How to Install the Infant Restraint/Base 7.1 Installing the Infant Restraint Without Base Using Vehicle Belt You must carefully follow the instructions provided by your vehicle manufacturer, in addition to the infant restraint, can be sure...
Owners Manual
Page 34
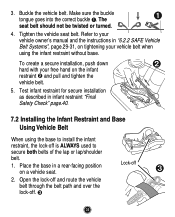
... infant restraint for secure installation as described in infant restraint "Final Safety Check" page.40. 7.2 Installing the Infant Restraint and Base Using Vehicle Belt When using the base to install the infant restraint, the lock-off is ALWAYS used to your vehicle owner's manual and the instructions in a rear...secure both belts of the lap or lap/shoulder belt. 1. Lock-off . Make sure the buckle tongue goes into the correct buckle . Place the base in "6.2.2 SAFE Vehicle Belt Systems", page.29-31, on tightening your free hand on a vehicle seat. 2. The seat belt should not be twisted...
... infant restraint for secure installation as described in infant restraint "Final Safety Check" page.40. 7.2 Installing the Infant Restraint and Base Using Vehicle Belt When using the base to install the infant restraint, the lock-off is ALWAYS used to your vehicle owner's manual and the instructions in a rear...secure both belts of the lap or lap/shoulder belt. 1. Lock-off . Make sure the buckle tongue goes into the correct buckle . Place the base in "6.2.2 SAFE Vehicle Belt Systems", page.29-31, on tightening your free hand on a vehicle seat. 2. The seat belt should not be twisted...
Owners Manual
Page 35
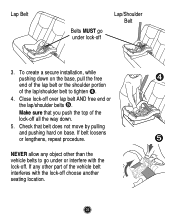
... any object other part of the lock-off Lap/Shoulder Belt 3. Make sure that belt does not move by pulling and pushing hard on the base, pull the free end of the lap belt or the shoulder portion of the lap/shoulder belt to go under or interfere with the lock...
... any object other part of the lock-off Lap/Shoulder Belt 3. Make sure that belt does not move by pulling and pushing hard on the base, pull the free end of the lap belt or the shoulder portion of the lap/shoulder belt to go under or interfere with the lock...
Owners Manual
Page 36
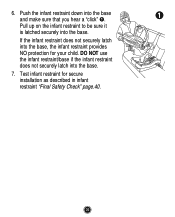
DO NOT use the infant restraint/base if the infant restraint does not securely latch into the base. Test infant restraint for your child. If the infant restraint does not securely latch into the base and make sure that you hear a "click" . 6. Pull up on the infant restraint to be sure it is latched securely into the base. 7. Push the infant restraint down into the base, the infant restraint provides NO protection for secure installation as described in infant restraint "Final Safety Check" page.40. 36
DO NOT use the infant restraint/base if the infant restraint does not securely latch into the base. Test infant restraint for your child. If the infant restraint does not securely latch into the base and make sure that you hear a "click" . 6. Pull up on the infant restraint to be sure it is latched securely into the base. 7. Push the infant restraint down into the base, the infant restraint provides NO protection for secure installation as described in infant restraint "Final Safety Check" page.40. 36
Owners Manual
Page 37
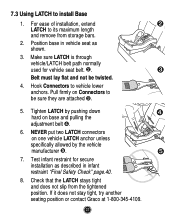
... two LATCH connectors on one vehicle LATCH anchor unless specifically allowed by pushing down hard on Connectors to install Base 1. If it does not stay tight, try another seating position or contact Graco at 1-800-345-4109. 37 Make sure LATCH is through vehicle/LATCH belt path normally used for secure installation... from storage bars. 2. Belt must lay flat and not be sure they are attached . 5. For ease of installation, extend LATCH to vehicle lower anchors. Position base in vehicle seat as described in infant restraint "Final Safety Check" page.40. 8.
... two LATCH connectors on one vehicle LATCH anchor unless specifically allowed by pushing down hard on Connectors to install Base 1. If it does not stay tight, try another seating position or contact Graco at 1-800-345-4109. 37 Make sure LATCH is through vehicle/LATCH belt path normally used for secure installation... from storage bars. 2. Belt must lay flat and not be sure they are attached . 5. For ease of installation, extend LATCH to vehicle lower anchors. Position base in vehicle seat as described in infant restraint "Final Safety Check" page.40. 8.
Owners Manual
Page 38
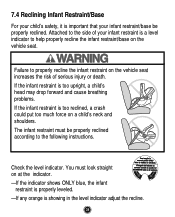
...shows ONLY blue, the infant restraint is properly leveled. -If any orange is a level indicator to help properly recline the infant restraint/base on the vehicle seat. Check the level indicator. You must be properly reclined according to properly recline the infant restraint on the vehicle ...seat increases the risk of your infant restraint/base be properly reclined. 7.4 Reclining Infant Restraint/Base For your child's safety, it is important that your infant restraint is showing in the level indicator adjust the...
...shows ONLY blue, the infant restraint is properly leveled. -If any orange is a level indicator to help properly recline the infant restraint/base on the vehicle seat. Check the level indicator. You must be properly reclined according to properly recline the infant restraint on the vehicle ...seat increases the risk of your infant restraint/base be properly reclined. 7.4 Reclining Infant Restraint/Base For your child's safety, it is important that your infant restraint is showing in the level indicator adjust the...
Owners Manual
Page 39
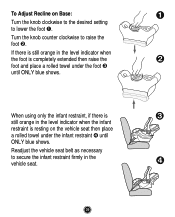
If there is still orange in the level indicator when the foot is resting on Base: Turn the knob clockwise to the desired setting to lower the foot . Turn the knob counter clockwise to secure the infant restraint firmly in the ...
If there is still orange in the level indicator when the foot is resting on Base: Turn the knob clockwise to the desired setting to lower the foot . Turn the knob counter clockwise to secure the infant restraint firmly in the ...
Owners Manual
Page 40
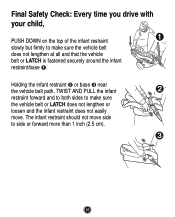
Holding the infant restraint or base near the vehicle belt path, TWIST AND PULL the infant restraint forward and to both sides to make sure the vehicle belt or LATCH does ... to make sure the vehicle belt does not lengthen at all and that the vehicle belt or LATCH is fastened securely around the infant restraint/base . The infant restraint should not move .
Holding the infant restraint or base near the vehicle belt path, TWIST AND PULL the infant restraint forward and to both sides to make sure the vehicle belt or LATCH does ... to make sure the vehicle belt does not lengthen at all and that the vehicle belt or LATCH is fastened securely around the infant restraint/base . The infant restraint should not move .
Owners Manual
Page 41
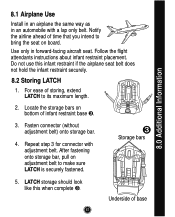
...step 3 for connector with a lap only belt. Underside of storing, extend LATCH to its maximum length. 8.0 Additional Information 2. Follow the flight attendants instructions about infant restraint placement. Storage bars 5. Notify the airline ahead of time that you intend to make sure LATCH is securely fastened. For ease of base... with adjustment belt. After fastening onto storage bar, pull on adjustment belt to bring the seat on bottom of infant restraint base . 3. 8.1 Airplane Use Install in an airplane the same way as in forward-facing aircraft seat. Do not use this...
...step 3 for connector with a lap only belt. Underside of storing, extend LATCH to its maximum length. 8.0 Additional Information 2. Follow the flight attendants instructions about infant restraint placement. Storage bars 5. Notify the airline ahead of time that you intend to make sure LATCH is securely fastened. For ease of base... with adjustment belt. After fastening onto storage bar, pull on adjustment belt to bring the seat on bottom of infant restraint base . 3. 8.1 Airplane Use Install in an airplane the same way as in forward-facing aircraft seat. Do not use this...


