
Assembly Instructions
Page 1
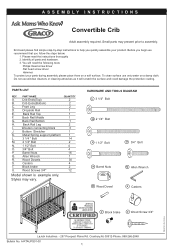
... tools: Philips Head screw driver Flat head screw driver Hammer. Back Rail Leg 2 I. Please read the instructions thoroughly 2. Crib Ends(Bottom) 2 C. Enclosed please find simple step-by-step instructions to assembly. To protect your product. Block brake 2... 2 1/4" Bolt 2 N. 1 1/2" Bolt 4 O. 3/4" Bolt 4 P. Wood Screws 3/4″ 12 Model shown is example only. ASSEMBLY INSTRUCTIONS Convertible Crib Adult assembly required. Styles may present prior to help you follow the steps below: 1. Before you begin we recommend that you quickly assemble your parts...
... tools: Philips Head screw driver Flat head screw driver Hammer. Back Rail Leg 2 I. Please read the instructions thoroughly 2. Crib Ends(Bottom) 2 C. Enclosed please find simple step-by-step instructions to assembly. To protect your product. Block brake 2... 2 1/4" Bolt 2 N. 1 1/2" Bolt 4 O. 3/4" Bolt 4 P. Wood Screws 3/4″ 12 Model shown is example only. ASSEMBLY INSTRUCTIONS Convertible Crib Adult assembly required. Styles may present prior to help you follow the steps below: 1. Before you begin we recommend that you quickly assemble your parts...

Assembly Instructions
Page 4
... phone to your product The item number can be found on the foot/headboard of your Client Service Specialist. Item number and description of the crib. If you do not have internet or fax access, please call us by e-mail at 888-266-2848 and be satisfied with your e-mail. 1. Short...
... phone to your product The item number can be found on the foot/headboard of your Client Service Specialist. Item number and description of the crib. If you do not have internet or fax access, please call us by e-mail at 888-266-2848 and be satisfied with your e-mail. 1. Short...

Assembly Instructions
Page 5
.... • NEVER USE PLASTIC SHIPPING BAGS OR ANY PLASTIC FILM AS MATTRESS COVERS, BECAUSE THEY CAN CAUSE SUFFOCATION. • ANY MATTRESS USED IN THIS CRIB MUST BE AT LEAST 27-1/4 INCHES (69 CENTIMETERS) BY 51-5/8 INCHES (131 CENTIMETERS), WITH A THICKNESS NOT EXCEEDING 6 INCHES (15 CENTIMETERS), THE DIMENSIONS... OF THE MATTRESS SHALL BE TAKEN FROM SEAM TO SEAM OR EDGE TO EDGE WHERE APPROPRIATE. • DO NOT USE A WATER MATTRESS WITH THIS CRIB. • WARNING. WARNING! • FAILURE TO FOLLOW THESE WARNINGS AND ASSEMBLY INSTRUCTIONS COULD RESULT IN SERIOUS INJURY OR DEATH. • READ ALL...
.... • NEVER USE PLASTIC SHIPPING BAGS OR ANY PLASTIC FILM AS MATTRESS COVERS, BECAUSE THEY CAN CAUSE SUFFOCATION. • ANY MATTRESS USED IN THIS CRIB MUST BE AT LEAST 27-1/4 INCHES (69 CENTIMETERS) BY 51-5/8 INCHES (131 CENTIMETERS), WITH A THICKNESS NOT EXCEEDING 6 INCHES (15 CENTIMETERS), THE DIMENSIONS... OF THE MATTRESS SHALL BE TAKEN FROM SEAM TO SEAM OR EDGE TO EDGE WHERE APPROPRIATE. • DO NOT USE A WATER MATTRESS WITH THIS CRIB. • WARNING. WARNING! • FAILURE TO FOLLOW THESE WARNINGS AND ASSEMBLY INSTRUCTIONS COULD RESULT IN SERIOUS INJURY OR DEATH. • READ ALL...
Assembly Instructions
Page 6
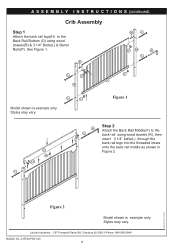
... insets onto the back rail middle as shown in Figure 2. PRINTED IN CHINA Figure 2 Model shown is example only. Styles may vary. A-RTAUPS01-00 6 A S S E M B L Y I N S T R U C T I O N S (continued) Crib Assembly Step 1 Attach the back rail legs(H) to the back rail using wood dowels(R) & 3 1/4" Bolts(L) & Barrel Nuts(P). Styles may vary. R R L P H Q L L P H P G L P Model shown is example only.
... insets onto the back rail middle as shown in Figure 2. PRINTED IN CHINA Figure 2 Model shown is example only. Styles may vary. A-RTAUPS01-00 6 A S S E M B L Y I N S T R U C T I O N S (continued) Crib Assembly Step 1 Attach the back rail legs(H) to the back rail using wood dowels(R) & 3 1/4" Bolts(L) & Barrel Nuts(P). Styles may vary. R R L P H Q L L P H P G L P Model shown is example only.
Assembly Instructions
Page 8
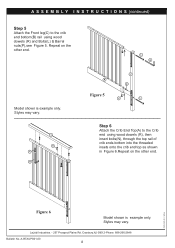
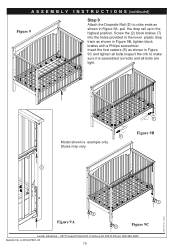
A R N Q B Figure 5 L Q C R P L Step 6 Attach the Crib End Top(A) to the crib end bottom(B) rail using wood dowels (R), then insert bolts(N), through the top rail of crib ends bottom into the threaded insets onto the crib end top as shown in Figure 6.Repeat on the other end. A-RTAUPS01-00 8 A S S E M B L Y I N S T R U... C T I O N S (continued) Step 5 Attach the Front leg(C) to the Crib end using wood dowels (R) and Bolts(L) & Barrel nuts(P),see Figure 5. PRINTED IN CHINA Figure 6 Model shown is example only. LaJobi Industries. - 257 Prospect Plains ...
A R N Q B Figure 5 L Q C R P L Step 6 Attach the Crib End Top(A) to the crib end bottom(B) rail using wood dowels (R), then insert bolts(N), through the top rail of crib ends bottom into the threaded insets onto the crib end top as shown in Figure 6.Repeat on the other end. A-RTAUPS01-00 8 A S S E M B L Y I N S T R U... C T I O N S (continued) Step 5 Attach the Front leg(C) to the Crib end using wood dowels (R) and Bolts(L) & Barrel nuts(P),see Figure 5. PRINTED IN CHINA Figure 6 Model shown is example only. LaJobi Industries. - 257 Prospect Plains ...
Assembly Instructions
Page 9
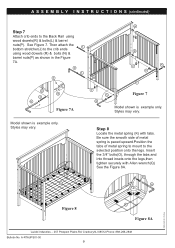
...Model shown is example only. O Q PRINTED IN CHINA Figure 8 K Figure 8A LaJobi Industries. - 257 Prospect Plains Rd. Then attach the L bottom stretcher(J) to the crib ends using wood dowels(R) & bolts(L) & barrel nuts(P). Insert the 3/4" bolts(O), through the tabs and into thread insets onto the legs,then tighten securely with tabs... to the selected position onto the legs. A-RTAUPS01-00 9 Styles may vary. A S S E M B L Y I N S T R U C T I O N S (continued) Step 7 Attach crib ends to the Back Rail using wood dowels (R) & bolts (N) & barrel nuts(P) as shown in the Figure 7A.
...Model shown is example only. O Q PRINTED IN CHINA Figure 8 K Figure 8A LaJobi Industries. - 257 Prospect Plains Rd. Then attach the L bottom stretcher(J) to the crib ends using wood dowels(R) & bolts(L) & barrel nuts(P). Insert the 3/4" bolts(O), through the tabs and into thread insets onto the legs,then tighten securely with tabs... to the selected position onto the legs. A-RTAUPS01-00 9 Styles may vary. A S S E M B L Y I N S T R U C T I O N S (continued) Step 7 Attach crib ends to the Back Rail using wood dowels (R) & bolts (N) & barrel nuts(P) as shown in the Figure 7A.
Assembly Instructions
Page 10
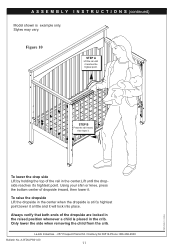
A-RTAUPS01-00 10 D D C T Model shown is assembled correctly and all bolts.Inspect the crib to the highest position. T Figure 9B PRINTED IN CHINA S S Figure 9A S Figure 9C LaJobi Industries. - 257 Prospect Plains Rd. Styles may vary. Cranbury,NJ 08512-... in the lower plastic drop track as shown in Figure 9B, tighten block brakes with a Philips screwdriver. A S S E M B L Y I N S T R U C T I O N S (continued) Figure 9 Step 9 Attach the Dropside Rail (D) to cribs ends as shown in Figure 9A, pull the drop rail up to make sure it is example only.
A-RTAUPS01-00 10 D D C T Model shown is assembled correctly and all bolts.Inspect the crib to the highest position. T Figure 9B PRINTED IN CHINA S S Figure 9A S Figure 9C LaJobi Industries. - 257 Prospect Plains Rd. Styles may vary. Cranbury,NJ 08512-... in the lower plastic drop track as shown in Figure 9B, tighten block brakes with a Philips screwdriver. A S S E M B L Y I N S T R U C T I O N S (continued) Figure 9 Step 9 Attach the Dropside Rail (D) to cribs ends as shown in Figure 9A, pull the drop rail up to make sure it is example only.
Assembly Instructions
Page 11
... dropside inward, then lower it reaches the highest point. Cranbury,NJ 08512-Phone: 888-266-2848 Bulletin No. A S S E M B L Y I N S T R U C T I O N S (continued) Model shown is placed in the crib. Only lower the side when removing the child from the...
... dropside inward, then lower it reaches the highest point. Cranbury,NJ 08512-Phone: 888-266-2848 Bulletin No. A S S E M B L Y I N S T R U C T I O N S (continued) Model shown is placed in the crib. Only lower the side when removing the child from the...
Assembly Instructions
Page 12
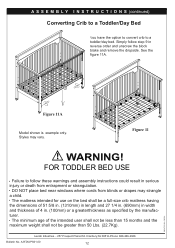
... strangle a child. • The mattress intended for use on the bed shall be greater than 50 Lbs. (22.7Kg). A S S E M B L Y I N S T R U C T I O N S (continued) Converting Crib to a Toddler/Day Bed You have the option to convert crib to follow step 9 in . (100mm) or a greaterthickness as specified by the manufacturer. • The minimum age of the intended user shall...
... strangle a child. • The mattress intended for use on the bed shall be greater than 50 Lbs. (22.7Kg). A S S E M B L Y I N S T R U C T I O N S (continued) Converting Crib to a Toddler/Day Bed You have the option to convert crib to follow step 9 in . (100mm) or a greaterthickness as specified by the manufacturer. • The minimum age of the intended user shall...
Assembly Instructions
Page 13
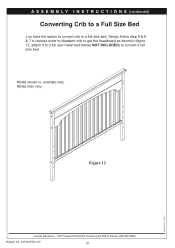
Cranbury,NJ 08512-Phone: 888-266-2848 Bulletin No. A S S E M B L Y I N S T R U C T I O N S (continued) Converting Crib to a Full Size Bed You have the option to convert crib to convert a full size bed Model shown is example only. Simply follow step 9 & 8 & 7 in reverse order to disattach crib to get the headboard as shown in figure 12, attach it to a full size metal bed frame( NOT INCLUDED) to a full size bed. Styles may vary. Figure 12 LaJobi Industries. - 257 Prospect Plains Rd. A-RTAUPS01-00 13 PRINTED IN CHINA
Cranbury,NJ 08512-Phone: 888-266-2848 Bulletin No. A S S E M B L Y I N S T R U C T I O N S (continued) Converting Crib to a Full Size Bed You have the option to convert crib to convert a full size bed Model shown is example only. Simply follow step 9 & 8 & 7 in reverse order to disattach crib to get the headboard as shown in figure 12, attach it to a full size metal bed frame( NOT INCLUDED) to a full size bed. Styles may vary. Figure 12 LaJobi Industries. - 257 Prospect Plains Rd. A-RTAUPS01-00 13 PRINTED IN CHINA


