
Assembly Instructions
Page 1
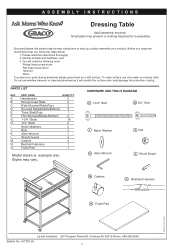
... 1 Model shown is example only. Identify all parts and hardware, and 3. To protect your product. Thick Shelf(Top) 1 F. Casters 4 N. HARDWARE AND TOOLS DIAGRAM G 1-3/4" Bolt H 3/4" Bolt I . ASSEMBLY INSTRUCTIONS Dressing Table Adult assembly required. To clean surface use window cleaners or cleaning abrasives as it will need the following tools: Philips Head screw driver Flat head screw driver Hammer...
... 1 Model shown is example only. Identify all parts and hardware, and 3. To protect your product. Thick Shelf(Top) 1 F. Casters 4 N. HARDWARE AND TOOLS DIAGRAM G 1-3/4" Bolt H 3/4" Bolt I . ASSEMBLY INSTRUCTIONS Dressing Table Adult assembly required. To clean surface use window cleaners or cleaning abrasives as it will need the following tools: Philips Head screw driver Flat head screw driver Hammer...
Assembly Instructions
Page 2
...Do not over time but extreme conditions may develop some woods darkening naturally over time and exposure to 10 percent. Furniture Care Instructions Room Climate Control Wood, when first cut contains more than 50 percent water. Do not push or drag it is placed in... the moisture content is not considered to air-conditioning outlets, fire places, radiators, space heaters, humidifiers or dehumidifiers. Tolerances have fewer problems when its environment. Use only a mild soap. The Ideal Environment for furniture construction it to avoid damage to legs Keep the furniture...
...Do not over time but extreme conditions may develop some woods darkening naturally over time and exposure to 10 percent. Furniture Care Instructions Room Climate Control Wood, when first cut contains more than 50 percent water. Do not push or drag it is placed in... the moisture content is not considered to air-conditioning outlets, fire places, radiators, space heaters, humidifiers or dehumidifiers. Tolerances have fewer problems when its environment. Use only a mild soap. The Ideal Environment for furniture construction it to avoid damage to legs Keep the furniture...

Assembly Instructions
Page 4
Your Name 2. Place and date of furniture. Procedures to follow should you have any questions: For best and most timely service please contact us at [email protected] Please provide the following information in your product The item number can be found on the foot/...headboard of the crib. Please include all the above information to ensure you with your Client Service Specialist. BULLETIN NO. A-PAP01-00 4 Our international team has spent many hours designing and engineering this piece and packaging to 609-409-5809 If ...
Your Name 2. Place and date of furniture. Procedures to follow should you have any questions: For best and most timely service please contact us at [email protected] Please provide the following information in your product The item number can be found on the foot/...headboard of the crib. Please include all the above information to ensure you with your Client Service Specialist. BULLETIN NO. A-PAP01-00 4 Our international team has spent many hours designing and engineering this piece and packaging to 609-409-5809 If ...

Assembly Instructions
Page 5
DO NOT USE THIS DRESSING/CHANGING TABLE OR CHANGING PAD IF THERE ARE ANY LOOSE JOINTS,MISSING OR BROKEN PARTS AND SHARP EDGES.PLEASE CONTACT LAJOBI INDUSTRIES,INC.,257 PROSPECT PLAINS ROAD,CRANBURY, NJ 08512 FOR REPLACEMENT PART AND INSTRUCTIONAL LITERATURE. LaJobi Industries. - 257 Prospect Plains Rd. Cranbury,NJ 08512-Phone: 888-266-2848 Bulletin No. THIS...
DO NOT USE THIS DRESSING/CHANGING TABLE OR CHANGING PAD IF THERE ARE ANY LOOSE JOINTS,MISSING OR BROKEN PARTS AND SHARP EDGES.PLEASE CONTACT LAJOBI INDUSTRIES,INC.,257 PROSPECT PLAINS ROAD,CRANBURY, NJ 08512 FOR REPLACEMENT PART AND INSTRUCTIONAL LITERATURE. LaJobi Industries. - 257 Prospect Plains Rd. Cranbury,NJ 08512-Phone: 888-266-2848 Bulletin No. THIS...
Assembly Instructions
Page 6
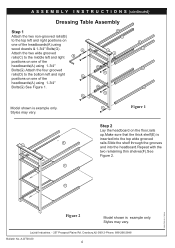
...on one of the headboards(A) using wood dowels & 1-3/4″ Bolts(G). F F PRINTED IN CHINA Figure 2 Model shown is example only. Styles may vary. D D G G Model shown is example only. G Figure 1 Step 2 Lay the headboard on the floor,rails up.Make sure...-00 6 Styles may vary. LaJobi Industries. - 257 Prospect Plains Rd. A S S E M B L Y I N S T R U C T I O N S (continued) Dressing Table Assembly Step 1 B Attach the two non-grooved rails(B) C to the bottom left and right positions on B one of the headboards(A) using 1-3/4″ Bolts(G).See Figure...
...on one of the headboards(A) using wood dowels & 1-3/4″ Bolts(G). F F PRINTED IN CHINA Figure 2 Model shown is example only. Styles may vary. D D G G Model shown is example only. G Figure 1 Step 2 Lay the headboard on the floor,rails up.Make sure...-00 6 Styles may vary. LaJobi Industries. - 257 Prospect Plains Rd. A S S E M B L Y I N S T R U C T I O N S (continued) Dressing Table Assembly Step 1 B Attach the two non-grooved rails(B) C to the bottom left and right positions on B one of the headboards(A) using 1-3/4″ Bolts(G).See Figure...
Assembly Instructions
Page 7
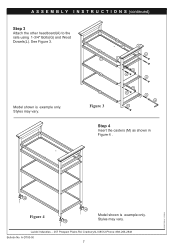
B C D D Figure 3 B C L A G D G D G G G G K Step 4 Insert the casters (M) as shown in Figure 4 . M LaJobi Industries. - 257 Prospect Plains Rd. A S S E M B L Y I N S T R U C T I O N S (continued) Step 3 Attach the other headboard(A) to the rails using 1-3/4″ Bolts(G) and Wood Dowels(L). Cranbury,NJ 08512-Phone: 888-266-2848 Bulletin No. See Figure 3. Styles may vary. PRINTED IN CHINA M Figure 4 M Model shown is example only. A-DT00-00 7 Styles may vary. Model shown is example only.
B C D D Figure 3 B C L A G D G D G G G G K Step 4 Insert the casters (M) as shown in Figure 4 . M LaJobi Industries. - 257 Prospect Plains Rd. A S S E M B L Y I N S T R U C T I O N S (continued) Step 3 Attach the other headboard(A) to the rails using 1-3/4″ Bolts(G) and Wood Dowels(L). Cranbury,NJ 08512-Phone: 888-266-2848 Bulletin No. See Figure 3. Styles may vary. PRINTED IN CHINA M Figure 4 M Model shown is example only. A-DT00-00 7 Styles may vary. Model shown is example only.
Assembly Instructions
Page 8
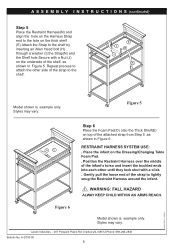
Gently pull the loose end of the strap to the shelf. Figure 6 Model shown is example only. Cranbury,NJ 08512-Phone: 888-266-2848 Bulletin No. E I ),the Strap(N) and the Shelf hole.Secure with a click. . Figure 5 NL Step 6 ... the Harness Strap end to the hole on the thick shelf (E).Attach the Strap to the shelf by inserting an Allen Head bolt (H) through a washer (I H J N Model shown is example only. Place the infant on the Dressing/Changing Table Foam Pad. . WARNING: FALL HAZARD ALWAY KEEP CHILD WITHIN AN ARMS REACH. Styles may vary.
Gently pull the loose end of the strap to the shelf. Figure 6 Model shown is example only. Cranbury,NJ 08512-Phone: 888-266-2848 Bulletin No. E I ),the Strap(N) and the Shelf hole.Secure with a click. . Figure 5 NL Step 6 ... the Harness Strap end to the hole on the thick shelf (E).Attach the Strap to the shelf by inserting an Allen Head bolt (H) through a washer (I H J N Model shown is example only. Place the infant on the Dressing/Changing Table Foam Pad. . WARNING: FALL HAZARD ALWAY KEEP CHILD WITHIN AN ARMS REACH. Styles may vary.

