

Assembly Instructions
Page 1
... T Block brake U Wood Screw 3/4″ LaJobi Industries. - 257 Prospect Plains Rd. Crib Ends(Top) 2 B. Front Leg 2 D. Back Rail Bottom 1 H. Metal Spring support platform 1 L. 3 1/4 " Bolt 14 M. 2 1/4" Bolt 2 N. 1 1/2" Bolt 4 O. 3/4" Bolt 4 P. Allen Wrench 1 R. Before you begin we recommend that you quickly assemble your parts during assembly please place them on a damp cloth. Small parts may vary. Back Rail Middle 1 G. ASSEMBLY INSTRUCTIONS Convertible Crib Adult assembly required. Back Rail Leg...
... T Block brake U Wood Screw 3/4″ LaJobi Industries. - 257 Prospect Plains Rd. Crib Ends(Top) 2 B. Front Leg 2 D. Back Rail Bottom 1 H. Metal Spring support platform 1 L. 3 1/4 " Bolt 14 M. 2 1/4" Bolt 2 N. 1 1/2" Bolt 4 O. 3/4" Bolt 4 P. Allen Wrench 1 R. Before you begin we recommend that you quickly assemble your parts during assembly please place them on a damp cloth. Small parts may vary. Back Rail Middle 1 G. ASSEMBLY INSTRUCTIONS Convertible Crib Adult assembly required. Back Rail Leg...
Assembly Instructions
Page 2
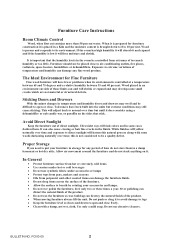
Furniture Care Instructions Room Climate Control Wood, when first cut contains more than 50 percent water. It is prepared for any fine wood product. The Ideal Environment for Fine Furniture... to put your accessories and lamps. Proper Storage If you need to normal over time; Do not drag items across the surface of the product. Do not push or drag it will lose moisture and ...close . Furniture should not be difficult to 10 percent. Tolerances have fewer problems when its environment. Allow the surface to direct sunlight will hasten this is low it will absorb it only two or ...
Furniture Care Instructions Room Climate Control Wood, when first cut contains more than 50 percent water. It is prepared for any fine wood product. The Ideal Environment for Fine Furniture... to put your accessories and lamps. Proper Storage If you need to normal over time; Do not drag items across the surface of the product. Do not push or drag it will lose moisture and ...close . Furniture should not be difficult to 10 percent. Tolerances have fewer problems when its environment. Allow the surface to direct sunlight will hasten this is low it will absorb it only two or ...

Assembly Instructions
Page 3
BULLETIN NO. STOP IF YOU EXPERIENCE ANY ISSUES WITH THIS PRODUCT BEFORE YOU RETURN THIS TO THE RETAILER PLEASE FOLLOW PROCEDURES ON THE REVERSE SIDE OF THIS FORM. PAP00-00 3
BULLETIN NO. STOP IF YOU EXPERIENCE ANY ISSUES WITH THIS PRODUCT BEFORE YOU RETURN THIS TO THE RETAILER PLEASE FOLLOW PROCEDURES ON THE REVERSE SIDE OF THIS FORM. PAP00-00 3

Assembly Instructions
Page 4
... or on that label including the PO# and production date. 6. Procedures to have all numbers found on the back of furniture. Address 3. Phone number 4. PAP01-00 4 Our international team has spent...follow should you will contact you via e-mail or phone to your Client Service Specialist. If you need help you with your purchase please contact us at any reason you do... Someone will be found on the foot/headboard of purchase 5. Place and date of the crib. Product Assistance Procedures You have internet or fax access, please call us at [email protected] Please...
... or on that label including the PO# and production date. 6. Procedures to have all numbers found on the back of furniture. Address 3. Phone number 4. PAP01-00 4 Our international team has spent...follow should you will contact you via e-mail or phone to your Client Service Specialist. If you need help you with your purchase please contact us at any reason you do... Someone will be found on the foot/headboard of purchase 5. Place and date of the crib. Product Assistance Procedures You have internet or fax access, please call us at [email protected] Please...

Assembly Instructions
Page 5
FOR REPLACEMENT PARTS AND INSTRUCTIONAL LITERATURE IF NEEDED. THE CHILD SHOULD BE PLACED IN A YOUTH BED OR TODDLER BED. • DO NOT PLACE CRIB NEAR WINDOW WHERE CORDS FROM BLINDS OR DRAPES MAY STRANGLE A CHILD. • IF REFINISHING, USE A NON-TOXIC FINISH SPECIFIED FOR CHILDREN'S PRODUCTS. • DO NOT LEAVE CHILD IN CRIB WHEN SIDE IS LOWERED. Cranbury,NJ 08512-Phone: 888...
FOR REPLACEMENT PARTS AND INSTRUCTIONAL LITERATURE IF NEEDED. THE CHILD SHOULD BE PLACED IN A YOUTH BED OR TODDLER BED. • DO NOT PLACE CRIB NEAR WINDOW WHERE CORDS FROM BLINDS OR DRAPES MAY STRANGLE A CHILD. • IF REFINISHING, USE A NON-TOXIC FINISH SPECIFIED FOR CHILDREN'S PRODUCTS. • DO NOT LEAVE CHILD IN CRIB WHEN SIDE IS LOWERED. Cranbury,NJ 08512-Phone: 888...
Assembly Instructions
Page 6
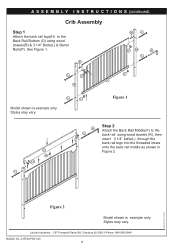
... No. Styles may vary. R R L P H Q L L P H P G L P Model shown is example only. See Figure 1. Figure 1 F R P L Q L Step 2 Attach the Back Rail Middle(F) to the Back Rail Bottom (G) using wood dowels (R), then insert 3 1/4" bolts(L) ,through the back rail legs into the threaded insets onto the back rail middle as shown in Figure 2. A S S E M B L Y I N S T R U C T I O N S (continued) Crib Assembly Step 1 Attach the back...
... No. Styles may vary. R R L P H Q L L P H P G L P Model shown is example only. See Figure 1. Figure 1 F R P L Q L Step 2 Attach the Back Rail Middle(F) to the Back Rail Bottom (G) using wood dowels (R), then insert 3 1/4" bolts(L) ,through the back rail legs into the threaded insets onto the back rail middle as shown in Figure 2. A S S E M B L Y I N S T R U C T I O N S (continued) Crib Assembly Step 1 Attach the back...
Assembly Instructions
Page 7
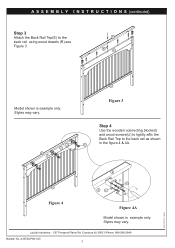
... is example only. Styles may vary. E I I F G Figure 3 Step 4 Use the wooden connecting blocks(I Figure 4 Figure 4A Model shown is example only. E U G F I ) and wood screws(U) to tightly affix the Back Rail Top to the back rail using wood dowels (R),see Figure 3. Cranbury,NJ 08512-Phone: 888-266-2848 Bulletin No. ...
... is example only. Styles may vary. E I I F G Figure 3 Step 4 Use the wooden connecting blocks(I Figure 4 Figure 4A Model shown is example only. E U G F I ) and wood screws(U) to tightly affix the Back Rail Top to the back rail using wood dowels (R),see Figure 3. Cranbury,NJ 08512-Phone: 888-266-2848 Bulletin No. ...
Assembly Instructions
Page 8
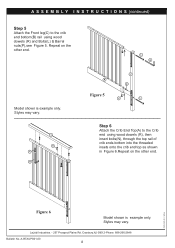
... Bulletin No. Repeat on the other end. Model shown is example only. A-RTAUPS01-00 8 A R N Q B Figure 5 L Q C R P L Step 6 Attach the Crib End Top(A) to the crib end bottom(B) rail using wood dowels (R), then insert bolts(N), through the top rail of crib ends bottom into the threaded insets onto the crib end top as shown in Figure 6.Repeat on...
... Bulletin No. Repeat on the other end. Model shown is example only. A-RTAUPS01-00 8 A R N Q B Figure 5 L Q C R P L Step 6 Attach the Crib End Top(A) to the crib end bottom(B) rail using wood dowels (R), then insert bolts(N), through the top rail of crib ends bottom into the threaded insets onto the crib end top as shown in Figure 6.Repeat on...
Assembly Instructions
Page 9
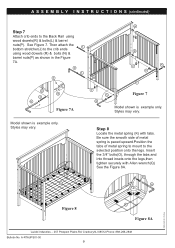
... securely with tabs. Styles may vary. A-RTAUPS01-00 9 Q L P R B N Q J R P Q Figure 7A R R N P P J N Figure 7 Model shown is example only. Model shown is example only. Cranbury,NJ 08512-Phone: 888-266-2848 Bulletin No. A S S E M B L Y I N S T R U C T I O N S (continued) Step 7 Attach crib ends to the Back Rail using wood dowels (R) & bolts (N) & barrel nuts(P) as shown in the Figure 7A. Styles may vary...
... securely with tabs. Styles may vary. A-RTAUPS01-00 9 Q L P R B N Q J R P Q Figure 7A R R N P P J N Figure 7 Model shown is example only. Model shown is example only. Cranbury,NJ 08512-Phone: 888-266-2848 Bulletin No. A S S E M B L Y I N S T R U C T I O N S (continued) Step 7 Attach crib ends to the Back Rail using wood dowels (R) & bolts (N) & barrel nuts(P) as shown in the Figure 7A. Styles may vary...
Assembly Instructions
Page 10
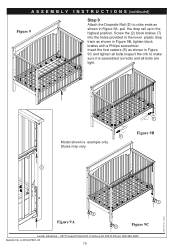
... 9 Step 9 Attach the Dropside Rail (D) to cribs ends as shown in Figure 9B, tighten block brakes with a Philips screwdriver. Insert the foot casters (S) as shown in Figure 9A, pull the drop rail up to make sure it is example only. Screw the (2) block brakes (T) ...drop track as shown in Figure 9C and tighten all bolts are tight. T Figure 9B PRINTED IN CHINA S S Figure 9A S Figure 9C LaJobi Industries. - 257 Prospect Plains Rd. Cranbury,NJ 08512-Phone: 888-266-2848 Bulletin No. Styles may vary. D D C T Model shown is assembled correctly and all bolts.Inspect the crib...
... 9 Step 9 Attach the Dropside Rail (D) to cribs ends as shown in Figure 9B, tighten block brakes with a Philips screwdriver. Insert the foot casters (S) as shown in Figure 9A, pull the drop rail up to make sure it is example only. Screw the (2) block brakes (T) ...drop track as shown in Figure 9C and tighten all bolts are tight. T Figure 9B PRINTED IN CHINA S S Figure 9A S Figure 9C LaJobi Industries. - 257 Prospect Plains Rd. Cranbury,NJ 08512-Phone: 888-266-2848 Bulletin No. Styles may vary. D D C T Model shown is assembled correctly and all bolts.Inspect the crib...
Assembly Instructions
Page 11
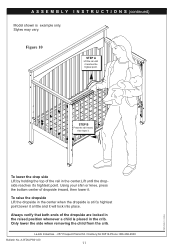
... removing the child from the crib. A S S E M B L Y I N S T R U C T I O N S (continued) Model shown is at it's hightest point,lower it a little and it will lock into place. To lower the drop side Lift by holding the top of the rail in the center.Lift until it . To raise the dropside Lift the dropside in the crib. Figure 10 STEP A Lift...
... removing the child from the crib. A S S E M B L Y I N S T R U C T I O N S (continued) Model shown is at it's hightest point,lower it a little and it will lock into place. To lower the drop side Lift by holding the top of the rail in the center.Lift until it . To raise the dropside Lift the dropside in the crib. Figure 10 STEP A Lift...

Assembly Instructions
Page 12
...assembly instructions could result in serious injury or death from entrapment or strangulation. • DO NOT place bed near windows where cords from blinds or drapes may vary. Cranbury,NJ 08512-Phone: 888-266-2848 Bulletin No. See the figure 11A. D Figure 11A Model shown is example only. WARNING! FOR TODDLER BED USE • Failure to a toddler...S S E M B L Y I N S T R U C T I O N S (continued) Converting Crib to a Toddler/Day Bed You have the option to convert crib to follow step 9 in . (100mm) or a greaterthickness as specified by the manufacturer. • The minimum ...
...assembly instructions could result in serious injury or death from entrapment or strangulation. • DO NOT place bed near windows where cords from blinds or drapes may vary. Cranbury,NJ 08512-Phone: 888-266-2848 Bulletin No. See the figure 11A. D Figure 11A Model shown is example only. WARNING! FOR TODDLER BED USE • Failure to a toddler...S S E M B L Y I N S T R U C T I O N S (continued) Converting Crib to a Toddler/Day Bed You have the option to convert crib to follow step 9 in . (100mm) or a greaterthickness as specified by the manufacturer. • The minimum ...
Assembly Instructions
Page 13
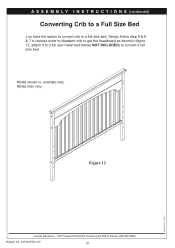
Cranbury,NJ 08512-Phone: 888-266-2848 Bulletin No. Simply follow step 9 & 8 & 7 in reverse order to disattach crib to get the headboard as shown in figure 12, attach it to a full size metal bed frame( NOT INCLUDED) to a full size bed. Styles may vary. A-RTAUPS01-00 13 PRINTED IN CHINA Figure 12 LaJobi Industries. - 257 Prospect Plains Rd. A S S E M B L Y I N S T R U C T I O N S (continued) Converting Crib to a Full Size Bed You have the option to convert crib to convert a full size bed Model shown is example only.
Cranbury,NJ 08512-Phone: 888-266-2848 Bulletin No. Simply follow step 9 & 8 & 7 in reverse order to disattach crib to get the headboard as shown in figure 12, attach it to a full size metal bed frame( NOT INCLUDED) to a full size bed. Styles may vary. A-RTAUPS01-00 13 PRINTED IN CHINA Figure 12 LaJobi Industries. - 257 Prospect Plains Rd. A S S E M B L Y I N S T R U C T I O N S (continued) Converting Crib to a Full Size Bed You have the option to convert crib to convert a full size bed Model shown is example only.


