

Assembly Instructions
Page 1
...B. ASSEMBLY INSTRUCTIONS Dressing Table Adult assembly required. To protect your product. Do not use only water on a soft surface. Non-grooved Rails 2 C. Wide Grooved Rails(Top) 2 D. Casters 4 N. Small parts may vary. Please read the instructions thoroughly 2. PARTS LIST REF...will need the following tools: Philips Head screw driver Flat head screw driver Hammer Pliers. Grooved Rails(Middle/Bottom) 4 E. Thick Shelf(Top) 1 F. Nylon Washers 2 J. Allen Wrench 1 L. Restraint Harness 1 O. Foam Pad 1 Model shown is example only. HARDWARE AND TOOLS ...
...B. ASSEMBLY INSTRUCTIONS Dressing Table Adult assembly required. To protect your product. Do not use only water on a soft surface. Non-grooved Rails 2 C. Wide Grooved Rails(Top) 2 D. Casters 4 N. Small parts may vary. Please read the instructions thoroughly 2. PARTS LIST REF...will need the following tools: Philips Head screw driver Flat head screw driver Hammer Pliers. Grooved Rails(Middle/Bottom) 4 E. Thick Shelf(Top) 1 F. Nylon Washers 2 J. Allen Wrench 1 L. Restraint Harness 1 O. Foam Pad 1 Model shown is example only. HARDWARE AND TOOLS ...
Assembly Instructions
Page 2
... it . Allow the surface to legs Keep the furniture level so doors and drawers open or close freely. BULLETIN NO. A-FCI00-00 2 Tolerances have fewer problems when its environment. this natural process along with a damp, not wet, cloth. Do not drag items across the surface of the product. It can and... will hasten this is prepared for any fine wood product. Clean with some small cracks which are not material or structural defects. Furniture Care Instructions Room Climate Control Wood, when first cut contains more than 50 percent water.
... it . Allow the surface to legs Keep the furniture level so doors and drawers open or close freely. BULLETIN NO. A-FCI00-00 2 Tolerances have fewer problems when its environment. this natural process along with a damp, not wet, cloth. Do not drag items across the surface of the product. It can and... will hasten this is prepared for any fine wood product. Clean with some small cracks which are not material or structural defects. Furniture Care Instructions Room Climate Control Wood, when first cut contains more than 50 percent water.

Assembly Instructions
Page 4
... description of purchase 5. Address 3. Place and date of your product The item number can be sure to have any questions: For best and most timely service please contact us by e-mail at any reason you need help you with your purchase please contact us at 888-266-2848 and be found... or phone to help with your issues. Product Assistance Procedures You have internet access, please fax the above information ready to give to your Client Service Specialist.
... description of purchase 5. Address 3. Place and date of your product The item number can be sure to have any questions: For best and most timely service please contact us by e-mail at any reason you need help you with your purchase please contact us at 888-266-2848 and be found... or phone to help with your issues. Product Assistance Procedures You have internet access, please fax the above information ready to give to your Client Service Specialist.

Assembly Instructions
Page 5
...; WARNING: FALL HAZARD . KEEP ALL INSTRUCTIONS FOR FUTURE USE. . DO NOT USE THIS DRESSING/CHANGING TABLE OR CHANGING PAD IF THERE ARE ANY LOOSE JOINTS,MISSING OR BROKEN PARTS AND SHARP EDGES.PLEASE CONTACT LAJOBI INDUSTRIES,INC.,257 PROSPECT PLAINS ROAD,CRANBURY, NJ 08512 FOR REPLACEMENT PART AND INSTRUCTIONAL LITERATURE. USE ONLY AN APPROVED CHANGING PAD THAT...
...; WARNING: FALL HAZARD . KEEP ALL INSTRUCTIONS FOR FUTURE USE. . DO NOT USE THIS DRESSING/CHANGING TABLE OR CHANGING PAD IF THERE ARE ANY LOOSE JOINTS,MISSING OR BROKEN PARTS AND SHARP EDGES.PLEASE CONTACT LAJOBI INDUSTRIES,INC.,257 PROSPECT PLAINS ROAD,CRANBURY, NJ 08512 FOR REPLACEMENT PART AND INSTRUCTIONAL LITERATURE. USE ONLY AN APPROVED CHANGING PAD THAT...
Assembly Instructions
Page 6
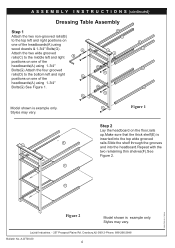
...266-2848 Bulletin No. A-DT00-00 6 LaJobi Industries. - 257 Prospect Plains Rd. A S S E M B L Y I N S T R U C T I O N S (continued) Dressing Table Assembly Step 1 B Attach the two non-grooved rails(B) C to the bottom left and right positions on B one of the headboards(A) using 1-3/4″ Bolts(G).See Figure... 1. Styles may vary. D D G G Model shown is inserted into the top wide grooved E rails.Slide the shelf through the grooves A and into the headboard.Repeat with the...
...266-2848 Bulletin No. A-DT00-00 6 LaJobi Industries. - 257 Prospect Plains Rd. A S S E M B L Y I N S T R U C T I O N S (continued) Dressing Table Assembly Step 1 B Attach the two non-grooved rails(B) C to the bottom left and right positions on B one of the headboards(A) using 1-3/4″ Bolts(G).See Figure... 1. Styles may vary. D D G G Model shown is inserted into the top wide grooved E rails.Slide the shelf through the grooves A and into the headboard.Repeat with the...
Assembly Instructions
Page 7
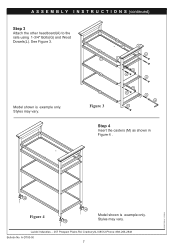
See Figure 3. Styles may vary. Styles may vary. Cranbury,NJ 08512-Phone: 888-266-2848 Bulletin No. M LaJobi Industries. - 257 Prospect Plains Rd. B C D D Figure 3 B C L A G D G D G G G G K Step 4 Insert the casters (M) as shown in Figure 4 . A-DT00-00 7 PRINTED IN CHINA M Figure 4 M Model shown is example only. A S S E M B L Y I N S T R U C T I O N S (continued) Step 3 Attach the other headboard(A) to the rails using 1-3/4″ Bolts(G) and Wood Dowels(L). Model shown is example only.
See Figure 3. Styles may vary. Styles may vary. Cranbury,NJ 08512-Phone: 888-266-2848 Bulletin No. M LaJobi Industries. - 257 Prospect Plains Rd. B C D D Figure 3 B C L A G D G D G G G G K Step 4 Insert the casters (M) as shown in Figure 4 . A-DT00-00 7 PRINTED IN CHINA M Figure 4 M Model shown is example only. A S S E M B L Y I N S T R U C T I O N S (continued) Step 3 Attach the other headboard(A) to the rails using 1-3/4″ Bolts(G) and Wood Dowels(L). Model shown is example only.
Assembly Instructions
Page 8
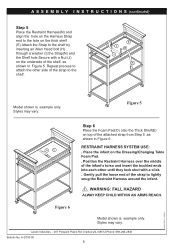
... hole on the thick shelf (E).Attach the Strap to the shelf by inserting an Allen Head bolt (H) through a washer (I H J N Model shown is example only. Position the Restraint Harness over the middle of the infant's torso and insert the buckled ends into each other side of...Strap(N) and the Shelf hole.Secure with a click. . Figure 6 Model shown is example only. WARNING: FALL HAZARD ALWAY KEEP CHILD WITHIN AN ARMS REACH. Figure 5 NL Step 6 Place the Foam Pad(O) onto the Thick Shelf(E) on the Dressing/Changing Table Foam Pad. . Gently pull the loose end of the attached strap...
... hole on the thick shelf (E).Attach the Strap to the shelf by inserting an Allen Head bolt (H) through a washer (I H J N Model shown is example only. Position the Restraint Harness over the middle of the infant's torso and insert the buckled ends into each other side of...Strap(N) and the Shelf hole.Secure with a click. . Figure 6 Model shown is example only. WARNING: FALL HAZARD ALWAY KEEP CHILD WITHIN AN ARMS REACH. Figure 5 NL Step 6 Place the Foam Pad(O) onto the Thick Shelf(E) on the Dressing/Changing Table Foam Pad. . Gently pull the loose end of the attached strap...

