Instruction Manual
Page 1
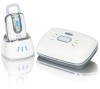
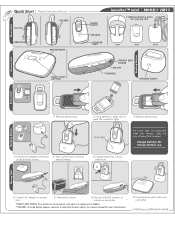
.... 3 Replace battery door. Light will illuminate while unit charges. Charge battery for 5 hours before use . 1 Connect AC adapter to the back 2 Place parent unit in . charge battery. 3 Charge battery for 5 hours before use . Make sure to help find the best signal. Dock Light The dock light will turn off when fully charged. Parent Unit Quick Start Product Instruction Manual ON/OFF VOLUME vibe VIBRATION MICROPHONE NIGHT LIGHT BUTTON R SOUND LIGHTS imonitor™ mini MODEL# 2M13 3 different battery doors for carrying unit...
.... 3 Replace battery door. Light will illuminate while unit charges. Charge battery for 5 hours before use . 1 Connect AC adapter to the back 2 Place parent unit in . charge battery. 3 Charge battery for 5 hours before use . Make sure to help find the best signal. Dock Light The dock light will turn off when fully charged. Parent Unit Quick Start Product Instruction Manual ON/OFF VOLUME vibe VIBRATION MICROPHONE NIGHT LIGHT BUTTON R SOUND LIGHTS imonitor™ mini MODEL# 2M13 3 different battery doors for carrying unit...

Instruction Manual
Page 4
imonitor™ mini www.gracobaby.com Owner's Manual Keep Instructions For Future Reference ©2008 Graco ISPM027BA 3/08
imonitor™ mini www.gracobaby.com Owner's Manual Keep Instructions For Future Reference ©2008 Graco ISPM027BA 3/08
Instruction Manual
Page 5
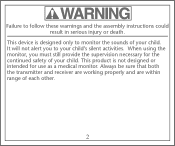
This device is not designed or intended for the continued safety of your child. This product is designed only to monitor the sounds of each other. 2 It will not alert you must still provide the supervision necessary for use as a medical monitor. When using the monitor, you to follow these warnings and the assembly instructions could result in serious injury or death. Always be sure that both the transmitter and receiver are working properly and are within range of your child. Failure to your child's silent activities.
This device is not designed or intended for the continued safety of your child. This product is designed only to monitor the sounds of each other. 2 It will not alert you must still provide the supervision necessary for use as a medical monitor. When using the monitor, you to follow these warnings and the assembly instructions could result in serious injury or death. Always be sure that both the transmitter and receiver are working properly and are within range of your child. Failure to your child's silent activities.

Instruction Manual
Page 6
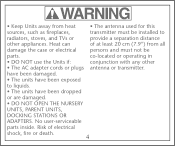
... Do not wet basement, etc. Do not put the the Nursery Units, Parent Units, Nursery Units inside a crib or or Docking Stations in any object 3 the sound or interfere with 110-120 volt • DO NOT place the Units near possible wet walked on or pinched by areas, such as ... the Nursery normal flow of child's reach. Do not use . Do not location which would muffle use • Protect the AC adapter cords. Do not place Keep the AC adapter cords out them so they are not the Units near AC electrical outlets. cover the Nursery Units or Parent Units with extension...
... Do not wet basement, etc. Do not put the the Nursery Units, Parent Units, Nursery Units inside a crib or or Docking Stations in any object 3 the sound or interfere with 110-120 volt • DO NOT place the Units near possible wet walked on or pinched by areas, such as ... the Nursery normal flow of child's reach. Do not use . Do not location which would muffle use • Protect the AC adapter cords. Do not place Keep the AC adapter cords out them so they are not the Units near AC electrical outlets. cover the Nursery Units or Parent Units with extension...
Instruction Manual
Page 7
No user-serviceable parts inside. have been damaged. • The units have been dropped or are damaged. • DO NOT OPEN THE NURSERY UNITS, PARENT UNITS, DOCKING STATIONS OR ADAPTERS. co-located or operating in • DO NOT use the Units if: conjunction with any other appliances. ...this sources, such as fireplaces, transmitter must not be installed to liquids. • The units have been exposed to radiators, stoves, and TVs or provide a separation distance other • The AC adapter cords or plugs antenna or transmitter. Heat can of electrical ...
No user-serviceable parts inside. have been damaged. • The units have been dropped or are damaged. • DO NOT OPEN THE NURSERY UNITS, PARENT UNITS, DOCKING STATIONS OR ADAPTERS. co-located or operating in • DO NOT use the Units if: conjunction with any other appliances. ...this sources, such as fireplaces, transmitter must not be installed to liquids. • The units have been exposed to radiators, stoves, and TVs or provide a separation distance other • The AC adapter cords or plugs antenna or transmitter. Heat can of electrical ...
Instruction Manual
Page 8
... comply with the limits for a Class B digital device, pursuant to operate this equipment does cause harmful interference to radio or television reception, which can radiate radio frequency energy and, if not installed and that interference will not occur in accordance with the instructions, may void users authority to Part 15 of the following measures: •...
... comply with the limits for a Class B digital device, pursuant to operate this equipment does cause harmful interference to radio or television reception, which can radiate radio frequency energy and, if not installed and that interference will not occur in accordance with the instructions, may void users authority to Part 15 of the following measures: •...

Instruction Manual
Page 10
Parent Unit Overview ON/OFF VOLUME vibe VIBRATION SOUND LIGHTS VIBE LINK SPEAKER CHARGER PORT 7 SPEAKER/LIGHTS
Parent Unit Overview ON/OFF VOLUME vibe VIBRATION SOUND LIGHTS VIBE LINK SPEAKER CHARGER PORT 7 SPEAKER/LIGHTS

Instruction Manual
Page 13
Remove battery door. 2 GSP523040 600mAh 3.7V GSP523040 600mAh 3.7V Replace battery door with 3 one of the 2 other door selections. 10
Remove battery door. 2 GSP523040 600mAh 3.7V GSP523040 600mAh 3.7V Replace battery door with 3 one of the 2 other door selections. 10
Instruction Manual
Page 17
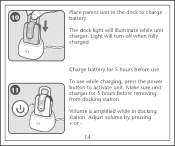
Adjust volume by pressing + or -. 14 The dock light will turn off when fully charged. Light will illuminate while unit charges. Volume is amplified while in the dock to activate unit. Place parent unit in docking station. Make sure unit charges for 5 hours before removing from docking station. Charge battery for 5 hours before use while charging, press the power 11 button to charge 10 battery. To use .
Adjust volume by pressing + or -. 14 The dock light will turn off when fully charged. Light will illuminate while unit charges. Volume is amplified while in the dock to activate unit. Place parent unit in docking station. Make sure unit charges for 5 hours before removing from docking station. Charge battery for 5 hours before use while charging, press the power 11 button to charge 10 battery. To use .
Instruction Manual
Page 19
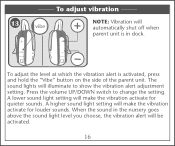
... alert adjustment setting. To adjust vibration 13 vibe NOTE: Vibration will automatically shut off when parent unit is activated, press and hold the "Vibe" button on the side of the parent unit. When the sound in dock. The sound lights will be activated. 16 vibe To adjust the level at which the vibration alert is in the nursery goes above the sound light level...
... alert adjustment setting. To adjust vibration 13 vibe NOTE: Vibration will automatically shut off when parent unit is activated, press and hold the "Vibe" button on the side of the parent unit. When the sound in dock. The sound lights will be activated. 16 vibe To adjust the level at which the vibration alert is in the nursery goes above the sound light level...

Instruction Manual
Page 20
Auto Dimming Sound Lights Sound lights will automatically dim in 15 dark room. 17 buttons to change 14 the volume level. Volume Press + or -
Auto Dimming Sound Lights Sound lights will automatically dim in 15 dark room. 17 buttons to change 14 the volume level. Volume Press + or -
Instruction Manual
Page 21
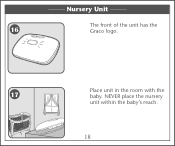
NEVER place the nursery unit within the baby's reach. Place unit in the room with the 17 baby. pf ch 18 Nursery Unit The front of the unit has the 16 Graco logo.
NEVER place the nursery unit within the baby's reach. Place unit in the room with the 17 baby. pf ch 18 Nursery Unit The front of the unit has the 16 Graco logo.
Instruction Manual
Page 22
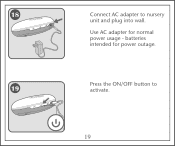
184 pf ch Connect AC adapter to activate. 19 Use AC adapter for power outage. 19 pf ch Press the ON/OFF button to nursery unit and plug into wall. batteries intended for normal power usage -
184 pf ch Connect AC adapter to activate. 19 Use AC adapter for power outage. 19 pf ch Press the ON/OFF button to nursery unit and plug into wall. batteries intended for normal power usage -

Instruction Manual
Page 23
20 VIBE LINK LIGHTS Parent/nursery units will locate each other. Green "LINK" icon indicates that you are connected to nursery unit. SPEAKER Optional Battery Back-up 21 CHA Unfasten both screws on the back of the Nursery Unit as shown. 20
20 VIBE LINK LIGHTS Parent/nursery units will locate each other. Green "LINK" icon indicates that you are connected to nursery unit. SPEAKER Optional Battery Back-up 21 CHA Unfasten both screws on the back of the Nursery Unit as shown. 20
Instruction Manual
Page 25
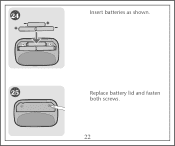
24 Insert batteries as shown. 25 Replace battery lid and fasten both screws. 22
24 Insert batteries as shown. 25 Replace battery lid and fasten both screws. 22
Instruction Manual
Page 28
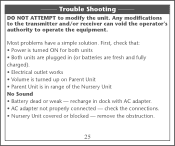
... that: • Power is turned ON for both units • Both units are plugged in (or batteries are fresh and fully charged). • Electrical outlet works • Volume is turned up on Parent Unit • Parent Unit is in dock with AC adapter. • AC adapter not properly connected - remove the obstruction. 25 recharge in range of the Nursery Unit No Sound • Battery dead or...
... that: • Power is turned ON for both units • Both units are plugged in (or batteries are fresh and fully charged). • Electrical outlet works • Volume is turned up on Parent Unit • Parent Unit is in dock with AC adapter. • AC adapter not properly connected - remove the obstruction. 25 recharge in range of the Nursery Unit No Sound • Battery dead or...

Instruction Manual
Page 29
... closer. • Significant amount of static (TVs, mixers, computers, fans, fluorescent lights, light dimmers, etc.) • Parent Unit too far from Nursery Unit - eliminate cause of obstructions between Parent Unit and Nursery Unit such as walls, ceilings & buildings. try repositioning Nursery Unit. • Volume setting too low - Try moving the Nursery Unit to another part of the room. • Change channel on Nursery Unit. Static • Interference from baby -
... closer. • Significant amount of static (TVs, mixers, computers, fans, fluorescent lights, light dimmers, etc.) • Parent Unit too far from Nursery Unit - eliminate cause of obstructions between Parent Unit and Nursery Unit such as walls, ceilings & buildings. try repositioning Nursery Unit. • Volume setting too low - Try moving the Nursery Unit to another part of the room. • Change channel on Nursery Unit. Static • Interference from baby -
Instruction Manual
Page 30
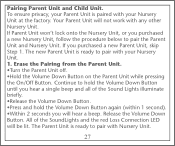
... Sound Lights illuminate briefly. •Release the Volume Down Button. •Press and hold the Volume Down Button until you hear a single beep and all of the SoundLights and the red Loss Connection LED will not work with your Nursery Unit. 1. Continue to pair with Nursery Unit. 27 The new Parent Unit is paired with any other Nursery Unit. Pairing Parent Unit and Child Unit...
... Sound Lights illuminate briefly. •Release the Volume Down Button. •Press and hold the Volume Down Button until you hear a single beep and all of the SoundLights and the red Loss Connection LED will not work with your Nursery Unit. 1. Continue to pair with Nursery Unit. 27 The new Parent Unit is paired with any other Nursery Unit. Pairing Parent Unit and Child Unit...

Instruction Manual
Page 31
... another Parent Unit with Nursery. •Turn OFF Nursery Unit and turn the Nursery Unit off and the Parent Unit will find the Nursery Unit. The SoundLights will shut off , and then on again. 28 2. The Parent Unit is now paired with the Nursery Unit, press the Channel Button on . •Within a few seconds, the Parent Unit will beep. What do I turned on the side. The green power light should...
... another Parent Unit with Nursery. •Turn OFF Nursery Unit and turn the Nursery Unit off and the Parent Unit will find the Nursery Unit. The SoundLights will shut off , and then on again. 28 2. The Parent Unit is now paired with the Nursery Unit, press the Channel Button on . •Within a few seconds, the Parent Unit will beep. What do I turned on the side. The green power light should...

Instruction Manual
Page 35
Exton, PA 19341 32 Replacement Parts Warranty Information (USA) To purchase parts or accessories or for warranty information in the United States, please contact us at the following: www.gracobaby.com OR 1-800-345-4109 Graco Children's Products 150 Oaklands Blvd.
Exton, PA 19341 32 Replacement Parts Warranty Information (USA) To purchase parts or accessories or for warranty information in the United States, please contact us at the following: www.gracobaby.com OR 1-800-345-4109 Graco Children's Products 150 Oaklands Blvd.


