Unique Features Introduction
Page 1
Unique Features BIOS Update Utilities...2 1-1 Updating the BIOS with the Q-Flash Utility 2 1-2 Updating the BIOS with the @BIOS Utility 5 1-3 Using Q-Flash Plus...6 APP Center...7 2-1 3D OSD...8 2-2 AutoGreen...9 2-3 BIOS Setup...10 2-4 Color Temperature 11 2-5 Cloud Station...12 2-6 EasyTune...17 2-7 Fast Boot...18 2-8 Game Boost...19 2-9 RGB Fusion...20 2-10 Smart TimeLock...22 2-11 Smart Keyboard...23 2-12 Smart...
Unique Features BIOS Update Utilities...2 1-1 Updating the BIOS with the Q-Flash Utility 2 1-2 Updating the BIOS with the @BIOS Utility 5 1-3 Using Q-Flash Plus...6 APP Center...7 2-1 3D OSD...8 2-2 AutoGreen...9 2-3 BIOS Setup...10 2-4 Color Temperature 11 2-5 Cloud Station...12 2-6 EasyTune...17 2-7 Fast Boot...18 2-8 Game Boost...19 2-9 RGB Fusion...20 2-10 Smart TimeLock...22 2-11 Smart Keyboard...23 2-12 Smart...

Unique Features Introduction
Page 2
..., providing multiple protection for the safety and stability of system safety, users cannot update the backup BIOS manually. From GIGABYTE's website, download the latest compressed BIOS update file that support DualBIOS have two BIOS onboard, a main BIOS and a backup BIOS. Note: The USB flash drive or hard drive must use and allow you from DualBIOS™...
..., providing multiple protection for the safety and stability of system safety, users cannot update the backup BIOS manually. From GIGABYTE's website, download the latest compressed BIOS update file that support DualBIOS have two BIOS onboard, a main BIOS and a backup BIOS. Note: The USB flash drive or hard drive must use and allow you from DualBIOS™...

Unique Features Introduction
Page 3
... keyboard or mouse to select an item to execute. In the main screen of Q-Flash, use the key during the POST to save the current BIOS file. •• Q-Flash only supports USB flash drive or hard drives using FAT32/16/12 file system. •• If the... BIOS update file is saved. Select the BIOS update file. The following procedure assumes that you to access Q-Flash. 2. Step 1: 1. Make sure the BIOS update file matches your motherboard model. - 3 - Insert the USB flash drive containing the...
... keyboard or mouse to select an item to execute. In the main screen of Q-Flash, use the key during the POST to save the current BIOS file. •• Q-Flash only supports USB flash drive or hard drives using FAT32/16/12 file system. •• If the... BIOS update file is saved. Select the BIOS update file. The following procedure assumes that you to access Q-Flash. 2. Step 1: 1. Make sure the BIOS update file matches your motherboard model. - 3 - Insert the USB flash drive containing the...

Unique Features Introduction
Page 4
...The screen will re-detect all peripheral devices after a BIOS update, so we recommend that the BIOS file is being read from your USB flash drive. Select Yes to begin the BIOS update. Step 3: The system will show that you reload BIOS defaults. Step 2: The screen will restart after the ...update process is complete. Please select Fast or Intact to load BIOS defaults Step 5: Select Save & Exit Setup and press ....
...The screen will re-detect all peripheral devices after a BIOS update, so we recommend that the BIOS file is being read from your USB flash drive. Select Yes to begin the BIOS update. Step 3: The system will show that you reload BIOS defaults. Step 2: The screen will restart after the ...update process is complete. Please select Fast or Intact to load BIOS defaults Step 5: Select Save & Exit Setup and press ....

Unique Features Introduction
Page 5
... the boot-up logo with your motherboard model. Follow the on the @BIOS server site, please manually download the BIOS update file from GIGABYTE's website and follow the instructions in a corrupted BIOS or a system that matches your location and then download the BIOS file that is not present on -screen instructions to save the current...
... the boot-up logo with your motherboard model. Follow the on the @BIOS server site, please manually download the BIOS update file from GIGABYTE's website and follow the instructions in a corrupted BIOS or a system that matches your location and then download the BIOS file that is not present on -screen instructions to save the current...

Unique Features Introduction
Page 6
...your USB flash drive, and rename it to update the backup BIOS. The FBIOS_LED will continue to GIGABYTE.bin. Uncompress the downloaded BIOS file, save it must use the FAT32/16 file system and it to your motherboard model. 2. After the main BIOS is complete. 1-3 Using Q-Flash Plus A. Wait for normal ...a USB 2.0 flash drive. 3. Using Q-Flash Plus If both the main and backup BIOS fail during system boot, wait for 15-20 seconds, the system will automatically search and match the BIOS file in the USB flash drive on the back panel. After completion, the system will...
...your USB flash drive, and rename it to update the backup BIOS. The FBIOS_LED will continue to GIGABYTE.bin. Uncompress the downloaded BIOS file, save it must use the FAT32/16 file system and it to your motherboard model. 2. After the main BIOS is complete. 1-3 Using Q-Flash Plus A. Wait for normal ...a USB 2.0 flash drive. 3. Using Q-Flash Plus If both the main and backup BIOS fail during system boot, wait for 15-20 seconds, the system will automatically search and match the BIOS file in the USB flash drive on the back panel. After completion, the system will...

Unique Features Introduction
Page 7
.... Running the APP Center Insert the motherboard driver disk. Figure 2 (Note) Available applications in the notification area to install GIGABYTE App Center and the selected apps. In Desktop mode, click the App Center icon in APP Center may also vary depending on... apps, drivers, and BIOS. Supported functions of GIGABYTE apps that help you get the most from your GIGABYTE motherboard . (Note) Using a simple, unified user interface, GIGABYTE App Center allows you to easily launch all GIGABYTE apps installed on motherboard specifications. - 7 - APP Center GIGABYTE App Center gives you easy...
.... Running the APP Center Insert the motherboard driver disk. Figure 2 (Note) Available applications in the notification area to install GIGABYTE App Center and the selected apps. In Desktop mode, click the App Center icon in APP Center may also vary depending on... apps, drivers, and BIOS. Supported functions of GIGABYTE apps that help you get the most from your GIGABYTE motherboard . (Note) Using a simple, unified user interface, GIGABYTE App Center allows you to easily launch all GIGABYTE apps installed on motherboard specifications. - 7 - APP Center GIGABYTE App Center gives you easy...

Unique Features Introduction
Page 10
...Reset button, the system will be turned off the system. The system is pressed for 4 seconds to select the default language used by the BIOS. •• Boot Option Priorities: Allows you to specify the overall boot order from the available devices. •• Bootup NumLock State:.... The system stays off upon the return of power from an AC power loss. The BIOS Setup Interface Using BIOS Setup: •• System Language: Allows you to determine whether to display the GIGABYTE Logo at system startup. •• AC BACK: Determines the state of the system ...
...Reset button, the system will be turned off the system. The system is pressed for 4 seconds to select the default language used by the BIOS. •• Boot Option Priorities: Allows you to specify the overall boot order from the available devices. •• Bootup NumLock State:.... The system stays off upon the return of power from an AC power loss. The BIOS Setup Interface Using BIOS Setup: •• System Language: Allows you to determine whether to display the GIGABYTE Logo at system startup. •• AC BACK: Determines the state of the system ...

Unique Features Introduction
Page 18
... GIGABYTE Fast Boot interface, you to enable or disable the fast boot function to shorten OS boot time. •• Next Boot After AC Power Loss: (Note 2) This option is the same as the Fast Boot option (Note 1) in the operating system. The settings will restart and enter BIOS ...Setup immediately. (Note 1) For more details about this function, refer to Chapter 2, "BIOS Setup." (Note 2) Whether this item is the same as the Next Boot After AC Power Loss option (Note...
... GIGABYTE Fast Boot interface, you to enable or disable the fast boot function to shorten OS boot time. •• Next Boot After AC Power Loss: (Note 2) This option is the same as the Fast Boot option (Note 1) in the operating system. The settings will restart and enter BIOS ...Setup immediately. (Note 1) For more details about this function, refer to Chapter 2, "BIOS Setup." (Note 2) Whether this item is the same as the Next Boot After AC Power Loss option (Note...

Unique Features Introduction
Page 22
... TimeLock GIGABYTE Smart TimeLock allows you to exit. The Lock Mode on the bottom left corner and enter the password . (Note) Set the time when a user can or cannot use your computer for weekdays and weekends. When the alert appears, you can set the User Password in the system BIOS Setup program...
... TimeLock GIGABYTE Smart TimeLock allows you to exit. The Lock Mode on the bottom left corner and enter the password . (Note) Set the time when a user can or cannot use your computer for weekdays and weekends. When the alert appears, you can set the User Password in the system BIOS Setup program...

Unique Features Introduction
Page 27
2-14 System Information Viewer GIGABYTE System Information Viewer allows you to adjust the smart fan speed. Using the Smart Fan option you can revert the fan settings back to record ... will run at any time. The System Alerts tab allows you can also display the hardware monitor information on the installed CPU, motherboard, and the BIOS version. The System Information Viewer Interface Tabs Information Tab Description The System Information tab provides information on the desktop to monitor hardware temperature, voltage and...
2-14 System Information Viewer GIGABYTE System Information Viewer allows you to adjust the smart fan speed. Using the Smart Fan option you can revert the fan settings back to record ... will run at any time. The System Alerts tab allows you can also display the hardware monitor information on the installed CPU, motherboard, and the BIOS version. The System Information Viewer Interface Tabs Information Tab Description The System Information tab provides information on the desktop to monitor hardware temperature, voltage and...

Unique Features Introduction
Page 29
After the system restarts, the settings will be synchronized with the BIOS settings. 2-16 USB DAC-UP 2 GIGABYTE USB DAC-UP 2 allows you want to adjust the voltage and choose an option. High-end audio players may vary by motherboard. - 29 - The options ...
After the system restarts, the settings will be synchronized with the BIOS settings. 2-16 USB DAC-UP 2 GIGABYTE USB DAC-UP 2 allows you want to adjust the voltage and choose an option. High-end audio players may vary by motherboard. - 29 - The options ...

Users Manual
Page 3
... the following types of documentations: „„ For quick set-up of this manual may be made by GIGABYTE without GIGABYTE's prior written permission. No part of this manual is protected by any form or by copyright laws and is the property... LTD. All rights reserved. For product-related information, check on our website at: http://www.gigabyte.com Identifying Your Motherboard Revision The revision number on your motherboard revision before updating motherboard BIOS, drivers, or when looking for technical information. The trademarks mentioned in any means without prior notice...
... the following types of documentations: „„ For quick set-up of this manual may be made by GIGABYTE without GIGABYTE's prior written permission. No part of this manual is protected by any form or by copyright laws and is the property... LTD. All rights reserved. For product-related information, check on our website at: http://www.gigabyte.com Identifying Your Motherboard Revision The revision number on your motherboard revision before updating motherboard BIOS, drivers, or when looking for technical information. The trademarks mentioned in any means without prior notice...
Users Manual
Page 4
Table of Contents Box Contents...6 Optional Items...6 X399 AORUS Gaming 7 Motherboard Layout 7 Chapter 1 Hardware Installation 9 1-1 Installation Precautions 9 1-2 Product Specifications 10 1-3 Installing the CPU and CPU Cooler 13 1-3-1 Installing ...SLI™ Configuration 20 1-7 Back Panel Connectors 21 1-8 Onboard LEDs and Buttons 23 1-9 Internal Connectors 24 Chapter 2 BIOS Setup 37 2-1 Startup Screen 38 2-2 The Main Menu 39 2-3 M.I.T...41 2-4 System...50 2-5 BIOS...51 2-6 Peripherals...54 2-7 Chipset...56 2-8 Power...57 2-9 Save & Exit...59 Chapter 3 Configuring a RAID Set 61...
Table of Contents Box Contents...6 Optional Items...6 X399 AORUS Gaming 7 Motherboard Layout 7 Chapter 1 Hardware Installation 9 1-1 Installation Precautions 9 1-2 Product Specifications 10 1-3 Installing the CPU and CPU Cooler 13 1-3-1 Installing ...SLI™ Configuration 20 1-7 Back Panel Connectors 21 1-8 Onboard LEDs and Buttons 23 1-9 Internal Connectors 24 Chapter 2 BIOS Setup 37 2-1 Startup Screen 38 2-2 The Main Menu 39 2-3 M.I.T...41 2-4 System...50 2-5 BIOS...51 2-6 Peripherals...54 2-7 Chipset...56 2-8 Power...57 2-9 Save & Exit...59 Chapter 3 Configuring a RAID Set 61...

Users Manual
Page 5
... 74 5-1-3 Using Q-Flash Plus 75 5-2 APP Center...76 5-2-1 3D OSD...77 5-2-2 AutoGreen...78 5-2-3 BIOS Setup...79 5-2-4 Color Temperature 80 5-2-5 Cloud Station...81 5-2-6 EasyTune...86 5-2-7 Fast Boot...87 5-2-8 Game Boost...88 5-2-9 RGB Fusion...89 5-2-10 Smart TimeLock...91 5-2-11 Smart Keyboard...92 5-2-12 Smart Backup...93 5-2-13 Smart HUD...95 5-2-14 System Information...
... 74 5-1-3 Using Q-Flash Plus 75 5-2 APP Center...76 5-2-1 3D OSD...77 5-2-2 AutoGreen...78 5-2-3 BIOS Setup...79 5-2-4 Color Temperature 80 5-2-5 Cloud Station...81 5-2-6 EasyTune...86 5-2-7 Fast Boot...87 5-2-8 Game Boost...88 5-2-9 RGB Fusion...89 5-2-10 Smart TimeLock...91 5-2-11 Smart Keyboard...92 5-2-12 Smart Backup...93 5-2-13 Smart HUD...95 5-2-14 System Information...

Users Manual
Page 12
... - USB Blocker - EasyTune - Smart TimeLock - Please visit GIGABYTE's website for APP Center * Available applications in APP Center may also vary depending on motherboard specifications. - 3D OSD - @BIOS - PnP 1.0a, DMI 2.7, WfM 2.0, SM BIOS 2.7, ACPI 5.0 Support for support lists of each application may vary by motherboard model. Game Boost - System Information Viewer - Hardware Installation - 12...
... - USB Blocker - EasyTune - Smart TimeLock - Please visit GIGABYTE's website for APP Center * Available applications in APP Center may also vary depending on motherboard specifications. - 3D OSD - @BIOS - PnP 1.0a, DMI 2.7, WfM 2.0, SM BIOS 2.7, ACPI 5.0 Support for support lists of each application may vary by motherboard model. Game Boost - System Information Viewer - Hardware Installation - 12...

Users Manual
Page 17
...r a r a 4 Modules a r a r r a r a 6 Modules a a a r r a a a 8 Modules a a a a a a a a a: Installed, r: Not Installed. Hardware Installation A memory module can be used. (Go to GIGABYTE's website for the latest supported memory speeds and memory modules.) •• Always turn off the computer and unplug the power cord from the power...prevent hardware damage. •• Memory modules have a foolproof design. It is installed, the BIOS will automatically detect the specifications and capacity of each channel has two memory sockets as DDR4_2_2A, ...
...r a r a 4 Modules a r a r r a r a 6 Modules a a a r r a a a 8 Modules a a a a a a a a a: Installed, r: Not Installed. Hardware Installation A memory module can be used. (Go to GIGABYTE's website for the latest supported memory speeds and memory modules.) •• Always turn off the computer and unplug the power cord from the power...prevent hardware damage. •• Memory modules have a foolproof design. It is installed, the BIOS will automatically detect the specifications and capacity of each channel has two memory sockets as DDR4_2_2A, ...

Users Manual
Page 19
... card with the expansion card in the expansion slot. 1. After installing all expansion cards, replace the chassis cover(s). 6. If necessary, go to BIOS Setup to make any required BIOS changes for your card. Turn on the top edge of the card until it is securely seated in the slot. 3. Make sure the...
... card with the expansion card in the expansion slot. 1. After installing all expansion cards, replace the chassis cover(s). 6. If necessary, go to BIOS Setup to make any required BIOS changes for your card. Turn on the top edge of the card until it is securely seated in the slot. 3. Make sure the...
Users Manual
Page 23
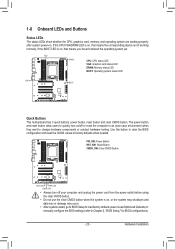
...shutdown and data loss or damage may occur. •• After system restart, go to BIOS Setup to load factory defaults (select Load Optimized Defaults) or manually configure the BIOS settings (refer to Chapter 2, "BIOS Setup," for BIOS configurations). - 23 - The power button and reset button allow users to quickly turn off or... Clear CMOS Button RST_SW PW_SW CMOS_SW •• Always turn on , that means the corresponding device is on . Use this button to clear the BIOS configuration and reset the CMOS values to change hardware components or conduct hardware testing.
...shutdown and data loss or damage may occur. •• After system restart, go to BIOS Setup to load factory defaults (select Load Optimized Defaults) or manually configure the BIOS settings (refer to Chapter 2, "BIOS Setup," for BIOS configurations). - 23 - The power button and reset button allow users to quickly turn off or... Clear CMOS Button RST_SW PW_SW CMOS_SW •• Always turn on , that means the corresponding device is on . Use this button to clear the BIOS configuration and reset the CMOS values to change hardware components or conduct hardware testing.

Users Manual
Page 26
... control function requires the use of a fan with fan speed control design. The header also provides speed control for a water cooling pump, refer to Chapter 2, "BIOS Setup," "M.I.T.," for more information 1 SYS_FAN6_PUMP 1 SYS_FAN5_PUMP Pin No. 1 2 3 4 Definition GND Voltage Speed Control Sense PWM Speed Control •• Be sure to connect fan cables...
... control function requires the use of a fan with fan speed control design. The header also provides speed control for a water cooling pump, refer to Chapter 2, "BIOS Setup," "M.I.T.," for more information 1 SYS_FAN6_PUMP 1 SYS_FAN5_PUMP Pin No. 1 2 3 4 Definition GND Voltage Speed Control Sense PWM Speed Control •• Be sure to connect fan cables...


