Gigabyte R270-R3C Support and Manuals
Get Help and Manuals for this Gigabyte item
View All Support Options Below
Free Gigabyte R270-R3C manuals!
Problems with Gigabyte R270-R3C?
Ask a Question
Free Gigabyte R270-R3C manuals!
Problems with Gigabyte R270-R3C?
Ask a Question
Popular Gigabyte R270-R3C Manual Pages
Manual - Page 2

... PC 5 Install Java Tool ...5 Gigabyte Content Management Network Configuration 6 Using the Web UI...8 Gigabyte Content Management System Console Overview 9 Enter Gigabyte Content Management System Console 10 Properties ...10 Configuration ...11
Network...11 Network Security ...12
Users ...13 Services ...14 IPMI ...15 Time Setting ...17 Sessions ...18 LDAP ...19 Updates ...20 Utilities...
Manual - Page 5

Gigabyte Content Management System Key Features and Functions
Support IPMI v2.0 Out-of-band monitoring and control for sever management over LAN. FRU information report includes main board part number, product name, and manufacturer, etc.) Health status/Hardware monitoring report. Events log, view, and clear. Event notification via...
Manual - Page 6

... your system for the following required configuration requirements:
Supported Browsers: Internet Explorer 8~12 Google chrome Version 29.0.1547.66m Firefox 2.0
JAVA Recommended Version 8 Update 25 or later version (file size: ~ 623KB)
Install Java Tool
Please follow the instruction to start the installation process.
5 Click on the middle of the file...
Manual - Page 7

The BMC IP Address will appear on the IPv4 Address parameter.
6 Save and Exit. 5. Define BMC LAN Configuration to BIOS setup menu. 2. Go to Dynamic or Static. 4. Gigabyte Content Management Network Configuration
Please follow the instruction to enable the console redirection function. 1. Select Server Management. 3.
Manual - Page 8
Save the configuration and exit BIOS setup menu. 7 6.
Manual - Page 9

Using the Web UI
The BMC firmware features an embedded web server, enabling users to connect to the BMC using an Internet browser (Microsoft® Internet Explorer™). The web server shall support 4 concurrent connections Web-based GUI is supported on the following browsers: Microsoft Windows: • Internet Explorer 8 ~ 12 • Mozilla® Firefox...
Manual - Page 12

... the Network Mode from the drop-down list. Shared Mode When set to Shared Mode, you can configure the BMC related settings through the NIC2 port. (Shared NIC Mode) Failover Mode When set to Dedicate Mode, you can configure the BMC related settings through the BMC or NIC2 port. (Backup Mode) When you can...
Manual - Page 13

After you finish the configuration, click Apply Change to save the settings.
12 Network Security
You can configure the network security settings on this screen. Check the IP Blocking Enabled box and input the desire value of IP Blocking Fail Count, IP Blocking Fail Window, and IP Blocking Penalty Time.
Manual - Page 17

To activate IPMI remote configuration by LAN, check Enable IPMI Over LAN option, define the Channel Privilege Level Limit, and enter the Encryption Key. IPMI Settings IPMI Settings provides remote configuration over LAN. When you finish the configuration, click "Apply Changes".
16
Manual - Page 31

After you finish the configuration, click Apply Change to save the settings.
30 Check the Enable Serial Over LAN box and select the Baud Rate and Channel Privilege Limit from the drop-down list. Serial Over LAN
You can configure the Serial Over LAN settings on this screen.
Manual - Page 35

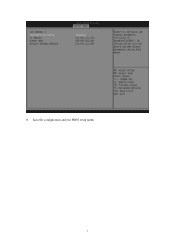
Console Redirection Configuration
This screen allows you finish the configuration, click "Apply Change" to configure the Remote Console settings. Check the Virtual KVM Configuration Enabled box or Virtual Media Configuration Enabled box, and select the Max Sessions, Remote Port, Video Encryption Enabled, and Preference Client from the drop-down list. After you to save the settings.
34
Manual - Page 6

...
[1] Get BIOS image file "image.RBU" of target system. [2] Make sure target system BMC is live. [3] Get BMC IP address of target system. [4] Download TFTP service application for Linux client PC (Please users set up their own TFTP server.). [6] Get ipmitool.
2.2. Update BIOS through free download). [5] Setup TFTP server for Windows client PC (e.g.
Manual - Page 8
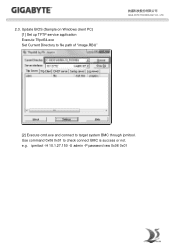
Update BIOS (Sample on Windows client PC) [1] Set up TFTP service application Execute Tftpd64.exe Set Current Directory to file path of "image.RBU"
GIGA -BYTE TECHNOLOGY CO., LTD.
[2] Execute cmd.exe and connect to check connect BMC is success or not. ipmitool -H 10.1.27.150 -U admin -P password raw 0x06 0x01 Use command 0x06 0x01 to target system BMC through ipmitool. e.g. 2.3.
Manual - Page 10
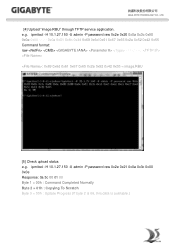
... Byte 1 = 00h : Command Completed Normally Byte 2 = 01h : Copying To Scratch Byte 3 = 00h : Update Progress (If byte 2 is 06, this data is available.) e.g. GIGA -BYTE TECHNOLOGY CO., LTD.
[4] Upload "image.RBU" through TFTP service application. ipmitool -H 10.1.27.150 -U admin -P password raw 0x2e 0x20 0x0a 0x3c 0x00 0x0e 0x00 0x00 0x0a 0x01 0x1b 0x34...
Manual - Page 16

... Database IP address
localhost
2. rpm
Initialize: /usr/pgsql-9.3/postgresql93-setup initdb
Gigabyte Server Management Console
- 16 - Enter Database User Name postgres • This utility supported CentOS 6.3 or later version. • PostgreSQL must be execute in root authority. • In Fedora 19, you have to install package in the following: Locate and edit your distributions...
Gigabyte R270-R3C Reviews
We have not received any reviews for Gigabyte yet.