
GIGABYTE User Guide
Page 3
... to disassemble or repair the monitor yourself. - 2 - Do not cover or block the ventilation holes with any hard or sharp object. • Use a soft lint-free cloth instead of the power cable is compatible with the power specification in a place that cannot be reached by children. • Before connecting the monitor to the power outlet, make sure that the voltage rating of a tissue to clean the monitor if...
... to disassemble or repair the monitor yourself. - 2 - Do not cover or block the ventilation holes with any hard or sharp object. • Use a soft lint-free cloth instead of the power cable is compatible with the power specification in a place that cannot be reached by children. • Before connecting the monitor to the power outlet, make sure that the voltage rating of a tissue to clean the monitor if...

GIGABYTE User Guide
Page 4
... remote controls, on the top of work you are performing. • Take regular and frequent breaks (at or slightly below your eye-height when you are comfortably seated. • Use adequate lighting for 10 minutes) every 30 minutes. • Be sure to periodically look up and down (2) slowly roll your eye (3) move your monitor: • Optimal viewing distances for monitors range...
... remote controls, on the top of work you are performing. • Take regular and frequent breaks (at or slightly below your eye-height when you are comfortably seated. • Use adequate lighting for 10 minutes) every 30 minutes. • Be sure to periodically look up and down (2) slowly roll your eye (3) move your monitor: • Optimal viewing distances for monitors range...

GIGABYTE User Guide
Page 5
... Installing the Stand Base...10 Lift the monitor...15 Adjusting the Viewing Angle...16 Pivot mode...20 Instructions for thread trimmer ring...22 Installing a Wall-Mount Bracket (Optional 23 Making Connections...25 USING THE DEVICE 26 Turning the Power On/Off...26 User Comfort Recommendations...27 OPERATIONS 29 Quick Menu...29 Configure the Device Settings...36 APPENDICES 47 Specifications...47 Supported Timing List...48 Troubleshooting...49 Basic Care...50 Notes on USB Charging...50 GIGABYTE Service...
... Installing the Stand Base...10 Lift the monitor...15 Adjusting the Viewing Angle...16 Pivot mode...20 Instructions for thread trimmer ring...22 Installing a Wall-Mount Bracket (Optional 23 Making Connections...25 USING THE DEVICE 26 Turning the Power On/Off...26 User Comfort Recommendations...27 OPERATIONS 29 Quick Menu...29 Configure the Device Settings...36 APPENDICES 47 Specifications...47 Supported Timing List...48 Troubleshooting...49 Basic Care...50 Notes on USB Charging...50 GIGABYTE Service...

GIGABYTE User Guide
Page 13
... front side of the Monitor to avoid damaging the screen by pressing the screen. - 12 - Do not press the front of the screen. 2. Make sure the mounting surface is designed to handle the monitor. Do not install on glass surfaces. When adjusting the screen position, hold the Monitor border. The C-clamp accessory is flat and strong enough to be used with any other product...
... front side of the Monitor to avoid damaging the screen by pressing the screen. - 12 - Do not press the front of the screen. 2. Make sure the mounting surface is designed to handle the monitor. Do not install on glass surfaces. When adjusting the screen position, hold the Monitor border. The C-clamp accessory is flat and strong enough to be used with any other product...

GIGABYTE User Guide
Page 27
... Main menu appears on the monitor. Power On 1. Power Off Press the Control button for 2 seconds to ON. USING THE DEVICE Turning the Power On/Off Make sure the power switch next to the AC power input jack is ready to a power outlet. 3. Connect other end of the monitor. 2. The Power LED will light in white, indicating the monitor is switched to turn off the monitor by moving the Control button down ( ). Connect one end of the power cable to...
... Main menu appears on the monitor. Power On 1. Power Off Press the Control button for 2 seconds to ON. USING THE DEVICE Turning the Power On/Off Make sure the power switch next to the AC power input jack is ready to a power outlet. 3. Connect other end of the monitor. 2. The Power LED will light in white, indicating the monitor is switched to turn off the monitor by moving the Control button down ( ). Connect one end of the power cable to...

GIGABYTE User Guide
Page 30
Note: To change the preset hot key function, refer to enter the Picture Mode menu. - 29 - OPERATIONS Quick Menu Hot Key By default, the Control button has been assigned with the specific function. Move the Control button up ( ) to enter the Black Equalizer menu. To access the hot key function, do the following: • Move the Control button up /down ( ) to adjust the setting and press the Control Black Equalizer 10 Adjust Exit • Move the Control button down ( ) to the "Quick Switch" section on page 43.
Note: To change the preset hot key function, refer to enter the Picture Mode menu. - 29 - OPERATIONS Quick Menu Hot Key By default, the Control button has been assigned with the specific function. Move the Control button up ( ) to enter the Black Equalizer menu. To access the hot key function, do the following: • Move the Control button up /down ( ) to adjust the setting and press the Control Black Equalizer 10 Adjust Exit • Move the Control button down ( ) to the "Quick Switch" section on page 43.

GIGABYTE User Guide
Page 33
... on the screen. - 32 - KVM Status USB-B : Type-C Type-C : N/A • KVM ON/OFF: Enable/Disable the KVM button function. √ Select ON to USB Type-C input source, simply press the KVM button or the Control button. Select USB-B Display Select TYPE-C Display HDMI 1 HDMI2 DisplayPort Type-C HDMI 1 HDMI2 DisplayPort Type-C Select Enter Select Enter USB-B Display Selection TYPE-C Display Selection Note: If you set the USB-B Display setting to the previous connected input source. However...
... on the screen. - 32 - KVM Status USB-B : Type-C Type-C : N/A • KVM ON/OFF: Enable/Disable the KVM button function. √ Select ON to USB Type-C input source, simply press the KVM button or the Control button. Select USB-B Display Select TYPE-C Display HDMI 1 HDMI2 DisplayPort Type-C HDMI 1 HDMI2 DisplayPort Type-C Select Enter Select Enter USB-B Display Selection TYPE-C Display Selection Note: If you set the USB-B Display setting to the previous connected input source. However...

GIGABYTE User Guide
Page 36
... fan Speed CPU usage Rate GPU temperature GPU frequency GPU fan speed GPU usage rate AORUS Mouse DPI Note: Make sure the USB cable is properly connected to the USB upstream port of the monitor and the USB port of your computer. • Display Alignment: When the function is complete, it displays the alignment lines on the four sides of the screen, providing handy tool...
... fan Speed CPU usage Rate GPU temperature GPU frequency GPU fan speed GPU usage rate AORUS Mouse DPI Note: Make sure the USB cable is properly connected to the USB upstream port of the monitor and the USB port of your computer. • Display Alignment: When the function is complete, it displays the alignment lines on the four sides of the screen, providing handy tool...

GIGABYTE User Guide
Page 38
... black areas. Black Equalizer Super Resolution Display Mode Overdrive AMD FreeSync Premium Pro Adjust the brightness of the screen. • Full: Scale the input image to fill the screen. Resolution 2560x1440 Black Equalizer 10 Aim Stabilizer OFF Overdrive Balance Gaming Picture Display PIP/PBP System Language Save Settings Reset All Aim Stabilizer sync Black Equalizer Super Resolution Display Mode Overdrive AMD FreeSync Premium Pro Refresh Rate 60 HZ AMD FreeSync Premium Pro ON Picture Mode Standard Exit Move/Adjust...
... black areas. Black Equalizer Super Resolution Display Mode Overdrive AMD FreeSync Premium Pro Adjust the brightness of the screen. • Full: Scale the input image to fill the screen. Resolution 2560x1440 Black Equalizer 10 Aim Stabilizer OFF Overdrive Balance Gaming Picture Display PIP/PBP System Language Save Settings Reset All Aim Stabilizer sync Black Equalizer Super Resolution Display Mode Overdrive AMD FreeSync Premium Pro Refresh Rate 60 HZ AMD FreeSync Premium Pro ON Picture Mode Standard Exit Move/Adjust...

GIGABYTE User Guide
Page 39
... picture mode settings. Note: The Monitor use low blue light panel and compliance with TÜV Rheinland Low Blue Light Hardware Solution at factory reset/default setting mode (Brightness: 70, Contrast: 50, CCT: 6500, Preset mode: Standard mode). - 38 - SDR Brightness Contrast 85 50 Gaming Picture Display PIP/PBP System Language Save Settings Reset All Standard FPS RTS/RPG Movie Reader sRGB Custom 1 Sharpness 5 Gamma OFF Color Temperature Normal Brightness Contrast 6 axis Color Color Vibrance Sharpness Gamma Color Temperature Picture Mode Standard 85 Exit Move/Adjust...
... picture mode settings. Note: The Monitor use low blue light panel and compliance with TÜV Rheinland Low Blue Light Hardware Solution at factory reset/default setting mode (Brightness: 70, Contrast: 50, CCT: 6500, Preset mode: Standard mode). - 38 - SDR Brightness Contrast 85 50 Gaming Picture Display PIP/PBP System Language Save Settings Reset All Standard FPS RTS/RPG Movie Reader sRGB Custom 1 Sharpness 5 Gamma OFF Color Temperature Normal Brightness Contrast 6 axis Color Color Vibrance Sharpness Gamma Color Temperature Picture Mode Standard 85 Exit Move/Adjust...

GIGABYTE User Guide
Page 40
Reset Picture: Reset all Picture settings to the default settings. Note: The HDR Enhance function will be replaced until the HDR turns off. - 39 - Local Dimming: Improve the blackness of images displayed on . HDR Brightness Contrast 85 50 Gaming HDR Picture Display PIP/PBP System Language Save Settings Reset All Sharpness 5 Gamma OFF Color Temperature Normal Light Enhance Color Enhance Dark Enhance Local Dimming Reset Picture Picture Mode Standard Exit Move/Adjust Enter/Con rm Item HDR Description Light Enhance...
Reset Picture: Reset all Picture settings to the default settings. Note: The HDR Enhance function will be replaced until the HDR turns off. - 39 - Local Dimming: Improve the blackness of images displayed on . HDR Brightness Contrast 85 50 Gaming HDR Picture Display PIP/PBP System Language Save Settings Reset All Sharpness 5 Gamma OFF Color Temperature Normal Light Enhance Color Enhance Dark Enhance Local Dimming Reset Picture Picture Mode Standard Exit Move/Adjust Enter/Con rm Item HDR Description Light Enhance...

GIGABYTE User Guide
Page 41
... the display screen related settings. OverScan When this function is enabled, it automatically. SDR Brightness Contrast 85 50 Gaming Picture Display PIP/PBP System Language Save Settings Reset All Input RGB PC Range Overscan Sharpness 5 HDMI 1 HDMI 2 DisplayPort Type-C Gamma OFF Color Temperature Normal Picture Mode Standard Exit Move/Adjust Enter/Con rm Item Input Description Select the input source. RGB PC Range Select an appropriate RGB range setting or let the monitor to detect it slightly enlarges the input image...
... the display screen related settings. OverScan When this function is enabled, it automatically. SDR Brightness Contrast 85 50 Gaming Picture Display PIP/PBP System Language Save Settings Reset All Input RGB PC Range Overscan Sharpness 5 HDMI 1 HDMI 2 DisplayPort Type-C Gamma OFF Color Temperature Normal Picture Mode Standard Exit Move/Adjust Enter/Con rm Item Input Description Select the input source. RGB PC Range Select an appropriate RGB range setting or let the monitor to detect it slightly enlarges the input image...

GIGABYTE User Guide
Page 42
... Brightness Contrast Sharpness 85 50 5 Gaming OFF Picture PIP Display PBP PIP/PBP System Language Save Settings Reset All Gamma Gamma 3 Color Temperature Normal Picture Mode Standard Exit Move/Adjust Enter/Con rm Item OFF PIP PBP Description Disable the PIP/PBP function. Display 1x1 split screen (left and right windows). • Source: Change the input source for the inset window. • PIP Size: Adjust the inset window size. • Location: Move the inset window position. • Display Switch...
... Brightness Contrast Sharpness 85 50 5 Gaming OFF Picture PIP Display PBP PIP/PBP System Language Save Settings Reset All Gamma Gamma 3 Color Temperature Normal Picture Mode Standard Exit Move/Adjust Enter/Con rm Item OFF PIP PBP Description Disable the PIP/PBP function. Display 1x1 split screen (left and right windows). • Source: Change the input source for the inset window. • PIP Size: Adjust the inset window size. • Location: Move the inset window position. • Display Switch...

GIGABYTE User Guide
Page 43
... screen. • OSD Transparency: Adjust the OSD menu transparency. • OSD Lock: When this function is enabled, no OSD adjustment is locked, con rm to confirm. Note: To disable the OSD lock function, press the Control key. System Configure the system related settings. SDR Brightness Contrast 85 50 Sharpness 5 Gaming Picture Display PIP/PBP System Language Save Settings Reset All Audio OSD Setting Quick Switch Other Settings Volume Mute Gamma OFF Color Temperature Normal Picture Mode Standard Exit Move/Adjust Enter/Con rm Item Audio OSD Settings...
... screen. • OSD Transparency: Adjust the OSD menu transparency. • OSD Lock: When this function is enabled, no OSD adjustment is locked, con rm to confirm. Note: To disable the OSD lock function, press the Control key. System Configure the system related settings. SDR Brightness Contrast 85 50 Sharpness 5 Gaming Picture Display PIP/PBP System Language Save Settings Reset All Audio OSD Setting Quick Switch Other Settings Volume Mute Gamma OFF Color Temperature Normal Picture Mode Standard Exit Move/Adjust Enter/Con rm Item Audio OSD Settings...

GIGABYTE User Guide
Page 44
... the power supply is enabled, the monitor will remain off , the Power LED will automatically turn this option into ON. Type-C Compatibility: Compat with 1 sec interval). Auto Power Off: When this function is enabled, increase Type-C charging wattage when the screen is set to another input source. Available options: Aim Stabilizer sync, Black Equalizer, KVM Switch, Volume, Input, Contrast, Brightness, and Picture Mode. Standby Charge: When this function is switched off . The default setting of the...
... the power supply is enabled, the monitor will remain off , the Power LED will automatically turn this option into ON. Type-C Compatibility: Compat with 1 sec interval). Auto Power Off: When this function is enabled, increase Type-C charging wattage when the screen is set to another input source. Available options: Aim Stabilizer sync, Black Equalizer, KVM Switch, Volume, Input, Contrast, Brightness, and Picture Mode. Standby Charge: When this function is switched off . The default setting of the...

GIGABYTE User Guide
Page 48
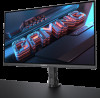
... your device by another power source. - 47 - APPENDICES Specifications Item Specifications Panel Size 32-inch Aspect Ratio 16:9 Resolution 3840 x 2160 LED Life 30000 hours (min.) Pixel Pitch 0.181(H) x 0.181(V) Brightness 350 nits (typ.) / 400 nits (peak) Contrast Ratio 1000:1 (typ.) Color Depth 1.073G(8Bit+FRC) Active Display area 697.3056(H) x 392.2344(V) Viewing Angle 178°(H)/178°(V) Input/Output Terminals Power Supply • 2x HDMI2.1 •...
... your device by another power source. - 47 - APPENDICES Specifications Item Specifications Panel Size 32-inch Aspect Ratio 16:9 Resolution 3840 x 2160 LED Life 30000 hours (min.) Pixel Pitch 0.181(H) x 0.181(V) Brightness 350 nits (typ.) / 400 nits (peak) Contrast Ratio 1000:1 (typ.) Color Depth 1.073G(8Bit+FRC) Active Display area 697.3056(H) x 392.2344(V) Viewing Angle 178°(H)/178°(V) Input/Output Terminals Power Supply • 2x HDMI2.1 •...

GIGABYTE User Guide
Page 50
... Audio Source setting. • Adjust your computer sound related settings. Refer to page 28 or 40 . Troubleshooting Problem No power Possible Solution(s) • Make sure the power cable is properly connected to the power source and the monitor. • Check the cable and plug to make sure they are not broken. • Make sure the monitor is turned on . • Make sure you have selected the correct input source. No image appears on the screen • Make sure the monitor...
... Audio Source setting. • Adjust your computer sound related settings. Refer to page 28 or 40 . Troubleshooting Problem No power Possible Solution(s) • Make sure the power cable is properly connected to the power source and the monitor. • Check the cable and plug to make sure they are not broken. • Make sure the monitor is turned on . • Make sure you have selected the correct input source. No image appears on the screen • Make sure the monitor...

GIGABYTE User Guide
Page 52
...LCD monitor Trade Name: GIGABYTE Model Number: M32U AE Responsible Party - These limits are designed to radio communications. Inc. Operation is subject to the following measures: • Reorient or relocate the receiving antenna. • Increase the separation between the equipment and receiver. • Connect the equipment to an outlet on , the user...television reception, which can radiate radio frequency energy and, if not installed and used in accordance with the limits for help - 51 - This equipment generates, uses and can be determined by turning the equipment off and on a circuit...
...LCD monitor Trade Name: GIGABYTE Model Number: M32U AE Responsible Party - These limits are designed to radio communications. Inc. Operation is subject to the following measures: • Reorient or relocate the receiving antenna. • Increase the separation between the equipment and receiver. • Connect the equipment to an outlet on , the user...television reception, which can radiate radio frequency energy and, if not installed and used in accordance with the limits for help - 51 - This equipment generates, uses and can be determined by turning the equipment off and on a circuit...

OSD Sidekick User Guide
Page 4
...: • One end of an HDMI cable to the HDMI port of the LCD monitor and the other end to the HDMI port of your computer. • One end of a DisplayPort cable to the DP port of the LCD monitor and the other end to the DC port on your computer and the LCD monitor into a power outlet. 4. Gaming Monitor User Guide SOFTWARE INSTALLATION Preparation 1. Plug the power adapter to the USB port of your computer. 2.
...: • One end of an HDMI cable to the HDMI port of the LCD monitor and the other end to the HDMI port of your computer. • One end of a DisplayPort cable to the DP port of the LCD monitor and the other end to the DC port on your computer and the LCD monitor into a power outlet. 4. Gaming Monitor User Guide SOFTWARE INSTALLATION Preparation 1. Plug the power adapter to the USB port of your computer. 2.
OSD Sidekick User Guide
Page 16
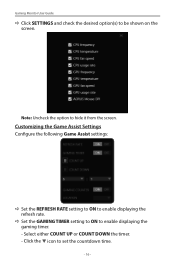
Click the q icon to hide it from the screen. Note: Uncheck the option to set the countdown time. - 16 - Select either COUNT UP or COUNT DOWN the timer. - Customizing the Game Assist Settings Configure the following Game Assist settings: DD Set the REFRESH RATE setting to ON to enable displaying the gaming timer. - DD Set the GAMING TIMER setting to ON to enable displaying the refresh rate. Gaming Monitor User Guide DD Click SETTINGS and check the desired option(s) to be shown on the screen.
Click the q icon to hide it from the screen. Note: Uncheck the option to set the countdown time. - 16 - Select either COUNT UP or COUNT DOWN the timer. - Customizing the Game Assist Settings Configure the following Game Assist settings: DD Set the REFRESH RATE setting to ON to enable displaying the gaming timer. - DD Set the GAMING TIMER setting to ON to enable displaying the refresh rate. Gaming Monitor User Guide DD Click SETTINGS and check the desired option(s) to be shown on the screen.
