
GIGABYTE User Manual
Page 3
... instructions, may cause undesired operation. This equipment has been tested and found to radio communications. If this device must accept any interference received, including interference that interference will not occur in a particular installation. SAFETY INFORMATION Gaming Monitor User Guide ...to correct the interference by turning the equipment off and on, the user is no guarantee that may cause harmful interference to comply with Part 15 of Conformity 47 CFR § 2.1077 Compliance Information Product Name: LCD monitor Trade Name: GIGABYTE Model Number: Responsible Party -
... instructions, may cause undesired operation. This equipment has been tested and found to radio communications. If this device must accept any interference received, including interference that interference will not occur in a particular installation. SAFETY INFORMATION Gaming Monitor User Guide ...to correct the interference by turning the equipment off and on, the user is no guarantee that may cause harmful interference to comply with Part 15 of Conformity 47 CFR § 2.1077 Compliance Information Product Name: LCD monitor Trade Name: GIGABYTE Model Number: Responsible Party -

GIGABYTE User Manual
Page 10
... cannot be reached by children. • Before connecting the monitor to the power outlet, make sure that which are located. • The power cord plug must be scratched, avoid touching the surface with the power specification in electric shock or damage to the monitor. • Make sure to unplug the monitor from the power outlet before using the monitor. • Only use a glass cleaner to wipe the screen.
... cannot be reached by children. • Before connecting the monitor to the power outlet, make sure that which are located. • The power cord plug must be scratched, avoid touching the surface with the power specification in electric shock or damage to the monitor. • Make sure to unplug the monitor from the power outlet before using the monitor. • Only use a glass cleaner to wipe the screen.

GIGABYTE User Manual
Page 11
... Overview...15 Getting Started...17 Installing the Monitor Base 17 Adjusting the Viewing Angle 19 Installing a Wall-Mount Bracket (Optional 20 Making Connections...21 Using the Device...22 Turning the Power On/Off 22 User Comfort Recommendations 23 Selecting the Input Source 23 Operations...24 Quick Menu...24 Configure the Device Settings 32 Appendices...42 Specifications...42 Supported Timing List 43 Troubleshooting...44 Basic Care...45 Notes on USB Charging 45 GIGABYTE Service Information 45 Trademark...
... Overview...15 Getting Started...17 Installing the Monitor Base 17 Adjusting the Viewing Angle 19 Installing a Wall-Mount Bracket (Optional 20 Making Connections...21 Using the Device...22 Turning the Power On/Off 22 User Comfort Recommendations 23 Selecting the Input Source 23 Operations...24 Quick Menu...24 Configure the Device Settings 32 Appendices...42 Specifications...42 Supported Timing List 43 Troubleshooting...44 Basic Care...45 Notes on USB Charging 45 GIGABYTE Service Information 45 Trademark...

GIGABYTE User Manual
Page 17
Gaming Monitor User Guide GETTING STARTED Installing the Monitor Base 1. Align and slide the upper hooks on the stand into the mounting slots on the rear of the monitor. Push the locking latch forward and then release to secure the lower hooks on the stand into the mounting slots on the lower EPS foam, with the standoff underneath the stand. Align the monitor base with the screen facing down. 2. Then attach the base onto the stand. - 17 - Locking latch 3. Place the monitor on the rear of the monitor.
Gaming Monitor User Guide GETTING STARTED Installing the Monitor Base 1. Align and slide the upper hooks on the stand into the mounting slots on the rear of the monitor. Push the locking latch forward and then release to secure the lower hooks on the stand into the mounting slots on the lower EPS foam, with the standoff underneath the stand. Align the monitor base with the screen facing down. 2. Then attach the base onto the stand. - 17 - Locking latch 3. Place the monitor on the rear of the monitor.

GIGABYTE User Manual
Page 20
... the screen facing down. 2. Then use the screws to the installation guide that is included in the wall-mount bracket kit. Locking latch 3. VESA mounting screw size: M4 x 15mm minimum. - 20 - Attach the mounting bracket to release the upper hooks from the mounting slots on the rear of the monitor. Gaming Monitor User Guide Installing a Wall-Mount Bracket (Optional) Use only a 100 x 100 mm VESA compatible wall mount kit. 1. While pushing the locking latch forward, slide the stand backward...
... the screen facing down. 2. Then use the screws to the installation guide that is included in the wall-mount bracket kit. Locking latch 3. VESA mounting screw size: M4 x 15mm minimum. - 20 - Attach the mounting bracket to release the upper hooks from the mounting slots on the rear of the monitor. Gaming Monitor User Guide Installing a Wall-Mount Bracket (Optional) Use only a 100 x 100 mm VESA compatible wall mount kit. 1. While pushing the locking latch forward, slide the stand backward...

GIGABYTE User Manual
Page 22
... to a power outlet. 4. The Power LED will go to turn on the screen, you can also turn off the monitor by moving the Control button down ( ). Note: When the Main menu appears on the monitor. Connect the power cable to use. Power Off Press the Control button for a while. Press the Control button to power saving mode and the Power LED lights white and starts blinking with a period of the monitor. 3. Connect the power adapter to turn off the monitor. Note: If no signal, the monitor will...
... to a power outlet. 4. The Power LED will go to turn on the screen, you can also turn off the monitor by moving the Control button down ( ). Note: When the Main menu appears on the monitor. Connect the power cable to use. Power Off Press the Control button for a while. Press the Control button to power saving mode and the Power LED lights white and starts blinking with a period of the monitor. 3. Connect the power adapter to turn off the monitor. Note: If no signal, the monitor will...

GIGABYTE User Manual
Page 26
... EXIT GAME ASSIST Game Assist Exit POWER OFF Power Off Then use the Control button to the device, a message box will appear on the screen, move the Control button left ( ) to USB-B or Type-C connection in the KVM Wizard settings. When there are several input signals connected to select the desired function and configure the related settings. Gaming Monitor User Guide Function Key Guide Press the Control button to display the Main menu.
... EXIT GAME ASSIST Game Assist Exit POWER OFF Power Off Then use the Control button to the device, a message box will appear on the screen, move the Control button left ( ) to USB-B or Type-C connection in the KVM Wizard settings. When there are several input signals connected to select the desired function and configure the related settings. Gaming Monitor User Guide Function Key Guide Press the Control button to display the Main menu.
GIGABYTE User Manual
Page 27
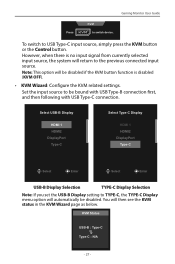
... will return to the previous connected input source. Set the input source to TYPE-C, the TYPE-C Display menu option wKiVllMautomatically be bound with USB Type-B connection first, and then following with USB Type-C connection. Select USB-B Display HDMI 1 HDMI2 DisplayPort Type-C Select Type-C Display HDMI 1 HDMI2 DisplayPort Type-C Select Enter Select Enter KVM Switch KVM Wizard KVM ON KVM Reset USB-B Display Selection TYPE-C Display Selection Note: If you set the USB-B Display setting to be...
... will return to the previous connected input source. Set the input source to TYPE-C, the TYPE-C Display menu option wKiVllMautomatically be bound with USB Type-B connection first, and then following with USB Type-C connection. Select USB-B Display HDMI 1 HDMI2 DisplayPort Type-C Select Type-C Display HDMI 1 HDMI2 DisplayPort Type-C Select Enter Select Enter KVM Switch KVM Wizard KVM ON KVM Reset USB-B Display Selection TYPE-C Display Selection Note: If you set the USB-B Display setting to be...

GIGABYTE User Manual
Page 28
... Control button to switch to switch device. Once the system detected USB Type-C input signal, a message box will be displayed on the left panel. • KVM Reset: Restore the KVM default settings. √√ HDMI 1 input source is bound with USB Type-B connection. √√ USB Type-C input source is bound with USB Type-C connection. √√ The KVM ON/OFF function is enabled, the KVM ON will appear on the screen. Gaming Monitor User Guide...
... Control button to switch to switch device. Once the system detected USB Type-C input signal, a message box will be displayed on the left panel. • KVM Reset: Restore the KVM default settings. √√ HDMI 1 input source is bound with USB Type-B connection. √√ USB Type-C input source is bound with USB Type-C connection. √√ The KVM ON/OFF function is enabled, the KVM ON will appear on the screen. Gaming Monitor User Guide...

GIGABYTE User Manual
Page 31
... GPU Usage Rate Game Mouse DPI Note: Make sure the USB cable is properly connected to the USB upstream port of the monitor and the USB port of your computer. • Display Alignment: When the function is complete, it displays the alignment lines on the four sides of the screen, providing handy tool for you to line up multiple monitors perfectly. - 31 - Gaming Monitor User Guide √...
... GPU Usage Rate Game Mouse DPI Note: Make sure the USB cable is properly connected to the USB upstream port of the monitor and the USB port of your computer. • Display Alignment: When the function is complete, it displays the alignment lines on the four sides of the screen, providing handy tool for you to line up multiple monitors perfectly. - 31 - Gaming Monitor User Guide √...
GIGABYTE User Manual
Page 32
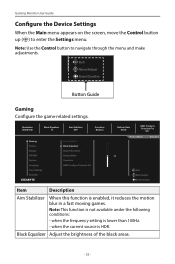
... Monitor User Guide Picture Mode Standard Configure the Device Settings When the Main menu appears on the screen, move the Control button up ( ) to navigate through the menu and make ium Pro adjustments. when the current source is enabled, it reduces the motion blur in a fast moving games. Note: Use the Control button to ente1r0the Settings menu. Resolution 2560X1440 Black Equalizer 10 Aim Stabilizer OFF Overdrive Balance Gaming Picture Display PIP/PBP System Language Save Settings Reset...
... Monitor User Guide Picture Mode Standard Configure the Device Settings When the Main menu appears on the screen, move the Control button up ( ) to navigate through the menu and make ium Pro adjustments. when the current source is enabled, it reduces the motion blur in a fast moving games. Note: Use the Control button to ente1r0the Settings menu. Resolution 2560X1440 Black Equalizer 10 Aim Stabilizer OFF Overdrive Balance Gaming Picture Display PIP/PBP System Language Save Settings Reset...
GIGABYTE User Manual
Page 33
... you turn on the FreeSync function while playing a game, the screen may flicker depending on a 27"W monitor of graphics card, the game option settings, or the video being played. Ideal for 16:9 aspect images. • Aspect: Display the input image without geometric distortion filling as much of the screen as possible. • 1:1: Display the input image in its native resolution without scaling. • 22"W(16:10): Display the input image...
... you turn on the FreeSync function while playing a game, the screen may flicker depending on a 27"W monitor of graphics card, the game option settings, or the video being played. Ideal for 16:9 aspect images. • Aspect: Display the input image without geometric distortion filling as much of the screen as possible. • 1:1: Display the input image in its native resolution without scaling. • 22"W(16:10): Display the input image...
GIGABYTE User Manual
Page 34
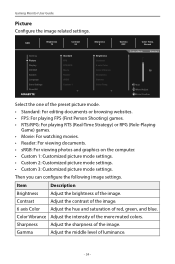
... - Contrast Adjust the contrast of the image. 6 axis Color Adjust the hue and saturation of the image. Gaming Monitor User Guide Picture Configure the image related settings. Item Description Brightness Adjust the brightness of red, green, and blue. Then you can configure the following image settings. Sharpness Adjust the sharpness of the more muted colors. SDR Brightness 75 Contrast 50 Gaming Picture Display PIP/PBP System Language Save Settings Reset All Standard FPS RTS/RPG Movie Reader sRGB Custom 1 Sharpness 6 Brightness Contrast 6 axis Color Color...
... - Contrast Adjust the contrast of the image. 6 axis Color Adjust the hue and saturation of the image. Gaming Monitor User Guide Picture Configure the image related settings. Item Description Brightness Adjust the brightness of red, green, and blue. Then you can configure the following image settings. Sharpness Adjust the sharpness of the more muted colors. SDR Brightness 75 Contrast 50 Gaming Picture Display PIP/PBP System Language Save Settings Reset All Standard FPS RTS/RPG Movie Reader sRGB Custom 1 Sharpness 6 Brightness Contrast 6 axis Color Color...
GIGABYTE User Manual
Page 35
... Low Blue Light Certification. It is optimized setting. Note: Select User Define to customize the color temperature by adjusting the red (R), green (G), or blue (B) level according to the default settings. - 35 - Gaming Monitor User Guide Item Description Color Temp. The image of the image to achieve the Contrast Ratio optimum contrast. (DCR) Senseye Demo Split the screen in half (2 windows). Reset Picture Reset all Picture settings to your preference. Dynamic Adjust the black level of the selected mode with its default settings...
... Low Blue Light Certification. It is optimized setting. Note: Select User Define to customize the color temperature by adjusting the red (R), green (G), or blue (B) level according to the default settings. - 35 - Gaming Monitor User Guide Item Description Color Temp. The image of the image to achieve the Contrast Ratio optimum contrast. (DCR) Senseye Demo Split the screen in half (2 windows). Reset Picture Reset all Picture settings to your preference. Dynamic Adjust the black level of the selected mode with its default settings...
GIGABYTE User Manual
Page 36
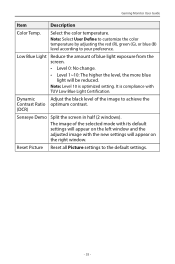
Gaming Monitor User Guide Display Configure the display screen related settings. Enable the monitor to detect it slightly enlarges the input image to reduce such effects by setting a lower refresh rate. SDR Brightness 75 Contrast 50 Gaming Picture Display PIP/PBP System Language Save Settings Reset All Input Overclock HDMI RGB PC Range Overscan Sharpness 6 HDMI 1 HDMI 2 DisplayPort Type-C Gamma OFF Color Temp. When this function is enabled, the monitor may result in flicker or other adverse effects that may derive...
Gaming Monitor User Guide Display Configure the display screen related settings. Enable the monitor to detect it slightly enlarges the input image to reduce such effects by setting a lower refresh rate. SDR Brightness 75 Contrast 50 Gaming Picture Display PIP/PBP System Language Save Settings Reset All Input Overclock HDMI RGB PC Range Overscan Sharpness 6 HDMI 1 HDMI 2 DisplayPort Type-C Gamma OFF Color Temp. When this function is enabled, the monitor may result in flicker or other adverse effects that may derive...
GIGABYTE User Manual
Page 37
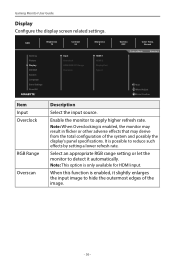
PIP Split the screen into 2 parts (main window and inset window). • Source: Change the input source for the right window. • PBP Size: Adjust the window size. • Display Switch: Swap the two windows. • Audio Switch: Select which audio source you want to hear the sound from . Note: PIP/PBP is not compatible with HDR and FreeSync Premium Pro functions. - 37 - Gaming Monitor User Guide SDR Brightness 75 Contrast 50 Gaming Picture Display PIP/PBP System Language Save Settings Reset All OFF...
PIP Split the screen into 2 parts (main window and inset window). • Source: Change the input source for the right window. • PBP Size: Adjust the window size. • Display Switch: Swap the two windows. • Audio Switch: Select which audio source you want to hear the sound from . Note: PIP/PBP is not compatible with HDR and FreeSync Premium Pro functions. - 37 - Gaming Monitor User Guide SDR Brightness 75 Contrast 50 Gaming Picture Display PIP/PBP System Language Save Settings Reset All OFF...
GIGABYTE User Manual
Page 38
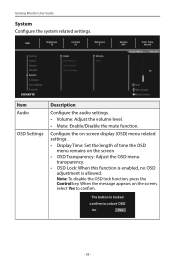
SDR Brightness 75 Contrast 50 Gaming Picture Display PIP/PBP System Language Save Settings Reset All Audio OSD Setting Quick Switch Other Settings Sharpness 6 Volume Mute Gamma OFF Color Temp. Configure the on-screen display (OSD) menu related settings. • Display Time: Set the length of time the OSD menu remains on the screen, select Yes to unlock OSD No Yes - 38 - The button is allowed. Note: To disable the OSD lock function, press the Control key. Gaming Monitor User Guide System Configure the system related settings. When...
SDR Brightness 75 Contrast 50 Gaming Picture Display PIP/PBP System Language Save Settings Reset All Audio OSD Setting Quick Switch Other Settings Sharpness 6 Volume Mute Gamma OFF Color Temp. Configure the on-screen display (OSD) menu related settings. • Display Time: Set the length of time the OSD menu remains on the screen, select Yes to unlock OSD No Yes - 38 - The button is allowed. Note: To disable the OSD lock function, press the Control key. Gaming Monitor User Guide System Configure the system related settings. When...

GIGABYTE User Manual
Page 39
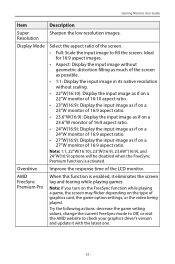
Available options: Aim Stabilizer, Black Equalizer, Low Blue Light, Volume, Input, Contrast, Brightness, and Picture Mode. LED Indicator Standby ON: The Power LED turns off the Power LED. - Gaming Monitor User Guide Item Quick Switch Description Assign the function of time. • LED Indicator: By default, the LED indicator is set to Always ON. - The default setting of the hot keys as below: DD Up ( ): Black Equalizer DD Down ( ): Picture Mode DD Right ( ): Input DD Left ( ): Volume Other Settings • Resolution Notice: When this...
Available options: Aim Stabilizer, Black Equalizer, Low Blue Light, Volume, Input, Contrast, Brightness, and Picture Mode. LED Indicator Standby ON: The Power LED turns off the Power LED. - Gaming Monitor User Guide Item Quick Switch Description Assign the function of time. • LED Indicator: By default, the LED indicator is set to Always ON. - The default setting of the hot keys as below: DD Up ( ): Black Equalizer DD Down ( ): Picture Mode DD Right ( ): Input DD Left ( ): Volume Other Settings • Resolution Notice: When this...
GIGABYTE User Manual
Page 42
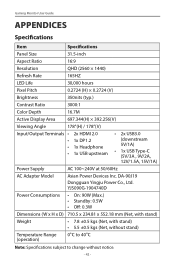
DA-90J19 Dongguan Yingju Power Co., Ltd. Gaming Monitor User Guide APPENDICES Specifications Item Specifications Panel Size 31.5-inch Aspect Ratio 16:9 Resolution QHD (2560 × 1440) Refresh Rate 165HZ LED Life 30,000 hours Pixel Pitch 0.2724 (H) × 0.2724 (V) Brightness 350nits (typ.) Contrast Ratio 3000:1 Color Depth 16.7M Active Display Area 697.344(H) × 392.256(V) Viewing Angle 178°(H) / 178°(V) Input/Output Terminals 2x HDMI 2.0 1x DP1.2 1x...
DA-90J19 Dongguan Yingju Power Co., Ltd. Gaming Monitor User Guide APPENDICES Specifications Item Specifications Panel Size 31.5-inch Aspect Ratio 16:9 Resolution QHD (2560 × 1440) Refresh Rate 165HZ LED Life 30,000 hours Pixel Pitch 0.2724 (H) × 0.2724 (V) Brightness 350nits (typ.) Contrast Ratio 3000:1 Color Depth 16.7M Active Display Area 697.344(H) × 392.256(V) Viewing Angle 178°(H) / 178°(V) Input/Output Terminals 2x HDMI 2.0 1x DP1.2 1x...
GIGABYTE User Manual
Page 44
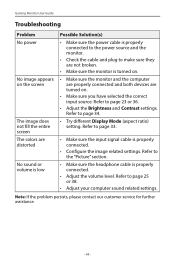
... turned on. • Make sure you have selected the correct input source. Gaming Monitor User Guide Troubleshooting Problem No power No image appears on the screen The image does not fill the entire screen The colors are distorted No sound or volume is low Possible Solution(s) • Make sure the power cable is properly connected to the power source and the monitor. • Check the cable and plug to make sure they are not broken. • Make sure the monitor...
... turned on. • Make sure you have selected the correct input source. Gaming Monitor User Guide Troubleshooting Problem No power No image appears on the screen The image does not fill the entire screen The colors are distorted No sound or volume is low Possible Solution(s) • Make sure the power cable is properly connected to the power source and the monitor. • Check the cable and plug to make sure they are not broken. • Make sure the monitor...
