Manual
Page 2
Hardware Installation 5 2.1. GIGABYTE OC Guru II...9 3.2. Table of Contents 1. Minimum System Requirements 3 2. Accessing NVIDIA Control Panel 20 4. Regulatory Statements 29 - 2 - Introduction...3 1.1. Display Properties Pages 19 3.3. Software Installation ...7 3.1. Driver and Utility Installation 7 3.1.1. Appendix...29 5.1. Troubleshooting Tips 28 5. Driver Installation...7 3.1.2. SLI Technology ...5 3.
Hardware Installation 5 2.1. GIGABYTE OC Guru II...9 3.2. Table of Contents 1. Minimum System Requirements 3 2. Accessing NVIDIA Control Panel 20 4. Regulatory Statements 29 - 2 - Introduction...3 1.1. Display Properties Pages 19 3.3. Software Installation ...7 3.1. Driver and Utility Installation 7 3.1.1. Appendix...29 5.1. Troubleshooting Tips 28 5. Driver Installation...7 3.1.2. SLI Technology ...5 3.
Manual
Page 3
Intel® Pentium® 4 or AMD AthlonTM XP class - 2GB system memory (4GB recommended) - Windows® 7 - Introduction 1.1. Optical drive for software installation (CD-ROM or DVD-ROM drive) • Operating System - 1. Windows® 8 - Windows® Vista - 3 - Introduction Minimum System Requirements • Hardware -
Intel® Pentium® 4 or AMD AthlonTM XP class - 2GB system memory (4GB recommended) - Windows® 7 - Introduction 1.1. Optical drive for software installation (CD-ROM or DVD-ROM drive) • Operating System - 1. Windows® 8 - Windows® Vista - 3 - Introduction Minimum System Requirements • Hardware -
Manual
Page 7
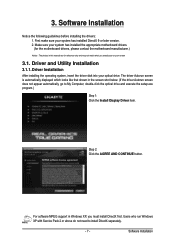
...3.1.1. The driver Autorun screen is automatically displayed which looks like that shown in Windows XP, you exactly see on your optical drive. Software Installation Notice the following guidelines before installing the drivers: 1. Driver Installation After installing the operating system, insert the driver disk into your... screen 3.1. Step 2: Click the AGREE AND CONTINUE button. For software MPEG support in the screen shot below. (If the driver Autorun screen does not appear automatically, go to install DirectX separately...
...3.1.1. The driver Autorun screen is automatically displayed which looks like that shown in Windows XP, you exactly see on your optical drive. Software Installation Notice the following guidelines before installing the drivers: 1. Driver Installation After installing the operating system, insert the driver disk into your... screen 3.1. Step 2: Click the AGREE AND CONTINUE button. For software MPEG support in the screen shot below. (If the driver Autorun screen does not appear automatically, go to install DirectX separately...
Manual
Page 9
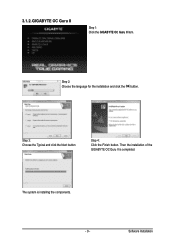
Step 2: Choose the language for the installation and click the OK button. Software Installation Then the installation of the GIGABYTE OC Guru II is installing the components. - 9 - Step 3: Choose the Typical and click the Next button Step 4: Click the Finish button. The system is completed. GIGABYTE OC Guru II Step 1: Click the GIGABYTE OC Guru II item. 3.1.2.
Step 2: Choose the language for the installation and click the OK button. Software Installation Then the installation of the GIGABYTE OC Guru II is installing the components. - 9 - Step 3: Choose the Typical and click the Next button Step 4: Click the Finish button. The system is completed. GIGABYTE OC Guru II Step 1: Click the GIGABYTE OC Guru II item. 3.1.2.

Manual
Page 11
MONITORING: Show real time GPU Clock/MEMORY Clock Click MORE to MONITORING PANEL MONITORING PANEL: Function: Monitoring Panel Settings. Function: Start recording. Software Installation Function: Stop recording. - 11 -
MONITORING: Show real time GPU Clock/MEMORY Clock Click MORE to MONITORING PANEL MONITORING PANEL: Function: Monitoring Panel Settings. Function: Start recording. Software Installation Function: Stop recording. - 11 -
Manual
Page 13
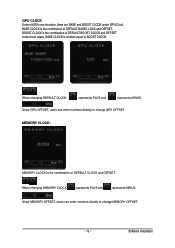
BASE CLOCK is smaller/ equal to BOOST CLOCK. Software Installation Show MEMORY OFFSET, users can enter numbers directly to change GPU OFFSET. Under most cases, BASE CLOCK is the combination of DEFAULT BASEC LOCK ...
BASE CLOCK is smaller/ equal to BOOST CLOCK. Software Installation Show MEMORY OFFSET, users can enter numbers directly to change GPU OFFSET. Under most cases, BASE CLOCK is the combination of DEFAULT BASEC LOCK ...
Manual
Page 15
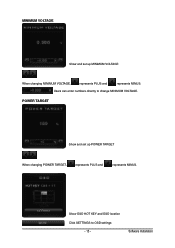
Users can enter numbers directly to OSD settings - 15 - Show OSD HOT KEY and OSD location Click SETTINGS to change MINIMUM VOLTAGE. POWER TARGET Show and set up POWER TARGET When changing POWER TARGET, represents PLUS and represents MINUS. Software Installation MINIMUM VOLTAGE Show and set up MINIMUM VOLTAGE When changing MINIMUM VOLTAGE, represents PLUS and represents MINUS.
Users can enter numbers directly to OSD settings - 15 - Show OSD HOT KEY and OSD location Click SETTINGS to change MINIMUM VOLTAGE. POWER TARGET Show and set up POWER TARGET When changing POWER TARGET, represents PLUS and represents MINUS. Software Installation MINIMUM VOLTAGE Show and set up MINIMUM VOLTAGE When changing MINIMUM VOLTAGE, represents PLUS and represents MINUS.
Manual
Page 16
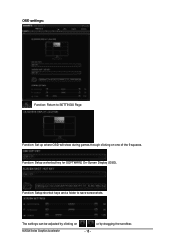
Function: Setup shortcut keys and a folder to SETTINGS Page. Function: Set up where OSD will show during games through clicking on NVIDIA Series Graphics Accelerator - 16 - Function: Setup a shortcut key for SOFTWARE On-Screen Display (OSD). or by clicking on one of the 9 squares. The settings can be adjusted by dragging the scrollbar. OSD settings: Function: Return to save screenshots.
Function: Setup shortcut keys and a folder to SETTINGS Page. Function: Set up where OSD will show during games through clicking on NVIDIA Series Graphics Accelerator - 16 - Function: Setup a shortcut key for SOFTWARE On-Screen Display (OSD). or by clicking on one of the 9 squares. The settings can be adjusted by dragging the scrollbar. OSD settings: Function: Return to save screenshots.
Manual
Page 17
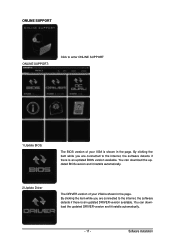
... is an updated DRIVER version available. You can download the updated BIOS version and it installs automatically. - 17 - Software Installation By clicking the item while you are connected to the internet, the software detects if there is an updated BIOS version available. ONLINE SUPPORT ONLINE SUPPORT: Click to enter ONLINE SUPPORT 1.Update...
... is an updated DRIVER version available. You can download the updated BIOS version and it installs automatically. - 17 - Software Installation By clicking the item while you are connected to the internet, the software detects if there is an updated BIOS version available. ONLINE SUPPORT ONLINE SUPPORT: Click to enter ONLINE SUPPORT 1.Update...
Manual
Page 18
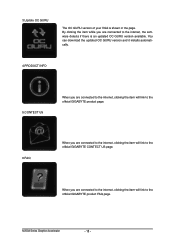
... and it installs automatically. 4.PRODUCT INFO 5.CONTECT US When you are connected to the internet, clicking the item will link to the official GIGABYTE product page. 6.FAQ When you are connected to the internet, clicking the item will link to the official... FAQ page. NVIDIA Series Graphics Accelerator - 18 - By clicking the item while you are connected to the official GIGABYTE CONTECT US page. 3.Update OC GURU The OC GURU version of your VGA is an updated OC GURU version available. When you are connected to ...
... and it installs automatically. 4.PRODUCT INFO 5.CONTECT US When you are connected to the internet, clicking the item will link to the official GIGABYTE product page. 6.FAQ When you are connected to the internet, clicking the item will link to the official... FAQ page. NVIDIA Series Graphics Accelerator - 18 - By clicking the item while you are connected to the official GIGABYTE CONTECT US page. 3.Update OC GURU The OC GURU version of your VGA is an updated OC GURU version available. When you are connected to ...
Manual
Page 19
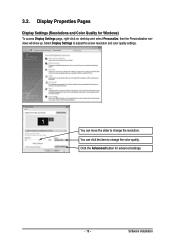
Select Display Settings to change the color quality. Software Installation You can move the slider to adjust the screen resolution and color quality settings. Click the Advanced button for Windows) To access Display Settings page, right-click on desktop and select Personalize, then the Personalization windows will show up. 3.2. Display Properties Pages Display Settings (Resolutions and Color Quality for advanced settings. - 19 - You can click the item to change the resolution.
Select Display Settings to change the color quality. Software Installation You can move the slider to adjust the screen resolution and color quality settings. Click the Advanced button for Windows) To access Display Settings page, right-click on desktop and select Personalize, then the Personalization windows will show up. 3.2. Display Properties Pages Display Settings (Resolutions and Color Quality for advanced settings. - 19 - You can click the item to change the resolution.

Manual
Page 21
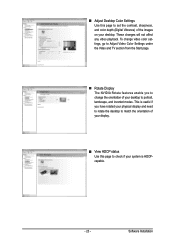
... - 21 - mance. • Assign specific 3D settings to a game so that these settings automatically load when a game is launched. Adjust Image Settings with Preview If you are unfamiliar with... the following: • Change the image and rendering settings of your 3D applications and games that utilize Direct3D and OpenGL technology. • Override the shipped clocked frequencies of your ...your Direct3D or OpenGL applications and to establish a unique set of 3D settings for a particular game or application. Set PhysX confiquration NVIDIA® PhysX® is a ...
... - 21 - mance. • Assign specific 3D settings to a game so that these settings automatically load when a game is launched. Adjust Image Settings with Preview If you are unfamiliar with... the following: • Change the image and rendering settings of your 3D applications and games that utilize Direct3D and OpenGL technology. • Override the shipped clocked frequencies of your ...your Direct3D or OpenGL applications and to establish a unique set of 3D settings for a particular game or application. Set PhysX confiquration NVIDIA® PhysX® is a ...
Manual
Page 23
Software Installation To change video color settings, go to Adjust Video Color Settings under the Video and TV section from the Start page. Rotate Display ...
Software Installation To change video color settings, go to Adjust Video Color Settings under the Video and TV section from the Start page. Rotate Display ...
Manual
Page 25
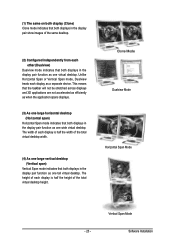
... same desktop. (2) Configured independently from each display as one tall virtual desktop. Clone Mode Dualview Mode Horizontal Span Mode Vertical Span Mode - 25 - Software Installation
... same desktop. (2) Configured independently from each display as one tall virtual desktop. Clone Mode Dualview Mode Horizontal Span Mode Vertical Span Mode - 25 - Software Installation
Manual
Page 27
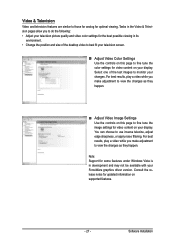
... analog for optimal viewing. For best results, play a video while you make adjustment to use inverse telecine, adjust edge sharpness, or apply noise filtering. Software Installation Video & Television Video and television features are similar to fine tune the color settings for video content on your ForceWare graphics driver version.
... analog for optimal viewing. For best results, play a video while you make adjustment to use inverse telecine, adjust edge sharpness, or apply noise filtering. Software Installation Video & Television Video and television features are similar to fine tune the color settings for video content on your ForceWare graphics driver version.
