
Manual
Page 8
Software Installation 9 3.1. Minimum System Requirement 3 2. Hardware Installation 4 2.1. Windows® XP Driver and Utilities Installation 9 3.1.1. Driver Installation ...11 3.1.4. Appendix 34 5.1. Resolutions and Color Depth Table (In Windows® XP 35 GV-RX55 Series Graphics Accelerator - 2 - Features ...3 1.2. Hardware Installation 7 3. Operating System Requirement 9 3.1.2. Utilities on Driver CD 13 3.1.5. Troubleshooting Tips 33 5. Reflash BIOS in MS-DOS mode 34...
Software Installation 9 3.1. Minimum System Requirement 3 2. Hardware Installation 4 2.1. Windows® XP Driver and Utilities Installation 9 3.1.1. Driver Installation ...11 3.1.4. Appendix 34 5.1. Resolutions and Color Depth Table (In Windows® XP 35 GV-RX55 Series Graphics Accelerator - 2 - Features ...3 1.2. Hardware Installation 7 3. Operating System Requirement 9 3.1.2. Utilities on Driver CD 13 3.1.5. Troubleshooting Tips 33 5. Reflash BIOS in MS-DOS mode 34...
Manual
Page 14
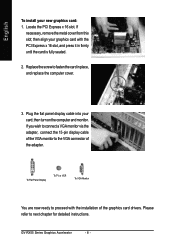
then turn on the computer and monitor. GV-RX55 Series Graphics Accelerator - 8 - Locate the PCI Express x 16 slot. If necessary, remove the metal cover from this slot; If you wish to connect a VGA ... VGA monitor to fasten the card in firmly until the card is fully seated. 2. Replace the screw to the VGA connector of the graphics card drivers. Please refer to proceed with the PCI Express x 16 slot, and press it in place, and replace the computer cover. 3. then align your graphics card...
then turn on the computer and monitor. GV-RX55 Series Graphics Accelerator - 8 - Locate the PCI Express x 16 slot. If necessary, remove the metal cover from this slot; If you wish to connect a VGA ... VGA monitor to fasten the card in firmly until the card is fully seated. 2. Replace the screw to the VGA connector of the graphics card drivers. Please refer to proceed with the PCI Express x 16 slot, and press it in place, and replace the computer cover. 3. then align your graphics card...

Manual
Page 15
....exe"). Then you can follow the subsection 3.1.3 "Driver installation" to be Drive D: The installation of SIS, or VIA chipsets, please install the appropriate driver program for motherboard driver. - 9 - Software Installation Windows® XP Driver and Utilities Installation 3.1.1. Or please contact your system ...• If you install the graphics card drivers for the motherboard, which consist of Windows® 2000 / Windows® XP drivers is very simple. Operating System Requirement • When loading the graphics card drivers for the system, please make sure your...
....exe"). Then you can follow the subsection 3.1.3 "Driver installation" to be Drive D: The installation of SIS, or VIA chipsets, please install the appropriate driver program for motherboard driver. - 9 - Software Installation Windows® XP Driver and Utilities Installation 3.1.1. Or please contact your system ...• If you install the graphics card drivers for the motherboard, which consist of Windows® 2000 / Windows® XP drivers is very simple. Operating System Requirement • When loading the graphics card drivers for the system, please make sure your...
Manual
Page 17
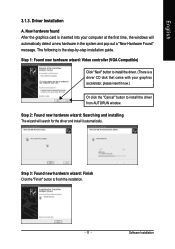
... message. Step 3: Found new hardware wizard: Finish Click the "Finish" button to install the driver. (There is the step-by-step installation guide. English 3.1.3. Driver Installation A. The following is a driver CD disk that came with your computer at the first time, the windows will search for the... driver and install it now.) Or click the "Cancel" button to install the driver from AUTORUN window. Step 1: Found new hardware wizard: Video controller (VGA Compatible) Click "Next" button to ...
... message. Step 3: Found new hardware wizard: Finish Click the "Finish" button to install the driver. (There is the step-by-step installation guide. English 3.1.3. Driver Installation A. The following is a driver CD disk that came with your computer at the first time, the windows will search for the... driver and install it now.) Or click the "Cancel" button to install the driver from AUTORUN window. Step 1: Found new hardware wizard: Video controller (VGA Compatible) Click "Next" button to ...

Manual
Page 18
...". Step 2. Click "Next" button. Windows installings the components. English B. Driver installation (Autorun Window) Insert the driver CD disk into your CD-ROM, and then you can see the AUTORUN window. Step 3. Setp 4. GV-RX55 Series Graphics Accelerator - 12 - Click "Yes" button. Step 5. Then the driver installation is completed. Step 1. Click "Finish" button to restart...
...". Step 2. Click "Next" button. Windows installings the components. English B. Driver installation (Autorun Window) Insert the driver CD disk into your CD-ROM, and then you can see the AUTORUN window. Step 3. Setp 4. GV-RX55 Series Graphics Accelerator - 12 - Click "Yes" button. Step 5. Then the driver installation is completed. Step 1. Click "Finish" button to restart...

Manual
Page 19
Utilities on Driver CD Insert the driver CD disk into your name and company. If it does not show up, please run "D:\setup.exe". Click the Next button. Step 3. Step 2. Step 4. Software Installation Then the V-Tuner2 installation is completed. - 13 - Click the Finish button to restart computer. English 3.1.4. z Install GIGABYTE Utility (V-Tuner2): Click the GIGABYTE Utility item. Enter your CD-ROM, and then you can see the AUTORUN window.
Utilities on Driver CD Insert the driver CD disk into your name and company. If it does not show up, please run "D:\setup.exe". Click the Next button. Step 3. Step 2. Step 4. Software Installation Then the V-Tuner2 installation is completed. - 13 - Click the Finish button to restart computer. English 3.1.4. z Install GIGABYTE Utility (V-Tuner2): Click the GIGABYTE Utility item. Enter your CD-ROM, and then you can see the AUTORUN window.

Manual
Page 22
... panel, showing a menu composed of shortcut of the display drivers, you will find a GIGABYTE icon on the taskbar's status area. Click the appropriate tab to GBT website for updated information about the graphics accelerator, latest drivers, and other functions. Right click the icon. You can link to change your display settings. Taskbar Icon... Settings. You may click the "Display Properties" item, and then click Settings. Click "VGA Information" item into the "VGA Info" and "Color Adjust"tabs. English 3.1.5. GV-RX55 Series Graphics Accelerator - 16 -
... panel, showing a menu composed of shortcut of the display drivers, you will find a GIGABYTE icon on the taskbar's status area. Click the appropriate tab to GBT website for updated information about the graphics accelerator, latest drivers, and other functions. Right click the icon. You can link to change your display settings. Taskbar Icon... Settings. You may click the "Display Properties" item, and then click Settings. Click "VGA Information" item into the "VGA Info" and "Color Adjust"tabs. English 3.1.5. GV-RX55 Series Graphics Accelerator - 16 -

Manual
Page 24
...select Properties\ Settings\ Advanced\ ATI CATALYST Control Center tab and press ATI CATALYST(tm) Control Center button (refer to Fig. 2). Fig. 3 GV-RX55 Series Graphics Accelerator - 18 - HYDRAVISIONTM Properties to set the HYDRAVISION (refer to configure all your graphics card settings. Fig. 1 Fig. 2... HYDRAVISIONTM : HYDRAVISION has everything you need to manage increased amounts of the display drivers, you will find an ATI CATALYSTTM Control Center icon on ATI CATALYSTTM Control Center icon to Fig. 1). Or you can : •...
...select Properties\ Settings\ Advanced\ ATI CATALYST Control Center tab and press ATI CATALYST(tm) Control Center button (refer to Fig. 2). Fig. 3 GV-RX55 Series Graphics Accelerator - 18 - HYDRAVISIONTM Properties to set the HYDRAVISION (refer to configure all your graphics card settings. Fig. 1 Fig. 2... HYDRAVISIONTM : HYDRAVISION has everything you need to manage increased amounts of the display drivers, you will find an ATI CATALYSTTM Control Center icon on ATI CATALYSTTM Control Center icon to Fig. 1). Or you can : •...
Manual
Page 33
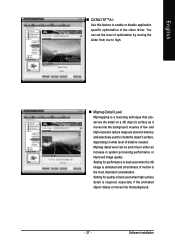
.... Mipmap detail level can set to high. „ Mipmap Detail Level Mipmapping is a texturing technique that preserves the detail on what level of the video driver. English „ CATALYSTTMA.I. Software Installation Use this feature to create the object's surface, depending on a 3D object's surface as it moves into the background. - 27...
.... Mipmap detail level can set to high. „ Mipmap Detail Level Mipmapping is a texturing technique that preserves the detail on what level of the video driver. English „ CATALYSTTMA.I. Software Installation Use this feature to create the object's surface, depending on a 3D object's surface as it moves into the background. - 27...
Manual
Page 37
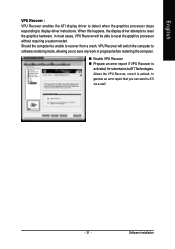
...; Enable VPU Recover „ Prepare an error report if VPU Recover is activated, for submission to reset the graphics hardware. When this happens, the display driver attempts to ATI Technologies. Software Installation Should the computer be able to ATI via e-mail. - 31 - English VPU Recover : VPU Recover enables the ATI display...
...; Enable VPU Recover „ Prepare an error report if VPU Recover is activated, for submission to reset the graphics hardware. When this happens, the display driver attempts to ATI Technologies. Software Installation Should the computer be able to ATI via e-mail. - 31 - English VPU Recover : VPU Recover enables the ATI display...

Manual
Page 38
To ensure you need to install the graphics card driver to take advantage of the higher performance, resolutions, and special graphics features of the graphics card. Type the following steps: 1. Click OK. 5. Click Yes to install the driver. GV-RX55 Series Graphics Accelerator - 32 - If Windows...® does not show up. Select Run. 3. English 3.2. Click Install Display Driver item, and follow the wizard to the license agreement. 8. Follow the Wizard...
To ensure you need to install the graphics card driver to take advantage of the higher performance, resolutions, and special graphics features of the graphics card. Type the following steps: 1. Click OK. 5. Click Yes to install the driver. GV-RX55 Series Graphics Accelerator - 32 - If Windows...® does not show up. Select Run. 3. English 3.2. Click Install Display Driver item, and follow the wizard to the license agreement. 8. Follow the Wizard...

Manual
Page 39
English 4. Press the F8 key on your computer manufacturer. After getting into Safe Mode, in Device Manager check whether the driver for more information, consult your computer's manual or manufacturer. (NOTE: Some manufacturers do not allow the built-in graphics capabilities on... the secondary display.) „ Make sure you selected the appropriate display device and graphics card when you experience problems. Contact your dealer or Gigabyte for the graphics card is securely fastened to the card's display connector. „ Make sure that the display cable is correct. „...
English 4. Press the F8 key on your computer manufacturer. After getting into Safe Mode, in Device Manager check whether the driver for more information, consult your computer's manual or manufacturer. (NOTE: Some manufacturers do not allow the built-in graphics capabilities on... the secondary display.) „ Make sure you selected the appropriate display device and graphics card when you experience problems. Contact your dealer or Gigabyte for the graphics card is securely fastened to the card's display connector. „ Make sure that the display cable is correct. „...

Manual
Page 40
... and press Enter. 6. Reflash BIOS in MS-DOS mode 1. Select the BIOS file from GIGABYTE website and extract it detects the current BIOS on -screen instructions. Change the command prompt to... Reflash the BIOS 5.1.1. Update BIOS NOT through the Internet a. Appendix 5.1. d. GV-RX55 Series Graphics Accelerator - 34 - s [BIOS file name](example: gvf13 -s rx80256d.e2) and press... Right-click to your card is the latest one.) 3. After installing the display drivers, you need a startup disk to your hard disk (or floppy disk). Select ...
... and press Enter. 6. Reflash BIOS in MS-DOS mode 1. Select the BIOS file from GIGABYTE website and extract it detects the current BIOS on -screen instructions. Change the command prompt to... Reflash the BIOS 5.1.1. Update BIOS NOT through the Internet a. Appendix 5.1. d. GV-RX55 Series Graphics Accelerator - 34 - s [BIOS file name](example: gvf13 -s rx80256d.e2) and press... Right-click to your card is the latest one.) 3. After installing the display drivers, you need a startup disk to your hard disk (or floppy disk). Select ...

