Manual
Page 6
...; 2000 Driver Installation 35 4. Board Layout 4 2.2. Utilities on Driver CD 15 3.1.5. Resolutions and Color Depth Table (In Windows® XP 38 GV-RX16P256D(DE)-RH Graphics Accelerator - 2 - Driver Installation ...13 3.1.4. Troubleshooting Tips 36 5. Reflash BIOS in Windows mode 37 5.2. DirectX Installation ...12 3.1.3. Taskbar Icon ...18 3.1.6. Hardware Installation 7 3. Appendix 37 5.1. Features ...3 1.2. Display Properties pages 21...
...; 2000 Driver Installation 35 4. Board Layout 4 2.2. Utilities on Driver CD 15 3.1.5. Resolutions and Color Depth Table (In Windows® XP 38 GV-RX16P256D(DE)-RH Graphics Accelerator - 2 - Driver Installation ...13 3.1.4. Troubleshooting Tips 36 5. Reflash BIOS in Windows mode 37 5.2. DirectX Installation ...12 3.1.3. Taskbar Icon ...18 3.1.6. Hardware Installation 7 3. Appendix 37 5.1. Features ...3 1.2. Display Properties pages 21...
Manual
Page 7
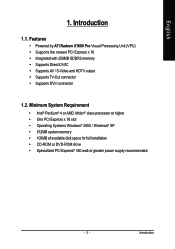
... System Requirement • Intel® Pentium® 4 or AMD Athlon® class processor or higher • One PCI Express x 16 slot • Operating Systems Windows® 2000 / Windows® XP • 512MB system memory • 100MB of available disk space for full installation • CD-ROM or DVD-ROM drive • Specialized...
... System Requirement • Intel® Pentium® 4 or AMD Athlon® class processor or higher • One PCI Express x 16 slot • Operating Systems Windows® 2000 / Windows® XP • 512MB system memory • 100MB of available disk space for full installation • CD-ROM or DVD-ROM drive • Specialized...
Manual
Page 15
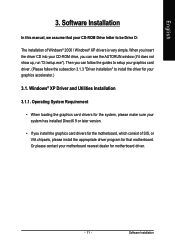
Then you can see the AUTORUN window (if it does not show up, run "D:\setup.exe"). English 3. Software Installation In this manual, we assume that motherboard. Windows® XP Driver and Utilities Installation 3.1.1. When you insert the driver CD into your CD-ROM drive, you install ...the graphics card drivers for the motherboard, which consist of Windows® 2000 / Windows® XP drivers is very simple. Software Installation Or please contact your CD-ROM Drive letter to install the driver for motherboard driver...
Then you can see the AUTORUN window (if it does not show up, run "D:\setup.exe"). English 3. Software Installation In this manual, we assume that motherboard. Windows® XP Driver and Utilities Installation 3.1.1. When you insert the driver CD into your CD-ROM drive, you install ...the graphics card drivers for the motherboard, which consist of Windows® 2000 / Windows® XP drivers is very simple. Software Installation Or please contact your CD-ROM Drive letter to install the driver for motherboard driver...
Manual
Page 16
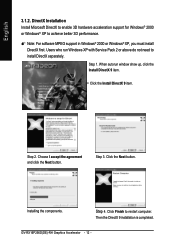
Users who run Windows XP with Service Pack 2 or above do not need to achieve better 3D performance. Step 4. GV-RX16P256D(DE)-RH Graphics Accelerator - 12 - English 3.1.2. Step 2.... Click the Install DirectX 9 item. Then the DirectX 9 installation is completed. Step 1. Installing the components. Choose I accept the agreement and click the Next button. Step 3. DirectX Installation Install Microsoft DirectX to enable 3D hardware acceleration support for Windows® 2000 or Windows...
Users who run Windows XP with Service Pack 2 or above do not need to achieve better 3D performance. Step 4. GV-RX16P256D(DE)-RH Graphics Accelerator - 12 - English 3.1.2. Step 2.... Click the Install DirectX 9 item. Then the DirectX 9 installation is completed. Step 1. Installing the components. Choose I accept the agreement and click the Next button. Step 3. DirectX Installation Install Microsoft DirectX to enable 3D hardware acceleration support for Windows® 2000 or Windows...
Manual
Page 17
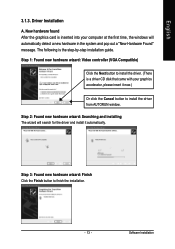
...Click the Next button to install the driver. (There is a driver CD disk that came with your computer at the first time, the windows will search for the driver and install it now.) Or click the Cancel button to finish the installation. - 13 - Step 3: Found ...new hardware wizard: Finish Click the Finish button to install the driver from AUTORUN window. The following is inserted into your graphics accelerator, please insert it automatically. English 3.1.3. Driver Installation A. New hardware found After the graphics card...
...Click the Next button to install the driver. (There is a driver CD disk that came with your computer at the first time, the windows will search for the driver and install it now.) Or click the Cancel button to finish the installation. - 13 - Step 3: Found ...new hardware wizard: Finish Click the Finish button to install the driver from AUTORUN window. The following is inserted into your graphics accelerator, please insert it automatically. English 3.1.3. Driver Installation A. New hardware found After the graphics card...
Manual
Page 18
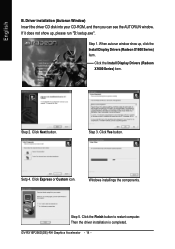
... (Radeon X1600 Series) item. Step 2. Step 3. Then the driver installation is completed. Step 1. Step 5. Click the Finish button to restart computer. GV-RX16P256D(DE)-RH Graphics Accelerator - 14 - English B. When autorun window show up , click the Install Display Drivers (Radeon X1600 Series) item. Click Next button. Click Express or Custom icon. Setp 4. Click...
... (Radeon X1600 Series) item. Step 2. Step 3. Then the driver installation is completed. Step 1. Step 5. Click the Finish button to restart computer. GV-RX16P256D(DE)-RH Graphics Accelerator - 14 - English B. When autorun window show up , click the Install Display Drivers (Radeon X1600 Series) item. Click Next button. Click Express or Custom icon. Setp 4. Click...
Manual
Page 19
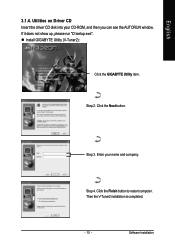
If it does not show up, please run "D:\setup.exe". Install GIGABYTE Utility (V-Tuner2): Click the GIGABYTE Utility item. Step 2. Enter your CD-ROM, and then you can see the AUTORUN window. Click the Finish button to restart computer. Software Installation Click the Next button. Step 4. Then the V-Tuner2 installation is completed. - 15 - English 3.1.4. Utilities on Driver CD Insert the driver CD disk into your name and company. Step 3.
If it does not show up, please run "D:\setup.exe". Install GIGABYTE Utility (V-Tuner2): Click the GIGABYTE Utility item. Step 2. Enter your CD-ROM, and then you can see the AUTORUN window. Click the Finish button to restart computer. Software Installation Click the Next button. Step 4. Then the V-Tuner2 installation is completed. - 15 - English 3.1.4. Utilities on Driver CD Insert the driver CD disk into your name and company. Step 3.
Manual
Page 20
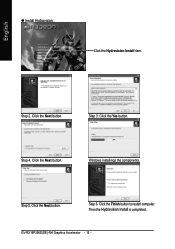
Click the Yes button. Then the Hydravision Install is completed. Click the Next button. Click the Next button. Step 4. Click the Next button. Step 5. English Install Hydravision : Click the Hydravision Install item. GV-RX16P256D(DE)-RH Graphics Accelerator - 16 - Click the Finish button to restart computer. Step 6. Step 3. Step 2. Windows installings the components.
Click the Yes button. Then the Hydravision Install is completed. Click the Next button. Click the Next button. Step 4. Click the Next button. Step 5. English Install Hydravision : Click the Hydravision Install item. GV-RX16P256D(DE)-RH Graphics Accelerator - 16 - Click the Finish button to restart computer. Step 6. Step 3. Step 2. Windows installings the components.

Manual
Page 24
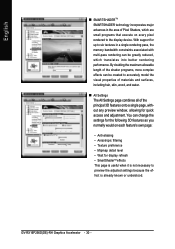
... desktop. You can right-click on ATI CATALYSTTM Control Center icon to select HYDRAVISIONTM> HYDRAVISIONTM Properties to set the HYDRAVISION (refer to windows and menus. You can : • arrange and rearrange monitors. • assign Hot Key shortcuts. • create up to ...9 virtual desktops. • add special effects to Fig. 3). Fig. 3 GV-RX16P256D(DE)-RH Graphics Accelerator - 20 - Or you work. Fig. 1 Fig. 2 HYDRAVISIONTM : HYDRAVISION has everything you need to manage increased amounts of the display...
... desktop. You can right-click on ATI CATALYSTTM Control Center icon to select HYDRAVISIONTM> HYDRAVISIONTM Properties to set the HYDRAVISION (refer to windows and menus. You can : • arrange and rearrange monitors. • assign Hot Key shortcuts. • create up to ...9 virtual desktops. • add special effects to Fig. 3). Fig. 3 GV-RX16P256D(DE)-RH Graphics Accelerator - 20 - Or you work. Fig. 1 Fig. 2 HYDRAVISIONTM : HYDRAVISION has everything you need to manage increased amounts of the display...
Manual
Page 25
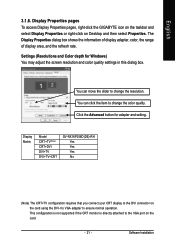
Display Matrix Model CRT+TV(Note) CRT+DVI DVI+TV DVI+TV+CRT GV-RX16P256D(DE)-RH Yes Yes Yes No (Note) The CRT+TV configuration requires that you connect your CRT display to change the resolution. You can click the item ... rate. You can move the slider to ensure normal operation. English 3.1.6. Settings (Resolutions and Color depth for adapter and setting. Click the Advanced button for Windows) You may adjust the screen resolution and color quality settings in this dialog box. Display Properties pages To access Display Properties pages, right-click the...
Display Matrix Model CRT+TV(Note) CRT+DVI DVI+TV DVI+TV+CRT GV-RX16P256D(DE)-RH Yes Yes Yes No (Note) The CRT+TV configuration requires that you connect your CRT display to change the resolution. You can click the item ... rate. You can move the slider to ensure normal operation. English 3.1.6. Settings (Resolutions and Color depth for adapter and setting. Click the Advanced button for Windows) You may adjust the screen resolution and color quality settings in this dialog box. Display Properties pages To access Display Properties pages, right-click the...
Manual
Page 34
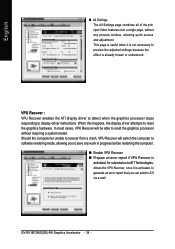
... as you normally would on every pixel rendered to accurately model the visual properties of the principal 3D features onto a single page, without any preview window, allowing for display refresh • SmartShaderTM effects This page is useful when it is already known or understood...
... as you normally would on every pixel rendered to accurately model the visual properties of the principal 3D features onto a single page, without any preview window, allowing for display refresh • SmartShaderTM effects This page is useful when it is already known or understood...
Manual
Page 38
... send to ATI Technologies. Should the computer be unable to recover from a crash, VPU Recover will be able to save any preview window, allowing quick access and adjustment. GV-RX16P256D(DE)-RH Graphics Accelerator - 34 - English All Settings The All Settings page combines all of the prin cipal Video features onto a single page...
... send to ATI Technologies. Should the computer be unable to recover from a crash, VPU Recover will be able to save any preview window, allowing quick access and adjustment. GV-RX16P256D(DE)-RH Graphics Accelerator - 34 - English All Settings The All Settings page combines all of the prin cipal Video features onto a single page...
Manual
Page 39
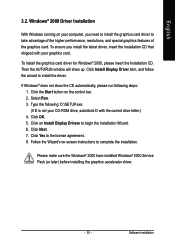
... To install the graphics card driver for Windows® 2000, please insert the Installation CD. Select Run. 3. Click Next. 7. If Windows® does not show up. Click on the control bar. 2. Please make sure the Windows® 2000 have installed Windows® 2000 Service Pack (or later...) before installing the graphics accelerator driver. - 35 - Then the AUTORUN window will show the CD automatically, please run following : D:\SETUP.exe (If...
... To install the graphics card driver for Windows® 2000, please insert the Installation CD. Select Run. 3. Click Next. 7. If Windows® does not show up. Click on the control bar. 2. Please make sure the Windows® 2000 have installed Windows® 2000 Service Pack (or later...) before installing the graphics accelerator driver. - 35 - Then the AUTORUN window will show the CD automatically, please run following : D:\SETUP.exe (If...
Manual
Page 40
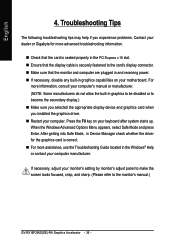
...to make the screen looks focused, crisp, and sharp. (Please refer to the monitor's manual.) GV-RX16P256D(DE)-RH Graphics Accelerator - 36 - Press the F8 key on your dealer or Gigabyte for the graphics card is securely fastened to become the secondary display.) Make sure you selected the... tips may help if you installed the graphics driver. If necessary, disable any built-in the PCI Express x 16 slot. When the Windows Advanced Options Menu appears, select Safe Mode and press Enter. Ensure that the display cable is correct. Restart your computer's manual or manufacturer...
...to make the screen looks focused, crisp, and sharp. (Please refer to the monitor's manual.) GV-RX16P256D(DE)-RH Graphics Accelerator - 36 - Press the F8 key on your dealer or Gigabyte for the graphics card is securely fastened to become the secondary display.) Make sure you selected the... tips may help if you installed the graphics driver. If necessary, disable any built-in the PCI Express x 16 slot. When the Windows Advanced Options Menu appears, select Safe Mode and press Enter. Ensure that the display cable is correct. Restart your computer's manual or manufacturer...
Manual
Page 41
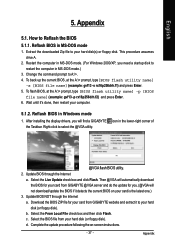
... then click Flash. d. Restart the computer in MS-DOS mode. (For Windows 2000/XP, you will not download/update the BIOS if it detects the current BIOS on -screen instructions. - 37 - icon in Windows mode 1. Select the BIOS file from GIGABYTE @VGA server and do the update for your card from... GIGABYTE website and extract it 's done, then restart your hard disk (or floppy disk). Reflash BIOS in ...
... then click Flash. d. Restart the computer in MS-DOS mode. (For Windows 2000/XP, you will not download/update the BIOS if it detects the current BIOS on -screen instructions. - 37 - icon in Windows mode 1. Select the BIOS file from GIGABYTE @VGA server and do the update for your card from... GIGABYTE website and extract it 's done, then restart your hard disk (or floppy disk). Reflash BIOS in ...
Manual
Page 42
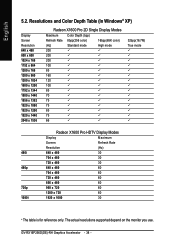
GV-RX16P256D(DE)-RH Graphics Accelerator - 38 - Resolutions and Color Depth Table (In Windows® XP) Display Screen Resolution 640 x 480 800 x 600 1024 x 768 1152 x 864 1280 x 768 1280 x 960 1280 x 1024 1600 x 1200 1792 x 1344 1800 x 1440 ...
GV-RX16P256D(DE)-RH Graphics Accelerator - 38 - Resolutions and Color Depth Table (In Windows® XP) Display Screen Resolution 640 x 480 800 x 600 1024 x 768 1152 x 864 1280 x 768 1280 x 960 1280 x 1024 1600 x 1200 1792 x 1344 1800 x 1440 ...
