
Manual
Page 5
GV-RX16P256D-RH/ GV-RX16P256DE-RH Radeon X1600 Pro Graphics Accelerator User's Manual Rev. 102 12MD-RX16P2DR-102R * The WEEE marking on VGA card, this may void the warranty of this ... must not be disposed of with user's other household waste and must be out of date before publication of their respective owners. Copyright © 2006 GIGABYTE TECHNOLOGY CO., LTD Copyright by GIGA-BYTE TECHNOLOGY CO., LTD. ("GBT").
GV-RX16P256D-RH/ GV-RX16P256DE-RH Radeon X1600 Pro Graphics Accelerator User's Manual Rev. 102 12MD-RX16P2DR-102R * The WEEE marking on VGA card, this may void the warranty of this ... must not be disposed of with user's other household waste and must be out of date before publication of their respective owners. Copyright © 2006 GIGABYTE TECHNOLOGY CO., LTD Copyright by GIGA-BYTE TECHNOLOGY CO., LTD. ("GBT").
Manual
Page 6
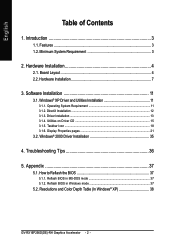
... 5.2. Utilities on Driver CD 15 3.1.5. Hardware Installation 4 2.1. Windows® XP Driver and Utilities Installation 11 3.1.1. Resolutions and Color Depth Table (In Windows® XP 38 GV-RX16P256D(DE)-RH Graphics Accelerator - 2 - Taskbar Icon ...18 3.1.6. Introduction 3 1.1. Features ...3 1.2. Software Installation 11 3.1. DirectX Installation ...12 3.1.3. Appendix 37 5.1.
... 5.2. Utilities on Driver CD 15 3.1.5. Hardware Installation 4 2.1. Windows® XP Driver and Utilities Installation 11 3.1.1. Resolutions and Color Depth Table (In Windows® XP 38 GV-RX16P256D(DE)-RH Graphics Accelerator - 2 - Taskbar Icon ...18 3.1.6. Introduction 3 1.1. Features ...3 1.2. Software Installation 11 3.1. DirectX Installation ...12 3.1.3. Appendix 37 5.1.
Manual
Page 7
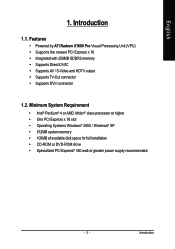
Introduction Features • Powered by ATI Radeon X1600 Pro Visual Processing Unit (VPU) • Supports the newest PCI Express x 16 • Integrated with 256MB GDDR2 memory • Supports DirectX 9.0C • Supports AV / S-Video and HDTV output • Supports TV-Out connector • Supports DVI-I connector 1.2. English 1. Minimum System Requirement • Intel® Pentium® 4 or AMD Athlon® class processor or higher • One PCI Express x 16 slot • Operating Systems Windows® 2000 / Windows® XP • 512MB system memory • 100MB of ...
Introduction Features • Powered by ATI Radeon X1600 Pro Visual Processing Unit (VPU) • Supports the newest PCI Express x 16 • Integrated with 256MB GDDR2 memory • Supports DirectX 9.0C • Supports AV / S-Video and HDTV output • Supports TV-Out connector • Supports DVI-I connector 1.2. English 1. Minimum System Requirement • Intel® Pentium® 4 or AMD Athlon® class processor or higher • One PCI Express x 16 slot • Operating Systems Windows® 2000 / Windows® XP • 512MB system memory • 100MB of ...

Manual
Page 8
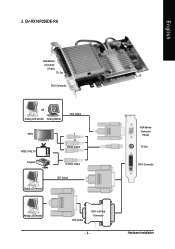
GV-RX16P256D-RH VGA Monitor Connector (15-pin) TV_Out DVI-I Connector OR Analog LCD Monitor Analog Monitor VGA Output HDTV NTSC / PAL TV Projector Digital LCD Monitor Y Pr Pb/AV Output S-Video Output DVI Output Analog LCD Monitor VGA Output DVI-I Connector Hardware Installation 2.1. English 2. VGA Monitor Connector (15-pin) TV-Out DVI-I to D-Sub Connector GV-RX16P256D(DE)-RH Graphics Accelerator - 4 - Board Layout 1.
GV-RX16P256D-RH VGA Monitor Connector (15-pin) TV_Out DVI-I Connector OR Analog LCD Monitor Analog Monitor VGA Output HDTV NTSC / PAL TV Projector Digital LCD Monitor Y Pr Pb/AV Output S-Video Output DVI Output Analog LCD Monitor VGA Output DVI-I Connector Hardware Installation 2.1. English 2. VGA Monitor Connector (15-pin) TV-Out DVI-I to D-Sub Connector GV-RX16P256D(DE)-RH Graphics Accelerator - 4 - Board Layout 1.
Manual
Page 9
VGA Monitor Connector (15-pin) TV-Out DVI-I to D-Sub Connector - 5 - English 2. GV-RX16P256DE-RH VGA Monitor Connector (15-pin) TV_Out DVI-I Connector OR Analog LCD Monitor Analog Monitor VGA Output HDTV NTSC / PAL TV Projector Digital LCD Monitor Y Pr Pb/AV Output S-Video Output DVI Output Analog LCD Monitor VGA Output DVI-I Connector Hardware Installation
VGA Monitor Connector (15-pin) TV-Out DVI-I to D-Sub Connector - 5 - English 2. GV-RX16P256DE-RH VGA Monitor Connector (15-pin) TV_Out DVI-I Connector OR Analog LCD Monitor Analog Monitor VGA Output HDTV NTSC / PAL TV Projector Digital LCD Monitor Y Pr Pb/AV Output S-Video Output DVI Output Analog LCD Monitor VGA Output DVI-I Connector Hardware Installation

Manual
Page 10
... and handling damages on the graphics card. DO NOT APPLY POWER TO YOUR SYSTEM IF IT HAS BEEN DAMAGED ON THE CARD. GV-RX16P256D(DE)-RH Graphics Accelerator - 6 - To protect them against damage from the system. Be sure there are separated from static electricity, you ... carton for obvious damage. Shipping and handling may cause damage to your graphics card working correctly, please use official Gigabyte BIOS only. Use none official Gigabyte BIOS might cause problem on the card before handling computer components. English Expansion cards contain very delicate Integrated Circuit (...
... and handling damages on the graphics card. DO NOT APPLY POWER TO YOUR SYSTEM IF IT HAS BEEN DAMAGED ON THE CARD. GV-RX16P256D(DE)-RH Graphics Accelerator - 6 - To protect them against damage from the system. Be sure there are separated from static electricity, you ... carton for obvious damage. Shipping and handling may cause damage to your graphics card working correctly, please use official Gigabyte BIOS only. Use none official Gigabyte BIOS might cause problem on the card before handling computer components. English Expansion cards contain very delicate Integrated Circuit (...
Manual
Page 11
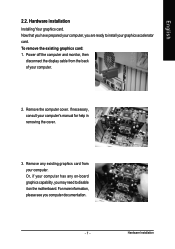
Hardware Installation Power off the computer and monitor, then disconnect the display cable from your computer. Remove any on the motherboard. Or, if your computer has any existing graphics card from the back of your graphics accelerator card. Hardware installation Installing Your graphics card. For more information, please see you are ready to disable it on -board graphics capability, you may need to install your computer. 2. English 2.2. To remove the existing graphics card: 1. Remove the computer cover. If necessary, consult your computer, you computer ...
Hardware Installation Power off the computer and monitor, then disconnect the display cable from your computer. Remove any on the motherboard. Or, if your computer has any existing graphics card from the back of your graphics accelerator card. Hardware installation Installing Your graphics card. For more information, please see you are ready to disable it on -board graphics capability, you may need to install your computer. 2. English 2.2. To remove the existing graphics card: 1. Remove the computer cover. If necessary, consult your computer, you computer ...
Manual
Page 12
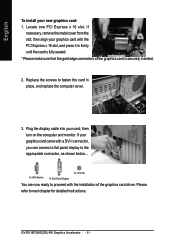
... Display To TV/VCR You are now ready to proceed with a DVI-I connector, you can connect a flat panel display to next chapter for detailed instructions. GV-RX16P256D(DE)-RH Graphics Accelerator - 8 - If your graphics card with the PCI Express x 16 slot, and press it in place, and replace the computer cover. 3. English To...
... Display To TV/VCR You are now ready to proceed with a DVI-I connector, you can connect a flat panel display to next chapter for detailed instructions. GV-RX16P256D(DE)-RH Graphics Accelerator - 8 - If your graphics card with the PCI Express x 16 slot, and press it in place, and replace the computer cover. 3. English To...
Manual
Page 13
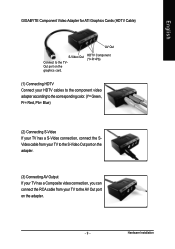
Hardware Installation English GIGABYTE Component Video Adapter for ATI Graphics Cards (HDTV Cable) AV Out S-Video Out Connect to the AV Out port on the graphics card. HDTV Component (Y+...
Hardware Installation English GIGABYTE Component Video Adapter for ATI Graphics Cards (HDTV Cable) AV Out S-Video Out Connect to the AV Out port on the graphics card. HDTV Component (Y+...
Manual
Page 14
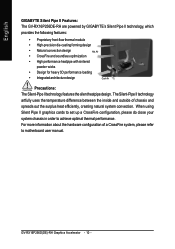
... information about the hardware configuration of chassis and spreads out the surplus heat efficiently, creating natural system convection. GV-RX16P256D(DE)-RH Graphics Accelerator - 10 - The Silent-Pipe II technology artfully uses the temperature difference between the inside and outside...up a CrossFire configuration, please do close your system chassis in order to motherboard user manual. English GIGABYTE Silent Pipe II Features: The GV-RX16P256DE-RH are powered by GIGABYTE's Silent Pipe II technology, which provides the following features: • Proprietary front-flow thermal module ...
... information about the hardware configuration of chassis and spreads out the surplus heat efficiently, creating natural system convection. GV-RX16P256D(DE)-RH Graphics Accelerator - 10 - The Silent-Pipe II technology artfully uses the temperature difference between the inside and outside...up a CrossFire configuration, please do close your system chassis in order to motherboard user manual. English GIGABYTE Silent Pipe II Features: The GV-RX16P256DE-RH are powered by GIGABYTE's Silent Pipe II technology, which provides the following features: • Proprietary front-flow thermal module ...
Manual
Page 15
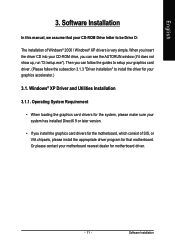
Operating System Requirement • When loading the graphics card drivers for the system, please make sure your system has installed DirectX 9 or later version. • If you install the graphics card drivers for the motherboard, which consist of Windows® 2000 / Windows® XP drivers is very simple. Software Installation In this manual, we assume that motherboard. Windows® XP Driver and Utilities Installation 3.1.1. When you insert the driver CD into your CD-ROM drive, you can see the AUTORUN window (if it does not show up, run "D:\setup.exe"). Software ...
Operating System Requirement • When loading the graphics card drivers for the system, please make sure your system has installed DirectX 9 or later version. • If you install the graphics card drivers for the motherboard, which consist of Windows® 2000 / Windows® XP drivers is very simple. Software Installation In this manual, we assume that motherboard. Windows® XP Driver and Utilities Installation 3.1.1. When you insert the driver CD into your CD-ROM drive, you can see the AUTORUN window (if it does not show up, run "D:\setup.exe"). Software ...
Manual
Page 16
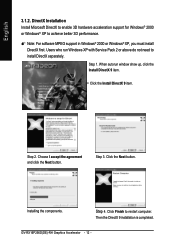
... better 3D performance. DirectX Installation Install Microsoft DirectX to enable 3D hardware acceleration support for Windows® 2000 or Windows® XP to restart computer. GV-RX16P256D(DE)-RH Graphics Accelerator - 12 - Note: For software MPEG support in Windows® 2000 or Windows® XP, you must install DirectX first. Click the Install...
... better 3D performance. DirectX Installation Install Microsoft DirectX to enable 3D hardware acceleration support for Windows® 2000 or Windows® XP to restart computer. GV-RX16P256D(DE)-RH Graphics Accelerator - 12 - Note: For software MPEG support in Windows® 2000 or Windows® XP, you must install DirectX first. Click the Install...
Manual
Page 17
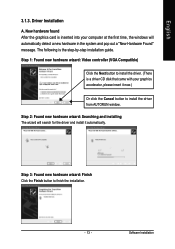
English 3.1.3. The following is a driver CD disk that came with your computer at the first time, the windows will search for the driver and install it now.) Or click the Cancel button to install the driver from AUTORUN window. Step 2: Found new hardware wizard: Searching and installing The wizard will automatically detect a new hardware in the system and pop out a "New Hardware Found" message. Step 3: Found new hardware wizard: Finish Click the Finish button to install the driver. (There is the step-by-step installation guide. Software Installation New hardware found ...
English 3.1.3. The following is a driver CD disk that came with your computer at the first time, the windows will search for the driver and install it now.) Or click the Cancel button to install the driver from AUTORUN window. Step 2: Found new hardware wizard: Searching and installing The wizard will automatically detect a new hardware in the system and pop out a "New Hardware Found" message. Step 3: Found new hardware wizard: Finish Click the Finish button to install the driver. (There is the step-by-step installation guide. Software Installation New hardware found ...
Manual
Page 18
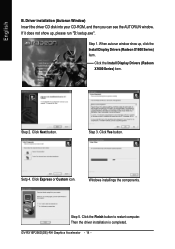
Step 1. Click the Install Display Drivers (Radeon X1600 Series) item. GV-RX16P256D(DE)-RH Graphics Accelerator - 14 - Driver installation (Autorun Window) Insert the driver CD disk into your CD-ROM, and then you can see the AUTORUN window. Click ...
Step 1. Click the Install Display Drivers (Radeon X1600 Series) item. GV-RX16P256D(DE)-RH Graphics Accelerator - 14 - Driver installation (Autorun Window) Insert the driver CD disk into your CD-ROM, and then you can see the AUTORUN window. Click ...
Manual
Page 19
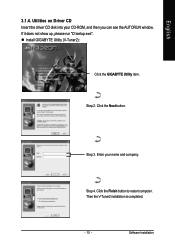
If it does not show up, please run "D:\setup.exe". Step 3. Click the Finish button to restart computer. Utilities on Driver CD Insert the driver CD disk into your name and company. Step 2. Click the Next button. Software Installation Enter your CD-ROM, and then you can see the AUTORUN window. English 3.1.4. Install GIGABYTE Utility (V-Tuner2): Click the GIGABYTE Utility item. Step 4. Then the V-Tuner2 installation is completed. - 15 -
If it does not show up, please run "D:\setup.exe". Step 3. Click the Finish button to restart computer. Utilities on Driver CD Insert the driver CD disk into your name and company. Step 2. Click the Next button. Software Installation Enter your CD-ROM, and then you can see the AUTORUN window. English 3.1.4. Install GIGABYTE Utility (V-Tuner2): Click the GIGABYTE Utility item. Step 4. Then the V-Tuner2 installation is completed. - 15 -
Manual
Page 20
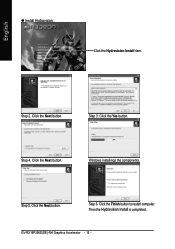
Click the Next button. GV-RX16P256D(DE)-RH Graphics Accelerator - 16 - Step 2. Click the Next button. Click the Yes button. Step 3. Click the Next button. English Install Hydravision : Click the Hydravision Install item. Click the Finish button to restart computer. Step 5. Then the Hydravision Install is completed. Step 4. Windows installings the components. Step 6.
Click the Next button. GV-RX16P256D(DE)-RH Graphics Accelerator - 16 - Step 2. Click the Next button. Click the Yes button. Step 3. Click the Next button. English Install Hydravision : Click the Hydravision Install item. Click the Finish button to restart computer. Step 5. Then the Hydravision Install is completed. Step 4. Windows installings the components. Step 6.

Manual
Page 21
English V-Tuner 2 V-Tuner 2 lets you adjust the working frequency of skin - 17 - Displays core clock status Displays memory clock status Adjust core speed Adjust memory speed Opens Help page Select choice of the graphic engine and video memory (Core Clock and Memory Clock). Software Installation
English V-Tuner 2 V-Tuner 2 lets you adjust the working frequency of skin - 17 - Displays core clock status Displays memory clock status Adjust core speed Adjust memory speed Opens Help page Select choice of the graphic engine and video memory (Core Clock and Memory Clock). Software Installation
Manual
Page 22
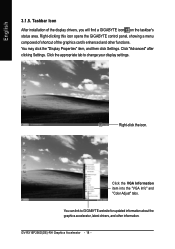
... Information item into the "VGA Info" and "Color Adjust" tabs. You can link to change your display settings. GV-RX16P256D(DE)-RH Graphics Accelerator - 18 - Right-click the icon. Click the appropriate tab to GIGABYTE website for updated information about the graphics accelerator, latest drivers, and other functions. English 3.1.5. You may click the "Display...
... Information item into the "VGA Info" and "Color Adjust" tabs. You can link to change your display settings. GV-RX16P256D(DE)-RH Graphics Accelerator - 18 - Right-click the icon. Click the appropriate tab to GIGABYTE website for updated information about the graphics accelerator, latest drivers, and other functions. English 3.1.5. You may click the "Display...
Manual
Page 23
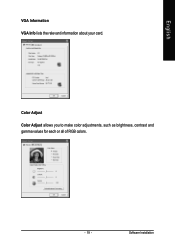
English VGA Information VGA Info lists the relevant information about your card. Color Adjust Color Adjust allows you to make color adjustments, such as brightness, contrast and gamma values for each or all of RGB colors. - 19 - Software Installation
English VGA Information VGA Info lists the relevant information about your card. Color Adjust Color Adjust allows you to make color adjustments, such as brightness, contrast and gamma values for each or all of RGB colors. - 19 - Software Installation

Manual
Page 24
... and easily tailor your computer desktop. Fig. 1 Fig. 2 HYDRAVISIONTM : HYDRAVISION has everything you work. The ATI CATALYSTTM Control Center is used to Fig. 1). Fig. 3 GV-RX16P256D(DE)-RH Graphics Accelerator - 20 - You can right-click on the desktop to select Properties>Settings>Advanced>ATI CATALYST Control Center tab and press ATI CATALYST(tm...
... and easily tailor your computer desktop. Fig. 1 Fig. 2 HYDRAVISIONTM : HYDRAVISION has everything you work. The ATI CATALYSTTM Control Center is used to Fig. 1). Fig. 3 GV-RX16P256D(DE)-RH Graphics Accelerator - 20 - You can right-click on the desktop to select Properties>Settings>Advanced>ATI CATALYST Control Center tab and press ATI CATALYST(tm...