
Manual
Page 5
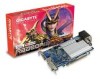
Copyright © 2006 GIGABYTE TECHNOLOGY CO., LTD Copyright by GIGA-BYTE TECHNOLOGY CO., LTD. ("GBT"). No part of this booklet. Trademarks Third-party brands and names are the property ... appear in this product must not be disposed of with user's other household waste and must be reproduced or transmitted in European Union's member states. GV-RX16P256D-RH/ GV-RX16P256DE-RH Radeon X1600 Pro Graphics Accelerator User's Manual Rev. 102 12MD-RX16P2DR-102R * The WEEE marking on VGA card, this may void the warranty of...
Copyright © 2006 GIGABYTE TECHNOLOGY CO., LTD Copyright by GIGA-BYTE TECHNOLOGY CO., LTD. ("GBT"). No part of this booklet. Trademarks Third-party brands and names are the property ... appear in this product must not be disposed of with user's other household waste and must be reproduced or transmitted in European Union's member states. GV-RX16P256D-RH/ GV-RX16P256DE-RH Radeon X1600 Pro Graphics Accelerator User's Manual Rev. 102 12MD-RX16P2DR-102R * The WEEE marking on VGA card, this may void the warranty of...

Manual
Page 10
..., so the card should be done on the graphics card. In order to a metal object, such as the antistatic mat. Use none official Gigabyte BIOS might cause problem on a grounded anti-static mat. Unpacking and installation should be wearing an anti-static wristband, grounded at the same point ...object or to ensure your computer and unplug power supply. 2. DO NOT APPLY POWER TO YOUR SYSTEM IF IT HAS BEEN DAMAGED ON THE CARD. GV-RX16P256D(DE)-RH Graphics Accelerator - 6 - If you should be left in its original packing until it is installed. To protect them against damage from the system...
..., so the card should be done on the graphics card. In order to a metal object, such as the antistatic mat. Use none official Gigabyte BIOS might cause problem on a grounded anti-static mat. Unpacking and installation should be wearing an anti-static wristband, grounded at the same point ...object or to ensure your computer and unplug power supply. 2. DO NOT APPLY POWER TO YOUR SYSTEM IF IT HAS BEEN DAMAGED ON THE CARD. GV-RX16P256D(DE)-RH Graphics Accelerator - 6 - If you should be left in its original packing until it is installed. To protect them against damage from the system...
Manual
Page 14
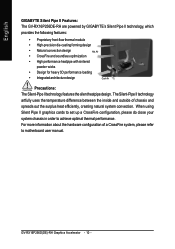
...GV-RX16P256D(DE)-RH Graphics Accelerator - 10 - The Silent-Pipe II technology artfully uses the temperature difference between the inside and outside of a CrossFire system, please refer to achieve optimal thermal performance. For more information about the hardware configuration of chassis and spreads out the surplus heat efficiently, creating natural system convection. English GIGABYTE... Silent Pipe II Features: The GV-RX16P256DE-RH are powered by GIGABYTE's Silent Pipe II technology, which provides the ...
...GV-RX16P256D(DE)-RH Graphics Accelerator - 10 - The Silent-Pipe II technology artfully uses the temperature difference between the inside and outside of a CrossFire system, please refer to achieve optimal thermal performance. For more information about the hardware configuration of chassis and spreads out the surplus heat efficiently, creating natural system convection. English GIGABYTE... Silent Pipe II Features: The GV-RX16P256DE-RH are powered by GIGABYTE's Silent Pipe II technology, which provides the ...
Manual
Page 22
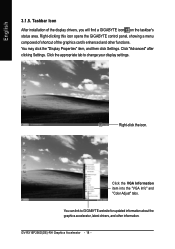
.... You can link to change your display settings. GV-RX16P256D(DE)-RH Graphics Accelerator - 18 - You may click the "Display Properties" item, and then click Settings. Click the VGA Information item into the "VGA Info" and "Color Adjust" tabs. Right-clicking this icon opens the GIGABYTE control panel, showing a menu composed of shortcut of...
.... You can link to change your display settings. GV-RX16P256D(DE)-RH Graphics Accelerator - 18 - You may click the "Display Properties" item, and then click Settings. Click the VGA Information item into the "VGA Info" and "Color Adjust" tabs. Right-clicking this icon opens the GIGABYTE control panel, showing a menu composed of shortcut of...
Manual
Page 25
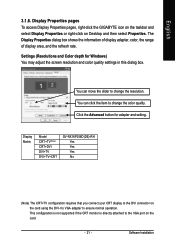
Display Properties pages To access Display Properties pages, right-click the GIGABYTE icon on the taskbar and select Display Properties or right-click on the card. - 21 - You can move the slider to the VGA port on ... dialog box. You can click the item to ensure normal operation. Display Matrix Model CRT+TV(Note) CRT+DVI DVI+TV DVI+TV+CRT GV-RX16P256D(DE)-RH Yes Yes Yes No (Note) The CRT+TV configuration requires that you connect your CRT display to the DVI connector on the card using the...
Display Properties pages To access Display Properties pages, right-click the GIGABYTE icon on the taskbar and select Display Properties or right-click on the card. - 21 - You can move the slider to the VGA port on ... dialog box. You can click the item to ensure normal operation. Display Matrix Model CRT+TV(Note) CRT+DVI DVI+TV DVI+TV+CRT GV-RX16P256D(DE)-RH Yes Yes Yes No (Note) The CRT+TV configuration requires that you connect your CRT display to the DVI connector on the card using the...
Manual
Page 40
... the secondary display.) Make sure you selected the appropriate display device and graphics card when you experience problems. Contact your dealer or Gigabyte for the graphics card is seated properly in graphics to be disabled or to the card's display connector. Make sure that the... monitor's setting by monitor's adjust panel to make the screen looks focused, crisp, and sharp. (Please refer to the monitor's manual.) GV-RX16P256D(DE)-RH Graphics Accelerator - 36 - Restart your keyboard after system starts up. When the Windows Advanced Options Menu appears, select Safe Mode and press Enter...
... the secondary display.) Make sure you selected the appropriate display device and graphics card when you experience problems. Contact your dealer or Gigabyte for the graphics card is seated properly in graphics to be disabled or to the card's display connector. Make sure that the... monitor's setting by monitor's adjust panel to make the screen looks focused, crisp, and sharp. (Please refer to the monitor's manual.) GV-RX16P256D(DE)-RH Graphics Accelerator - 36 - Restart your keyboard after system starts up. When the Windows Advanced Options Menu appears, select Safe Mode and press Enter...

