Manual
Page 3
... ...19 3.1.6. HARDWARE INSTALLATION 5 2.1. UNPACKING 5 2.2. HARDWARE INSTALLATION 8 3. PREFACE 4 1.2. OPERATING SYSTEM REQUIREMENT 10 3.1.2. WINDOWS 2000 DRIVER INSTALLATION 31 3.3. DISPLAY PROPERTIES PAGES 23 3.2. BIOS FLASH UTILITY 31 4. TROUBLESHOOTING TIPS 32 5. WINDOWS® 98 /98SE / WINDOWS® ME / WINDOWS® XP DRIVER AND UTILITIES INSTALLATION 10 3.1.1. APPENDIX 33 - 3 - Table of Content DIRECTX INSTALLATION 11 3.1.3. English TABLE...
... ...19 3.1.6. HARDWARE INSTALLATION 5 2.1. UNPACKING 5 2.2. HARDWARE INSTALLATION 8 3. PREFACE 4 1.2. OPERATING SYSTEM REQUIREMENT 10 3.1.2. WINDOWS 2000 DRIVER INSTALLATION 31 3.3. DISPLAY PROPERTIES PAGES 23 3.2. BIOS FLASH UTILITY 31 4. TROUBLESHOOTING TIPS 32 5. WINDOWS® 98 /98SE / WINDOWS® ME / WINDOWS® XP DRIVER AND UTILITIES INSTALLATION 10 3.1.1. APPENDIX 33 - 3 - Table of Content DIRECTX INSTALLATION 11 3.1.3. English TABLE...

Manual
Page 5
... card working correctly, please use official Gigabyte BIOS only. UNPACKING The GV-R9200 Series package contains the following: z The GV-R92128VH / GV-R92128DH / GV-R9264DH graphics accelerator x 1 z This USER'S MANUAL z The GV-R9200-H Series Driver CD x 1 z PowerDVD XP CD x 1 z PowerDirector x 1 (For GV-R92128VH only) z Game CD x ...cause damage to D-sub Connector z Cable support S-video and AV In/Output (For GV-R92128VH only) z Cable support S-video and AV Output (For GV-R92128DH and GV-R9264DH) WARNING! The operator should follow some precautions whenever you do not have one, touch...
... card working correctly, please use official Gigabyte BIOS only. UNPACKING The GV-R9200 Series package contains the following: z The GV-R92128VH / GV-R92128DH / GV-R9264DH graphics accelerator x 1 z This USER'S MANUAL z The GV-R9200-H Series Driver CD x 1 z PowerDVD XP CD x 1 z PowerDirector x 1 (For GV-R92128VH only) z Game CD x ...cause damage to D-sub Connector z Cable support S-video and AV In/Output (For GV-R92128VH only) z Cable support S-video and AV Output (For GV-R92128DH and GV-R9264DH) WARNING! The operator should follow some precautions whenever you do not have one, touch...

Manual
Page 9
...with the AGP slot, and press it in place, and replace the computer cover. 6. Locate the AGP slot. GV-R92128VH / GV-R92128DH / GV-R9264DH graphics card AGP slot 5. For detailed instructions, select your graphics card came with a DVI connector, you can ...connect a flat panel display to fasten the card in firmly until the card is fully eated. Plug the display cable into your graphics card with the installation of the graphics card driver...
...with the AGP slot, and press it in place, and replace the computer cover. 6. Locate the AGP slot. GV-R92128VH / GV-R92128DH / GV-R9264DH graphics card AGP slot 5. For detailed instructions, select your graphics card came with a DVI connector, you can ...connect a flat panel display to fasten the card in firmly until the card is fully eated. Plug the display cable into your graphics card with the installation of the graphics card driver...

Manual
Page 10
...ROM drive, you can follow guides to setup your OS is very simple. Operating system requirement z If your GV-R92128VH / GV-R92128DH / GV-R9264DH driver (Please follow the subsection 3.1.3 "Step By Step Installation" to be Drive D: 3.1. SOFTWARE INSTALLATION In this ...Or please contact your motherboard nearest dealer for the system, please make sure your GV-R92128VH / GV-R92128DH / GV-R9264DH graphics accelerator. 3.1.1. English 3. Then you install the GV-R92128VH / GV-R92128DH / GV-R9264DH drivers for your system (Windows 98/98SE, Windows2000 or Windows ME) has installed DirectX....
...ROM drive, you can follow guides to setup your OS is very simple. Operating system requirement z If your GV-R92128VH / GV-R92128DH / GV-R9264DH driver (Please follow the subsection 3.1.3 "Step By Step Installation" to be Drive D: 3.1. SOFTWARE INSTALLATION In this ...Or please contact your motherboard nearest dealer for the system, please make sure your GV-R92128VH / GV-R92128DH / GV-R9264DH graphics accelerator. 3.1.1. English 3. Then you install the GV-R92128VH / GV-R92128DH / GV-R9264DH drivers for your system (Windows 98/98SE, Windows2000 or Windows ME) has installed DirectX....
Manual
Page 11
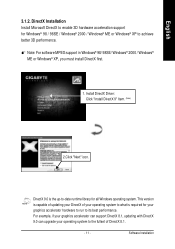
Install DirectX Driver: Click "Install DirectX 9" Item. (Note) 2.Click "Next" icon. DirectX Installation Install Microsoft DirectX to enable 3D hardware acceleration support for Windows® 98 / 98SE / Windows&#...
Install DirectX Driver: Click "Install DirectX 9" Item. (Note) 2.Click "Next" icon. DirectX Installation Install Microsoft DirectX to enable 3D hardware acceleration support for Windows® 98 / 98SE / Windows&#...

Manual
Page 13
... system will automatically detect a new hardware in order to complete the VGA driver installation. If you don't have the CD, you press it. Step 1: New Hardware Found After GV-R92128VH / GV-R92128DH / GV-R9264DH is the step-by-step installation guide. Step 4: System Setting Change 2.Click... "Finish" icon. - 13 - Software Installation Step 3: Update Device Driver Wizard: Finish At this time, system will ask...
... system will automatically detect a new hardware in order to complete the VGA driver installation. If you don't have the CD, you press it. Step 1: New Hardware Found After GV-R92128VH / GV-R92128DH / GV-R9264DH is the step-by-step installation guide. Step 4: System Setting Change 2.Click... "Finish" icon. - 13 - Software Installation Step 3: Update Device Driver Wizard: Finish At this time, system will ask...

Manual
Page 14
Radeon 9200 Series Graphics Accelerator - 14 - Click "Windows XP Drivers (Radeon 9200 Series)" item. 2.Click "Next". After the system has finished loading, insert the GV-R92128VH / GV-R92128DH / GVR9264DH driver CD disk into your CD-ROM, and then you can see the AUTORUN window. If it does not show up, please run "D:\setup.exe". Step 5: Driver Setup (Pictures below are shown in Windows XP) 1. English 3..Click "No" icon.
Radeon 9200 Series Graphics Accelerator - 14 - Click "Windows XP Drivers (Radeon 9200 Series)" item. 2.Click "Next". After the system has finished loading, insert the GV-R92128VH / GV-R92128DH / GVR9264DH driver CD disk into your CD-ROM, and then you can see the AUTORUN window. If it does not show up, please run "D:\setup.exe". Step 5: Driver Setup (Pictures below are shown in Windows XP) 1. English 3..Click "No" icon.
Manual
Page 16
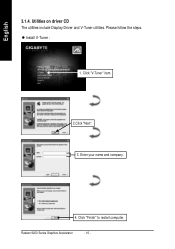
Please follow the steps. Enter your name and company. 4. Click "V-Tuner" item. 2.Click "Next". 3. Utilities on driver CD The utilities include Display Driver and V-Tuner utilities. English 3.1.4. z Install V-Tuner : 1. Click "Finish" to restart computer. Radeon 9200 Series Graphics Accelerator - 16 -
Please follow the steps. Enter your name and company. 4. Click "V-Tuner" item. 2.Click "Next". 3. Utilities on driver CD The utilities include Display Driver and V-Tuner utilities. English 3.1.4. z Install V-Tuner : 1. Click "Finish" to restart computer. Radeon 9200 Series Graphics Accelerator - 16 -

Manual
Page 19
Right-clicking this icon opens the GBT control panel, showing a menu composed of shortcute of the display drivers, you will find an GBT icon on the taskbar's status area. You may click the "Display Properties" item, and then click Settings.... You can link to change your display settings. English 3.1.5. Click the appropriate tab to GBT website for updated information about the graphics card, latest drivers, and other functions. Click "Advanced" after clickng Settings. Right click the icon. Software Installation Taskbar Icon After installation of the graphics card's enhanced...
Right-clicking this icon opens the GBT control panel, showing a menu composed of shortcute of the display drivers, you will find an GBT icon on the taskbar's status area. You may click the "Display Properties" item, and then click Settings.... You can link to change your display settings. English 3.1.5. Click the appropriate tab to GBT website for updated information about the graphics card, latest drivers, and other functions. Click "Advanced" after clickng Settings. Right click the icon. Software Installation Taskbar Icon After installation of the graphics card's enhanced...

Manual
Page 22
... designed for HYDRAVISION™ display management software. A RADEON 9200 with only one display output can still take advantage of the many features of the display drivers, you will find an ATi icon on the ATI icon to access the application's features and help, or to the ATI Icon. Clicking this software...
... designed for HYDRAVISION™ display management software. A RADEON 9200 with only one display output can still take advantage of the many features of the display drivers, you will find an ATi icon on the ATI icon to access the application's features and help, or to the ATI Icon. Clicking this software...

Manual
Page 23
...", into details settings: Options Properties „ Version Information provides the Catalyst version number, 2D version number and the driver build information. „ Details button access to the Details tab which lists the card's hardware details and driver information. „ Re-activate all warning messages allows you to the change the color depth.
...", into details settings: Options Properties „ Version Information provides the Catalyst version number, 2D version number and the driver build information. „ Details button access to the Details tab which lists the card's hardware details and driver information. „ Re-activate all warning messages allows you to the change the color depth.

Manual
Page 27
... texture, and all subsequent mipmaps are experiencing the symptoms mentioned, as it should increase, requiring a higher quality texture of texture format. By selecting Disabled, the driver will run. „ TRUFORM makes the curved surfaces of 3D objects look smoother and more lifelike. „ Compatibility Settings button This button allows you to...
... texture, and all subsequent mipmaps are experiencing the symptoms mentioned, as it should increase, requiring a higher quality texture of texture format. By selecting Disabled, the driver will run. „ TRUFORM makes the curved surfaces of 3D objects look smoother and more lifelike. „ Compatibility Settings button This button allows you to...
Manual
Page 29
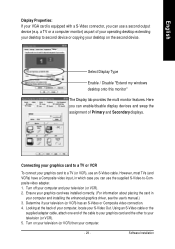
... your television (or VCR) then your computer. - 29 - Software Installation Looking at the back of your computer, locate your computer and installing the enhanced graphics driver, see the user's manual.) 3. Turn on the second device. Select Display Type Enable / Disable "Extend my windows desktop onto this monitor" The Display tab provides...
... your television (or VCR) then your computer. - 29 - Software Installation Looking at the back of your computer, locate your computer and installing the enhanced graphics driver, see the user's manual.) 3. Turn on the second device. Select Display Type Enable / Disable "Extend my windows desktop onto this monitor" The Display tab provides...

Manual
Page 31
... graphic features of the Graphics card. To ensure you need to install the GV-R92128VH / GV-R92128DH / GV-R9264DH driver to the license agreement. 9. With Windows® 2000 running on -screen instructions to begin the ...driver. Insert the INSTALLATION CD into your computer, you install the latest driver, use the Installation CD that shipped with the correct drive letter.) 5. BIOS FLASH UTILITY GV-R92128VH / GV-R92128DH / GV-R9264DH BIOS update procedure: 0Note: Please download the newest BIOS from our website (www.gigabyte.com.tw) or contact your GV-R92128VH / GV-R92128DH / GV-R9264DH...
... graphic features of the Graphics card. To ensure you need to install the GV-R92128VH / GV-R92128DH / GV-R9264DH driver to the license agreement. 9. With Windows® 2000 running on -screen instructions to begin the ...driver. Insert the INSTALLATION CD into your computer, you install the latest driver, use the Installation CD that shipped with the correct drive letter.) 5. BIOS FLASH UTILITY GV-R92128VH / GV-R92128DH / GV-R9264DH BIOS update procedure: 0Note: Please download the newest BIOS from our website (www.gigabyte.com.tw) or contact your GV-R92128VH / GV-R92128DH / GV-R9264DH...

Manual
Page 32
... sharp. (Please refer to become the secondary display.) „ Make sure you selected the appropriate display device and graphics card when you installed the graphics driver. „ If you are plugged in and receiving power. „ If necessary, disable any built-in the Windows® Help or contact your computer in...
... sharp. (Please refer to become the secondary display.) „ Make sure you selected the appropriate display device and graphics card when you installed the graphics driver. „ If you are plugged in and receiving power. „ If necessary, disable any built-in the Windows® Help or contact your computer in...

