Manual
Page 6
Driver Installation ...14 3.2. Features ...7 1.2. Driver and Utility Installation 14 3.1.1. Display Properties Pages 18 4. Regulatory Statements 34 - 6 - Board Layout ...8 2.2. Taskbar Icon ...16 3.3. Resolutions and Color Depth Tables 33 5.2. Hardware Installation ...13 3. Hardware Installation 8 2.1. Appendix ...33 5.1. Table of Contents 1. Introduction ...7 1.1. Minimum System Requirements 7 2. Software Installation 14 3.1. Troubleshooting Tips 32 5.
Driver Installation ...14 3.2. Features ...7 1.2. Driver and Utility Installation 14 3.1.1. Display Properties Pages 18 4. Regulatory Statements 34 - 6 - Board Layout ...8 2.2. Taskbar Icon ...16 3.3. Resolutions and Color Depth Tables 33 5.2. Hardware Installation ...13 3. Hardware Installation 8 2.1. Appendix ...33 5.1. Table of Contents 1. Introduction ...7 1.1. Minimum System Requirements 7 2. Software Installation 14 3.1. Troubleshooting Tips 32 5.
Manual
Page 7
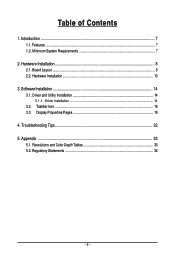
...® 7 - A CrossFireX certified motherboard with Service Pack 2 (SP2) - Windows® XP with two PCI Express x16 slots and correct chipset driver - A power supply that provides at least 600-watt and with one 75w 6-pin PCIe power connector is required. The power supply should be with ...regulations. (For the list of a CrossFireX system, the following is required. Minimum System Requirements • Hardware - Two GV-R677D5-1GD / GV-R677OC-1GD / GV-R677UD-1GD / GV-R675OC-1GI - Features • Powered by adapter) • Supports HDMI connector • Supports Display port (only...
...® 7 - A CrossFireX certified motherboard with Service Pack 2 (SP2) - Windows® XP with two PCI Express x16 slots and correct chipset driver - A power supply that provides at least 600-watt and with one 75w 6-pin PCIe power connector is required. The power supply should be with ...regulations. (For the list of a CrossFireX system, the following is required. Minimum System Requirements • Hardware - Two GV-R677D5-1GD / GV-R677OC-1GD / GV-R677UD-1GD / GV-R675OC-1GI - Features • Powered by adapter) • Supports HDMI connector • Supports Display port (only...
Manual
Page 13
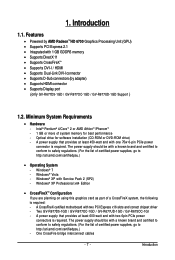
... connector. To connect a DisplayPort monitor to your graphics card, use the DVI-I connector. Hardware Installation Now that the gold edge connector of the graphics card driver. Step 3. Hardware Installation After installation, remember to connect the power cable to install your graphics card. Please refer to prevent system instability. Locate the PCI...
... connector. To connect a DisplayPort monitor to your graphics card, use the DVI-I connector. Hardware Installation Now that the gold edge connector of the graphics card driver. Step 3. Hardware Installation After installation, remember to connect the power cable to install your graphics card. Please refer to prevent system instability. Locate the PCI...
Manual
Page 14
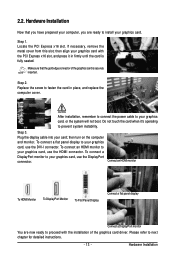
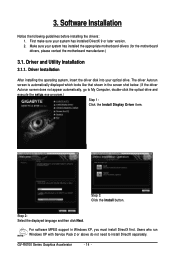
...GV-R6700 Series Graphics Accelerator - 14 - Make sure your optical drive. The driver Autorun screen is automatically displayed which looks like that shown in Windows XP, you must install DirectX first. Step 2: Select the displayed language and then click Next. Driver Installation After installing the operating system, insert the driver...drive and execute the setup.exe program.) Step 1: Click the Install Display Driver item. For software MPEG support in the screen shot below. (If the driver Autorun screen does not appear automatically, go to install DirectX separately. Software ...
...GV-R6700 Series Graphics Accelerator - 14 - Make sure your optical drive. The driver Autorun screen is automatically displayed which looks like that shown in Windows XP, you must install DirectX first. Step 2: Select the displayed language and then click Next. Driver Installation After installing the operating system, insert the driver...drive and execute the setup.exe program.) Step 1: Click the Install Display Driver item. For software MPEG support in the screen shot below. (If the driver Autorun screen does not appear automatically, go to install DirectX separately. Software ...
Manual
Page 15
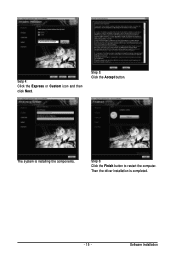
Setp 4: Click the Express or Custom icon and then click Next. Step 5: Click the Accept button. Software Installation Then the driver installation is installing the components. The system is completed. - 15 - Step 6: Click the Finish button to restart the computer.
Setp 4: Click the Express or Custom icon and then click Next. Step 5: Click the Accept button. Software Installation Then the driver installation is installing the components. The system is completed. - 15 - Step 6: Click the Finish button to restart the computer.
Manual
Page 16
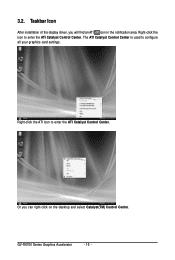
Or you will find an ATI icon in the notification area. The ATI Catalyst Control Center is used to enter the ATI Catalyst Control Center. Right-click the icon to configure all your graphics card settings. Right-click the ATI icon to enter the ATI Catalyst Control Center. GV-R6700 Series Graphics Accelerator - 16 - 3.2. Taskbar Icon After installation of the display driver, you can right-click on the desktop and select Catalyst(TM) Control Center.
Or you will find an ATI icon in the notification area. The ATI Catalyst Control Center is used to enter the ATI Catalyst Control Center. Right-click the icon to configure all your graphics card settings. Right-click the ATI icon to enter the ATI Catalyst Control Center. GV-R6700 Series Graphics Accelerator - 16 - 3.2. Taskbar Icon After installation of the display driver, you can right-click on the desktop and select Catalyst(TM) Control Center.
Manual
Page 21
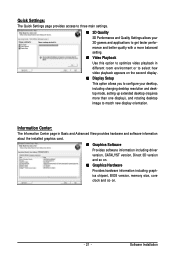
... Information Center page in Basic and Advanced View provides hardware and software information about the installed graphics card. „ Graphics Software Provides software information including driver version, CATALYST version, Direct 3D version and so on. „ Graphics Hardware Provides hardware information including graphics chipset, BIOS version, memory size, core clock and...
... Information Center page in Basic and Advanced View provides hardware and software information about the installed graphics card. „ Graphics Software Provides software information including driver version, CATALYST version, Direct 3D version and so on. „ Graphics Hardware Provides hardware information including graphics chipset, BIOS version, memory size, core clock and...
Manual
Page 31
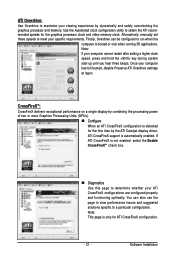
... when the computer is detected for ATI CrossFireX configuration. - 31 - Alternatively, manually set these speeds to maximize your viewing experience by the ATI Catalyst display driver, ATI CrossFireX support is only for the first time by dynamically and safely overclocking the graphics processor and memory. ATI Overdrive: Use Overdrive to meet...
... when the computer is detected for ATI CrossFireX configuration. - 31 - Alternatively, manually set these speeds to maximize your viewing experience by the ATI Catalyst display driver, ATI CrossFireX support is only for the first time by dynamically and safely overclocking the graphics processor and memory. ATI Overdrive: Use Overdrive to meet...
Manual
Page 32
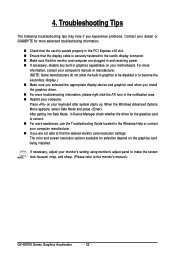
...make the screen look focused, crisp, and sharp. (Please refer to the monitor's manual.) GV-R6700 Series Graphics Accelerator - 32 - For more advanced troubleshooting information. „ Check that...in the Windows Help or contact your computer manufacturer. „ If you install the graphics driver. „ For more troubleshooting information, please right-click the ATI icon in the notification... The following troubleshooting tips may help if you experience problems. Contact your dealer or GIGABYTE for selection depend on your keyboard after system starts up. When the Windows Advanced ...
...make the screen look focused, crisp, and sharp. (Please refer to the monitor's manual.) GV-R6700 Series Graphics Accelerator - 32 - For more advanced troubleshooting information. „ Check that...in the Windows Help or contact your computer manufacturer. „ If you install the graphics driver. „ For more troubleshooting information, please right-click the ATI icon in the notification... The following troubleshooting tips may help if you experience problems. Contact your dealer or GIGABYTE for selection depend on your keyboard after system starts up. When the Windows Advanced ...

