

Manual
Page 5
Hardware Installation GV-R545D2-512D D-Sub Monitor Connector (15-pin) HDMI Connector Displayport Connector HDMI Connector or Analog LCD Monitor Analog CRT Monitor D-Sub Output HDMI TV HDMI TV Digital LCD Monitor HDMI TV HDMI TV D-Sub Monitor Connector (15-pin) HDMI Connector DisplayPort Connector HDMI Connector - 5 - Board Layout 1. 2. Hardware Installation 2.1.
Hardware Installation GV-R545D2-512D D-Sub Monitor Connector (15-pin) HDMI Connector Displayport Connector HDMI Connector or Analog LCD Monitor Analog CRT Monitor D-Sub Output HDMI TV HDMI TV Digital LCD Monitor HDMI TV HDMI TV D-Sub Monitor Connector (15-pin) HDMI Connector DisplayPort Connector HDMI Connector - 5 - Board Layout 1. 2. Hardware Installation 2.1.
Manual
Page 7
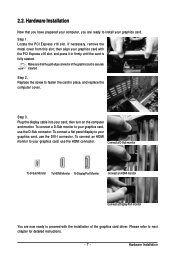
...Hardware Installation Now that the gold edge connector of the graphics card driver. Connect a D-Sub monitor To D-Sub Monitor To HDMI Monitor To DisplayPort Monitor Connect an HDMI monitor Connect a DisplayPort monitor You are ready to your card; Please refer to proceed with the PCI Express x16 slot,.... Make sure that you have prepared your graphics card with the installation of the graphics card is fully seated. To connect an HDMI monitor to install your graphics card, use the DVI-I connector. 2.2. Step 1. then align your computer, you are now ready to next chapter...
...Hardware Installation Now that the gold edge connector of the graphics card driver. Connect a D-Sub monitor To D-Sub Monitor To HDMI Monitor To DisplayPort Monitor Connect an HDMI monitor Connect a DisplayPort monitor You are ready to your card; Please refer to proceed with the PCI Express x16 slot,.... Make sure that you have prepared your graphics card with the installation of the graphics card is fully seated. To connect an HDMI monitor to install your graphics card, use the DVI-I connector. 2.2. Step 1. then align your computer, you are now ready to next chapter...
Manual
Page 25
... information, please right-click the ATI icon in graphics capabilities on your keyboard after system starts up. Press on your dealer or GIGABYTE for selection depend on the graphics card being installed. Troubleshooting Tips For more information, consult your computer's manual or manufacturer. (NOTE... you are plugged in and receiving power. „ If necessary, disable any built-in the notification area. „ Restart your monitor's setting using monitor's adjust panel to make the screen look focused, crisp, and sharp. (Please refer to become the secondary display.) „ Make...
... information, please right-click the ATI icon in graphics capabilities on your keyboard after system starts up. Press on your dealer or GIGABYTE for selection depend on the graphics card being installed. Troubleshooting Tips For more information, consult your computer's manual or manufacturer. (NOTE... you are plugged in and receiving power. „ If necessary, disable any built-in the notification area. „ Restart your monitor's setting using monitor's adjust panel to make the screen look focused, crisp, and sharp. (Please refer to become the secondary display.) „ Make...
Manual
Page 26
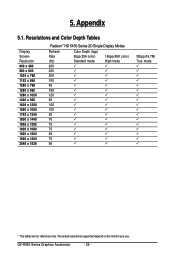
The actual resolutions supported depend on the monitor you use. Appendix 5.1. Resolutions and Color Depth Tables Display Screen Resolution 640 x 480 800 x 600 1024 x 768 1152 x 864 1280 x 768 1280 x 960 1280 x 1024 ... 3 3 100 3 3 85 3 3 160 3 3 120 3 3 60 3 3 100 3 3 100 3 3 85 3 3 70 3 3 75 3 3 75 3 3 85 3 3 75 3 3 66 3 3 32bpp(16.7M) True mode 3 3 3 3 3 3 3 3 3 3 3 3 3 3 3 3 3 * The tables are for reference only. GV-R545 Series Graphics Accelerator - 26 - 5.
The actual resolutions supported depend on the monitor you use. Appendix 5.1. Resolutions and Color Depth Tables Display Screen Resolution 640 x 480 800 x 600 1024 x 768 1152 x 864 1280 x 768 1280 x 960 1280 x 1024 ... 3 3 100 3 3 85 3 3 160 3 3 120 3 3 60 3 3 100 3 3 100 3 3 85 3 3 70 3 3 75 3 3 75 3 3 85 3 3 75 3 3 66 3 3 32bpp(16.7M) True mode 3 3 3 3 3 3 3 3 3 3 3 3 3 3 3 3 3 * The tables are for reference only. GV-R545 Series Graphics Accelerator - 26 - 5.


