Manual
Page 1
... limited viewing uses only unless otherwise authorized by U.S. Trademarks Third-party brands and names are the properties of this graphics card. No part of this manual may be out of date before publication of this this manual. Macrovision corporation product .... The author assumes no responsibility for home and other intellectual property rights. GV-NX96T1GHP/ GV-NX96T512HP/ GV-NX96T512H GeForceTM 9600 GT Graphics Accelerator User's Manual Rev. 202 12MD-NX96T5HP-202R Copyright © 2008 GIGABYTE TECHNOLOGY CO., LTD Copyright by Macrovision, and is intended for any errors ...
... limited viewing uses only unless otherwise authorized by U.S. Trademarks Third-party brands and names are the properties of this graphics card. No part of this manual may be out of date before publication of this this manual. Macrovision corporation product .... The author assumes no responsibility for home and other intellectual property rights. GV-NX96T1GHP/ GV-NX96T512HP/ GV-NX96T512H GeForceTM 9600 GT Graphics Accelerator User's Manual Rev. 202 12MD-NX96T5HP-202R Copyright © 2008 GIGABYTE TECHNOLOGY CO., LTD Copyright by Macrovision, and is intended for any errors ...

Manual
Page 5
...with the same model name (e.g. /GV-NX96T1GHP/GV-NX96T512HPGV-NX96T512H) and from the same vendor (e.g. Introduction 1.1. Intel® Pentium® or AMD AthlonTM - 128 MB of an SLI system, the following are planning on using this graphics card as part of system memory; ... installation (CD-ROM or DVD-ROM drive) - Graphics cards working in an SLI configuration must • Operating System - An SLI bridge connector (Note) SLI technology requires a PCI Express motherboard with 1000-watt or above is recommended - GIGABYTE TECHNOLOGY). - 5 - Windows® Vista - Optical...
...with the same model name (e.g. /GV-NX96T1GHP/GV-NX96T512HPGV-NX96T512H) and from the same vendor (e.g. Introduction 1.1. Intel® Pentium® or AMD AthlonTM - 128 MB of an SLI system, the following are planning on using this graphics card as part of system memory; ... installation (CD-ROM or DVD-ROM drive) - Graphics cards working in an SLI configuration must • Operating System - An SLI bridge connector (Note) SLI technology requires a PCI Express motherboard with 1000-watt or above is recommended - GIGABYTE TECHNOLOGY). - 5 - Windows® Vista - Optical...

Manual
Page 8
... an anti-static wristband, grounded at the same point as the power supply case. 3. Inspect the card carton for obvious damage. Using non-official GIGABYTE BIOS might cause problem(s) on the card before handling computer components. GV-NX96T Series Graphics Accelerator - 8 - Shipping and handling may cause damage to a metal object, such as the anti-static...
... an anti-static wristband, grounded at the same point as the power supply case. 3. Inspect the card carton for obvious damage. Using non-official GIGABYTE BIOS might cause problem(s) on the card before handling computer components. GV-NX96T Series Graphics Accelerator - 8 - Shipping and handling may cause damage to a metal object, such as the anti-static...
Manual
Page 9
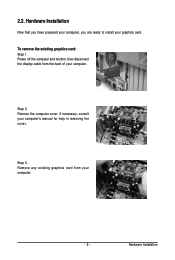
Remove any existing graphics card from the back of your computer. - 9 - To remove the existing graphics card: Step 1. Power off the computer and monitor, then disconnect the display cable from your computer. Step 3. Hardware Installation Now that you have prepared your computer, you are ready to install your computer's manual for help in removing the cover. If necessary, consult your graphics card. Hardware Installation Step 2. 2.2. Remove the computer cover.
Remove any existing graphics card from the back of your computer. - 9 - To remove the existing graphics card: Step 1. Power off the computer and monitor, then disconnect the display cable from your computer. Step 3. Hardware Installation Now that you have prepared your computer, you are ready to install your computer's manual for help in removing the cover. If necessary, consult your graphics card. Hardware Installation Step 2. 2.2. Remove the computer cover.
Manual
Page 10
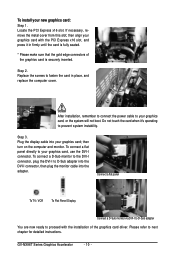
...graphics card with the installation of the graphics card is fully seated. * Please make sure that the gold edge connectors of the graphics card driver. After installation, remember to connect the power cable to your new graphics card...: Step 1. To connect a D-Sub monitor to the DVI-I connector, plug the DVI-I to fasten the card in firmly until the card...D-Sub adapter You are now ready to your graphics card; If necessary, remove the metal cover from this slot; then turn on...
...graphics card with the installation of the graphics card is fully seated. * Please make sure that the gold edge connectors of the graphics card driver. After installation, remember to connect the power cable to your new graphics card...: Step 1. To connect a D-Sub monitor to the DVI-I connector, plug the DVI-I to fasten the card in firmly until the card...D-Sub adapter You are now ready to your graphics card; If necessary, remove the metal cover from this slot; then turn on...
Manual
Page 11
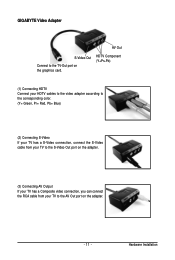
Hardware Installation HDTV Component (Y+Pr+Pb) (1) Connecting HDTV Connect your HDTV cables to the video adapter according to the corresponding color. (Y= Green, Pr= Red, Pb= Blue) (2) Connecting S-Video If your TV has a S-Video connection, connect the S-Video cable from your TV to the S-Video Out port on the adapter. (3) Connecting AV Output If your TV has a Composite video connection, you can connect the RCA cable from your TV to the TV-Out port on the adapter. - 11 - GIGABYTE Video Adapter AV Out S-Video Out Connect to the AV Out port on the graphics card.
Hardware Installation HDTV Component (Y+Pr+Pb) (1) Connecting HDTV Connect your HDTV cables to the video adapter according to the corresponding color. (Y= Green, Pr= Red, Pb= Blue) (2) Connecting S-Video If your TV has a S-Video connection, connect the S-Video cable from your TV to the S-Video Out port on the adapter. (3) Connecting AV Output If your TV has a Composite video connection, you can connect the RCA cable from your TV to the TV-Out port on the adapter. - 11 - GIGABYTE Video Adapter AV Out S-Video Out Connect to the AV Out port on the graphics card.

Manual
Page 12
... beware of the same type. (Example: GV-NX88X768H-RH) SLI bridge connector (provided by motherboard manufacturer) GIGABYTE Thermal Solution Guidelines(Note): 1. GV-NX96T Series Graphics Accelerator - 12 - Please maintain passive thermal sink at a normal and clean environment. GIGABYTE's passive thermal solution allows system to scale graphics performance. Two SLI-ready graphics cards of the other excess component or...
... beware of the same type. (Example: GV-NX88X768H-RH) SLI bridge connector (provided by motherboard manufacturer) GIGABYTE Thermal Solution Guidelines(Note): 1. GV-NX96T Series Graphics Accelerator - 12 - Please maintain passive thermal sink at a normal and clean environment. GIGABYTE's passive thermal solution allows system to scale graphics performance. Two SLI-ready graphics cards of the other excess component or...

Manual
Page 13
First make sure your system has installed the appropriate motherboard drivers (for your graphics card driver. (Please follow the instructions to setup your graphics card.) 3.1. Windows® XP Driver and Utilities Installation 3.1.1. Software Installation In this manual, we assume that your CD-ROM drive letter to install the driver for ...
First make sure your system has installed the appropriate motherboard drivers (for your graphics card driver. (Please follow the instructions to setup your graphics card.) 3.1. Windows® XP Driver and Utilities Installation 3.1.1. Software Installation In this manual, we assume that your CD-ROM drive letter to install the driver for ...
Manual
Page 15
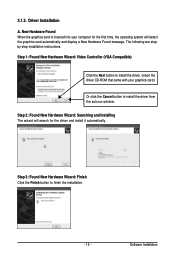
... and Installing The wizard will search for the first time, the operating system will detect the graphics card automatically and display a New Hardware Found message. Software Installation New Hardware Found When the graphics card is inserted into your graphics card.) Or click the Cancel button to finish the installation. - 15 - Step 1: Found New Hardware Wizard: Video...
... and Installing The wizard will search for the first time, the operating system will detect the graphics card automatically and display a New Hardware Found message. Software Installation New Hardware Found When the graphics card is inserted into your graphics card.) Or click the Cancel button to finish the installation. - 15 - Step 1: Found New Hardware Wizard: Video...

Manual
Page 18
GV-NX96T Series Graphics Accelerator - 18 - Displays the current operating voltage Voltage adjustment (Note) Help page Displays the current operating frequency Automatically optimizes the voltage/frequency Enables manual adjustment ... item is configurable only if 2D/3D Auto-Optimized is set to your graphics card and the working frequency of the voltage/frequency Clock adjustment(Note) Hardware Monitor Button Default(Note) Apply(Note) Enable Disable Hardware Monitor ? GIGABYTE Gamer HUD The GIGABYTE Gamer HUD allows you to manually configure the voltage and GPU/Shader...
GV-NX96T Series Graphics Accelerator - 18 - Displays the current operating voltage Voltage adjustment (Note) Help page Displays the current operating frequency Automatically optimizes the voltage/frequency Enables manual adjustment ... item is configurable only if 2D/3D Auto-Optimized is set to your graphics card and the working frequency of the voltage/frequency Clock adjustment(Note) Hardware Monitor Button Default(Note) Apply(Note) Enable Disable Hardware Monitor ? GIGABYTE Gamer HUD The GIGABYTE Gamer HUD allows you to manually configure the voltage and GPU/Shader...

Manual
Page 19
Taskbar Icon After installing the graphics card driver, you will find an NVIDIA icon in your system tray. Right click the NVIDIA icon to open the control panel. Click this icon to enter the NVIDIA Control Center. Software Installation You can adjust the properties of the graphics card here. - 19 - 3.1.5.
Taskbar Icon After installing the graphics card driver, you will find an NVIDIA icon in your system tray. Right click the NVIDIA icon to open the control panel. Click this icon to enter the NVIDIA Control Center. Software Installation You can adjust the properties of the graphics card here. - 19 - 3.1.5.
Manual
Page 25
This is present only in order to support a variety of different display timings for ultimate flexibility for your graphics card in Advanced view mode. (Note 2) This item will help you enable and customize your multi-display setup. (Note 1) This item is useful if you have ...
This is present only in order to support a variety of different display timings for ultimate flexibility for your graphics card in Advanced view mode. (Note 2) This item will help you enable and customize your multi-display setup. (Note 1) This item is useful if you have ...
Manual
Page 29
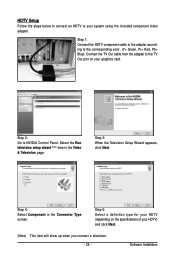
... corresponding color. (Y= Green, Pr= Red, Pb= Blue). Step 4: Select Component in the Video & Television page. Step 5: Select a definition type for your HDTV (depending on your graphics card. Connect the TV Out cable from the adapter to your system using the included component video adapter. HDTV Setup Follow the steps below to connect...
... corresponding color. (Y= Green, Pr= Red, Pb= Blue). Step 4: Select Component in the Video & Television page. Step 5: Select a definition type for your HDTV (depending on your graphics card. Connect the TV Out cable from the adapter to your system using the included component video adapter. HDTV Setup Follow the steps below to connect...

Manual
Page 31
.... With nView you be more productive when using your system tray and select nView Properties under nView Desktop Manager. Step 1: Click nView Properties. in your graphics card. 3.1.7. Software Installation Multiple desktops give you extra desktop areas on which to help you can set up when you can click the NVIDIA icon nView...
.... With nView you be more productive when using your system tray and select nView Properties under nView Desktop Manager. Step 1: Click nView Properties. in your graphics card. 3.1.7. Software Installation Multiple desktops give you extra desktop areas on which to help you can set up when you can click the NVIDIA icon nView...

Manual
Page 36
...adjust your monitor's setting using monitor's adjust panel to make the screen look focused, crisp, and sharp. (Please refer to the card's display connector. „ Make sure that the display cable is correct. „ For more information, consult your computer's manual ...; Make sure you selected the appropriate display device and graphics card when you install the graphics driver. „ Restart your dealer or GIGABYTE for the graphics card is securely fastened to the monitor's manual.) GV-NX96T Series Graphics Accelerator - 36 - Troubleshooting Tips The following troubleshooting tips...
...adjust your monitor's setting using monitor's adjust panel to make the screen look focused, crisp, and sharp. (Please refer to the card's display connector. „ Make sure that the display cable is correct. „ For more information, consult your computer's manual ...; Make sure you selected the appropriate display device and graphics card when you install the graphics driver. „ Restart your dealer or GIGABYTE for the graphics card is securely fastened to the monitor's manual.) GV-NX96T Series Graphics Accelerator - 36 - Troubleshooting Tips The following troubleshooting tips...

